Roy B
-
Joined
-
Last visited
-
Days Won
188
Everything posted by Roy B
-
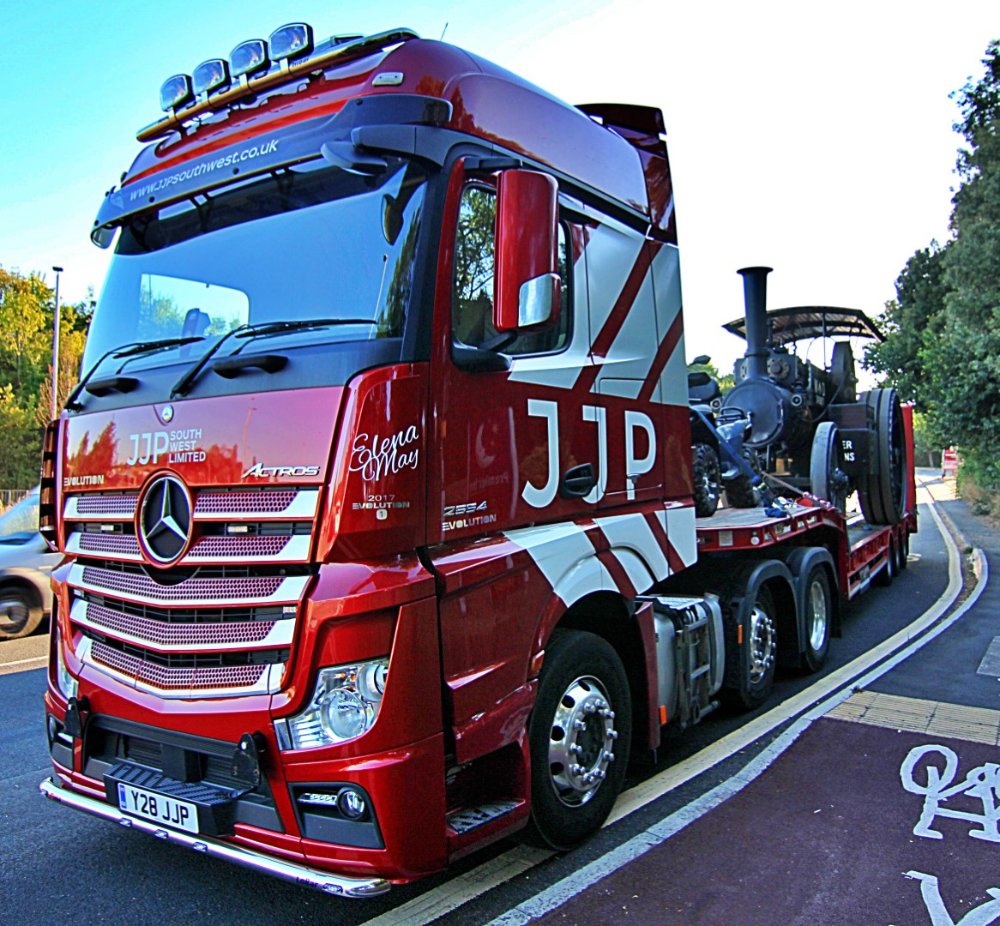
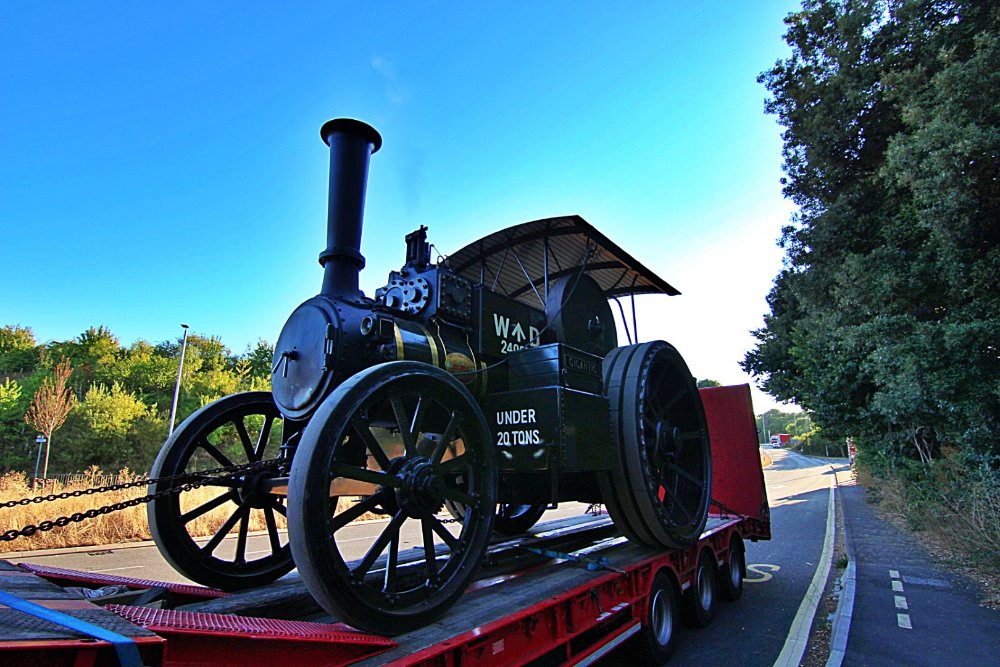
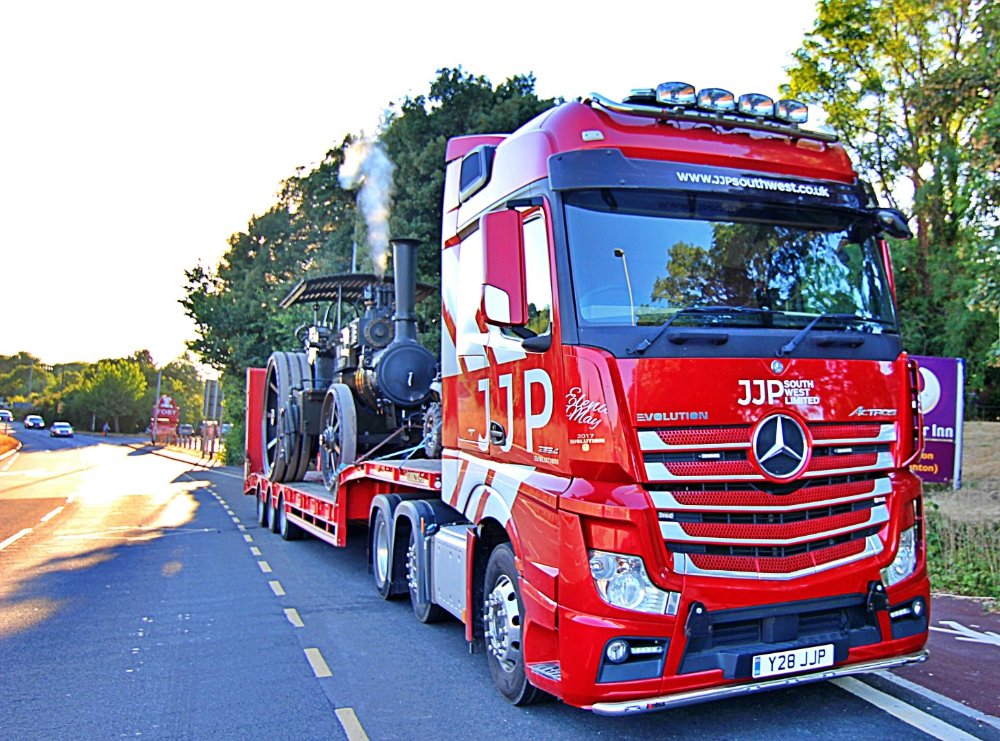
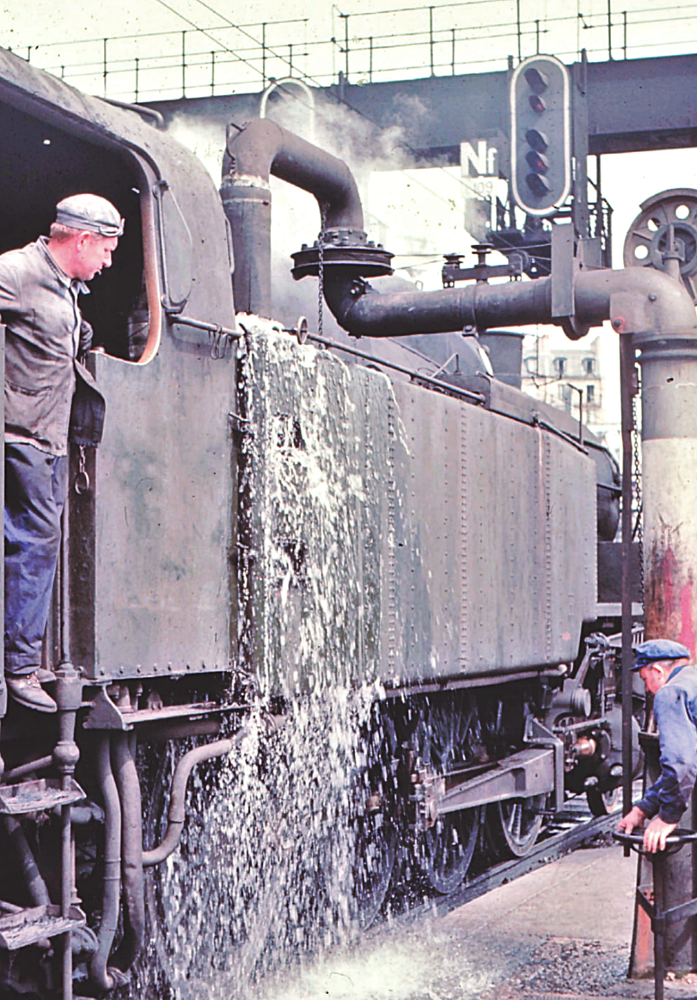
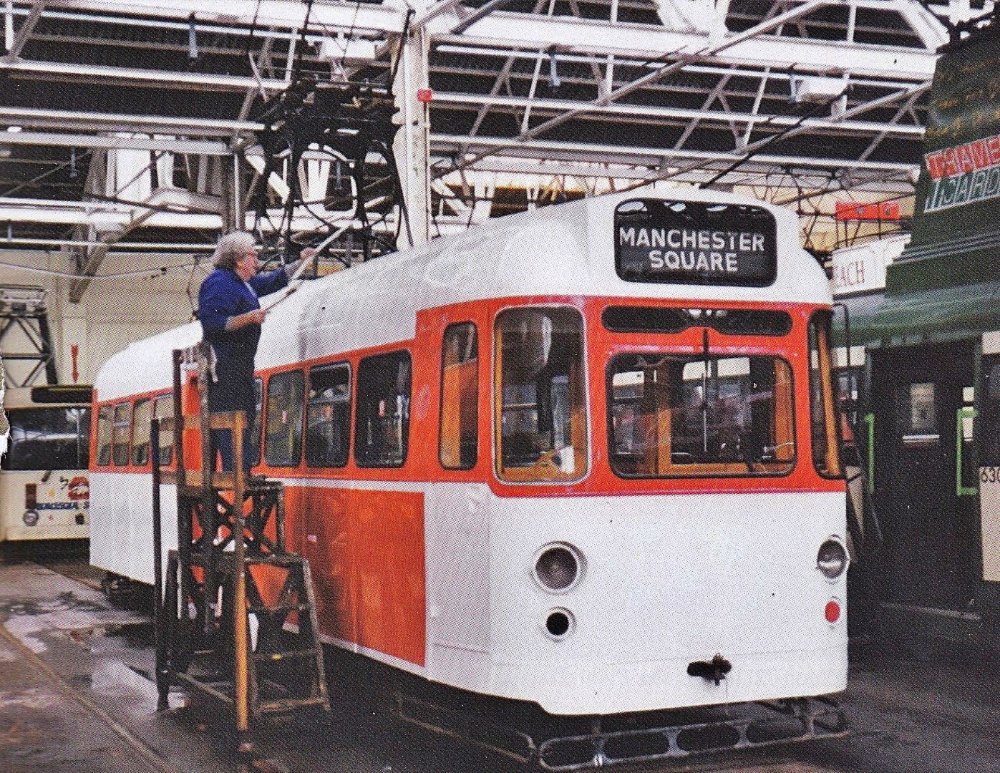
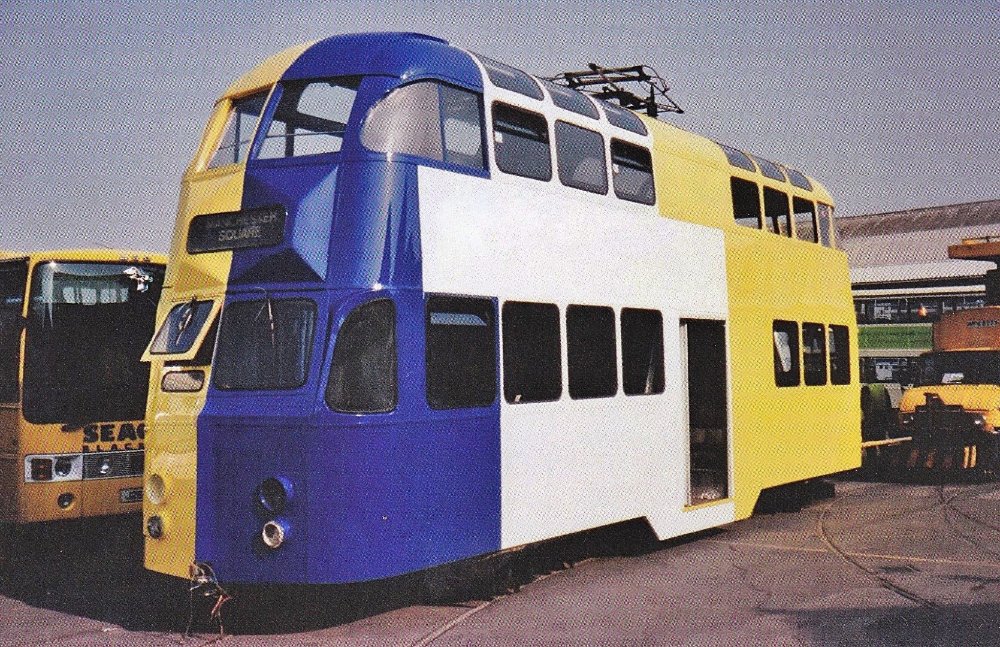
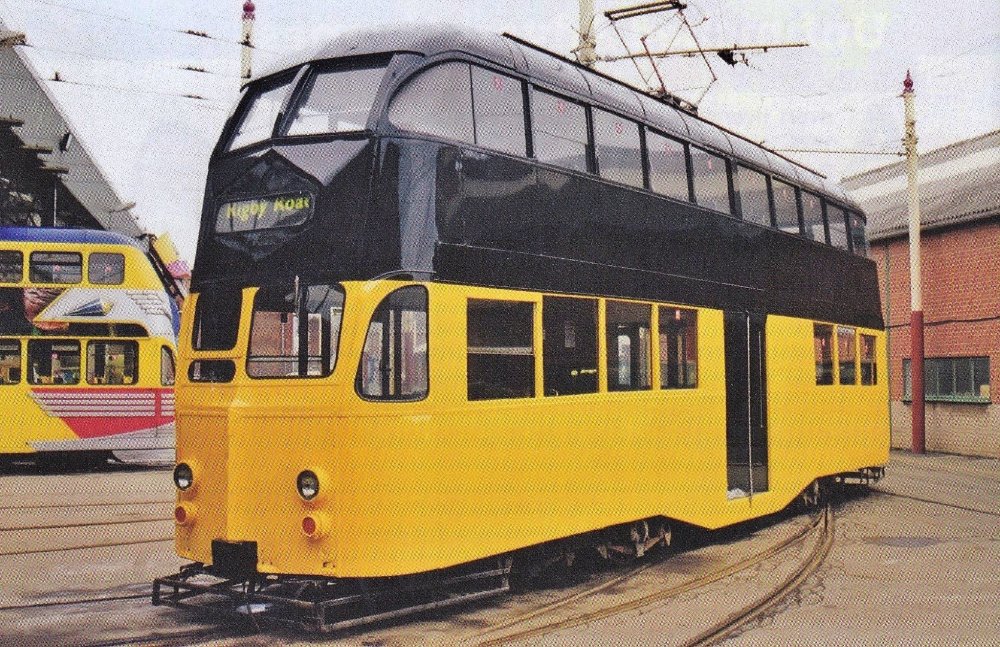
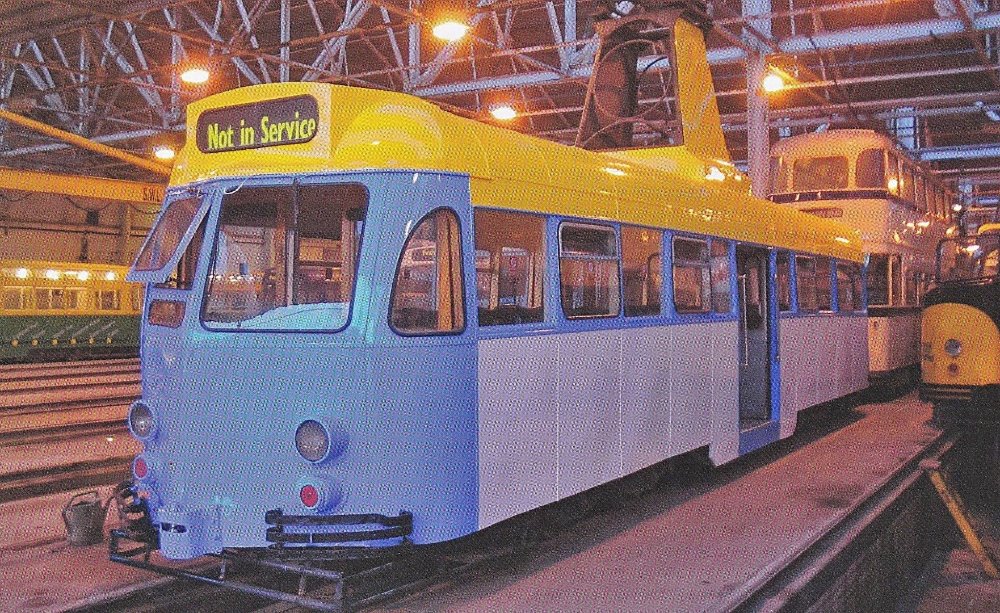
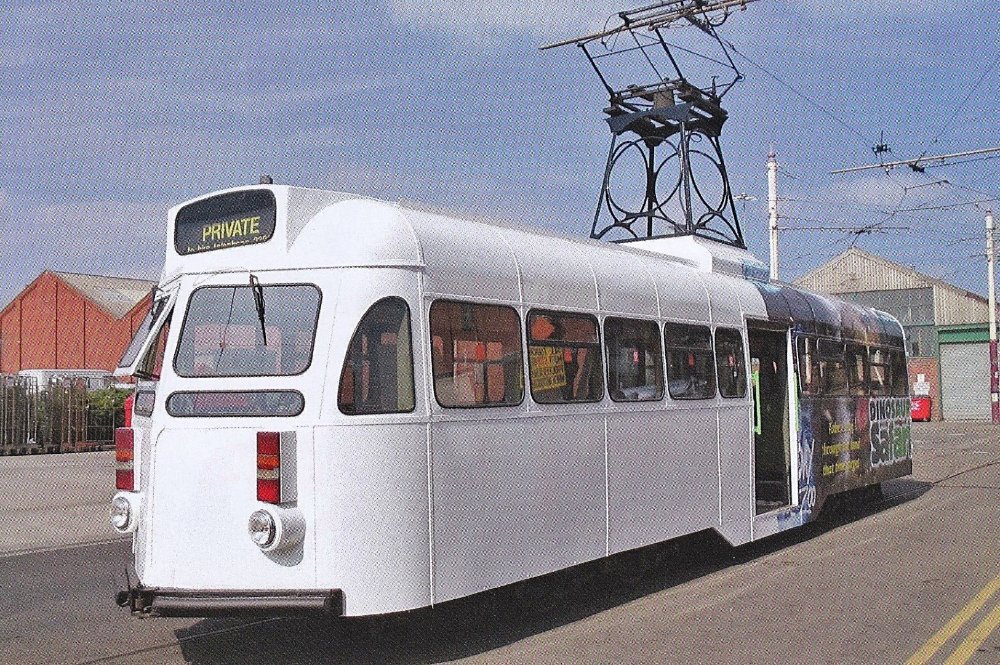
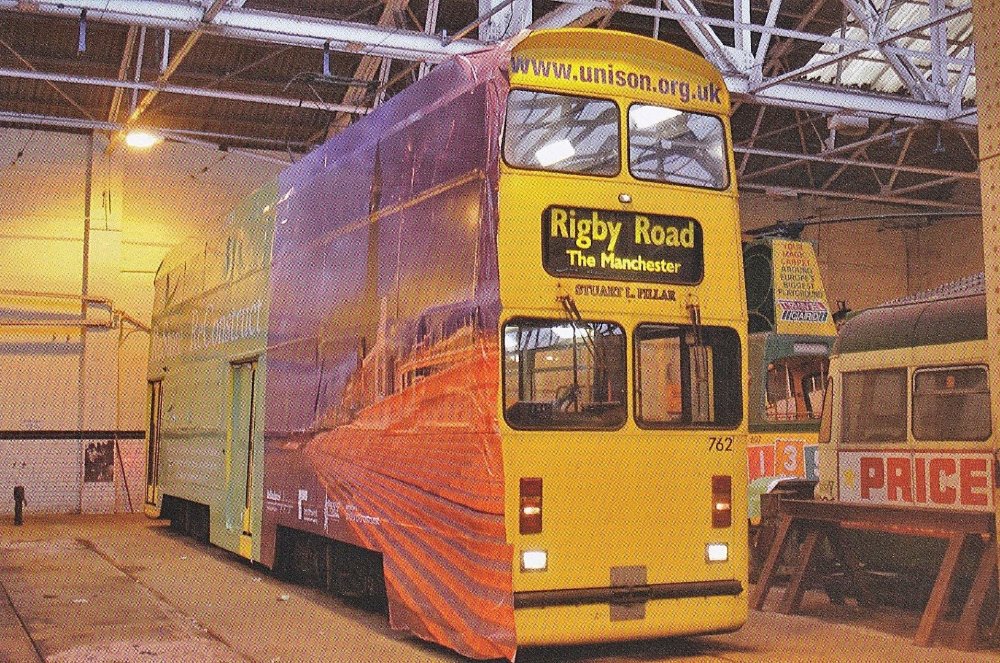
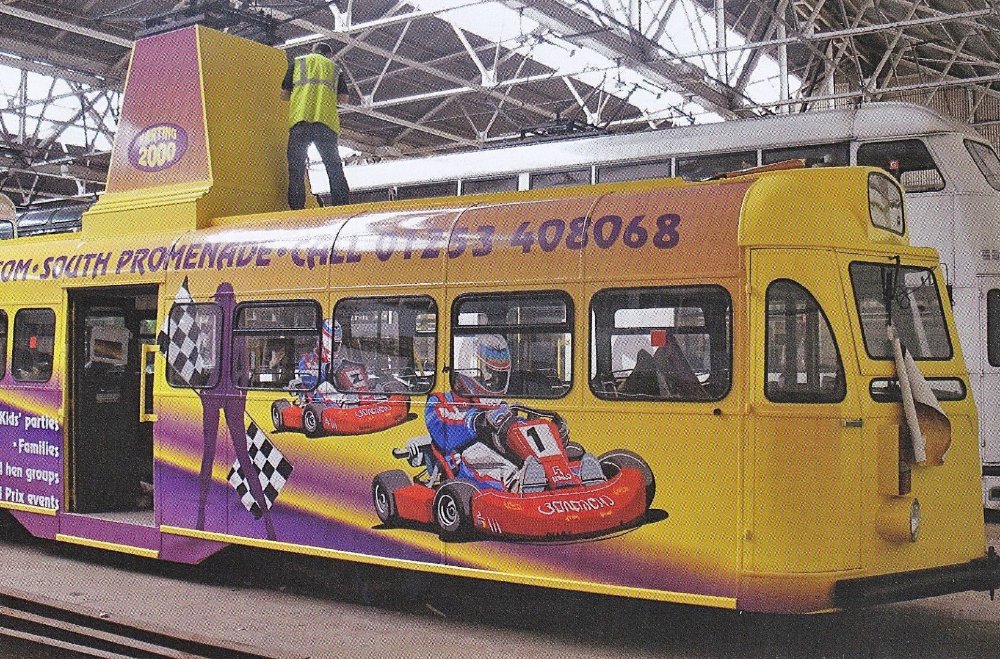
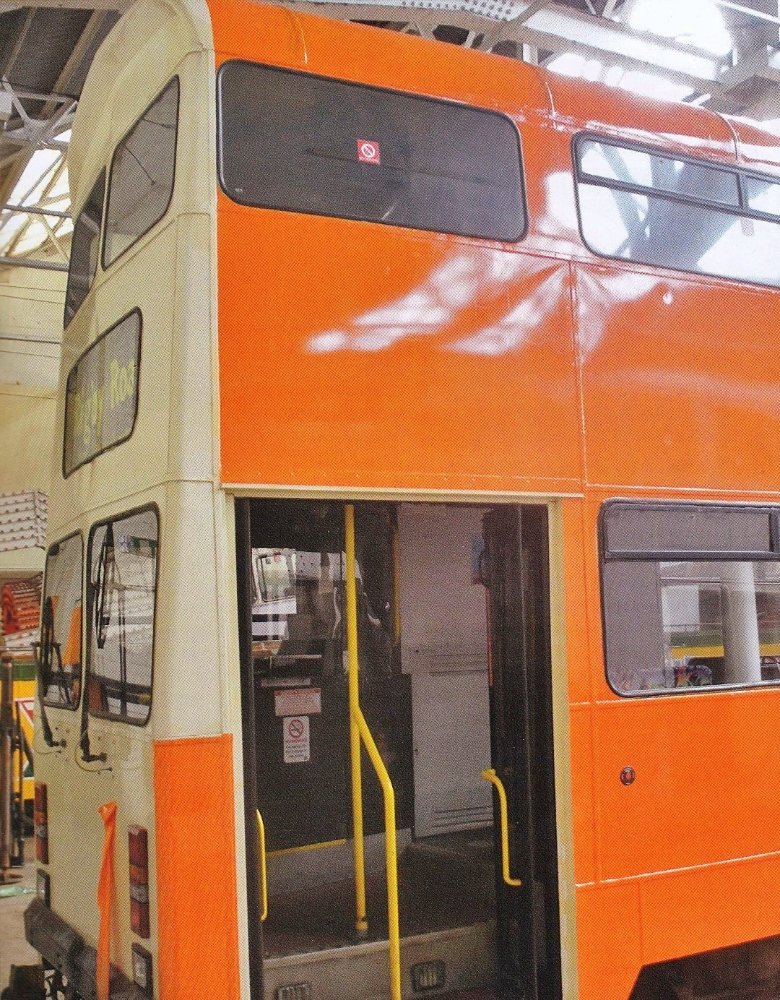
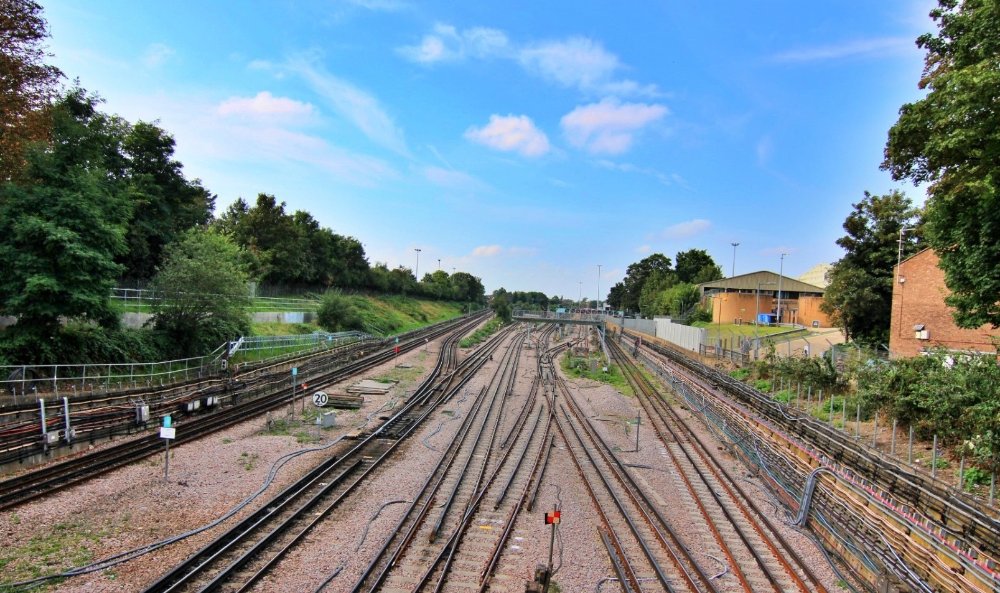
See above for section 2: Out and About Section 3. Odds and Ends/Miscellaneous: Ok, let us see what’s in the Odds and Ends box this week: Returning from a Taunton F2 meeting I was very lucky to come across this combination close to junction 25 of the M5 The stunning 8yr old Elena May – A Merc Actros from Weston-super-Mare based JJP Heavy Haulage With the King tri-axle low loader trailer she has just picked up a participant from a steam rally at Norton Fitzwarren ‘Gigantic’ is a McLaren road locomotive built in 1912 for the War Department ‘Gigantic’ lets off steam. She’s alive I tell you! Three railway pics next: On the 7th June 66059 heads the 10:34 Corby-Margam empty BLA and JSA coil wagons at Pencoed on the South Wales main line. A recent addition to this train is a head load of five SSA wagons containing scrap pipes destined for Tata’s Port Talbot steelworks. (Pic credit to Stephen Miles) The Green World of Ribblehead. Having run around its train at Blea Moor, GBRf 66796 The Green Progressor heads across Ribblehead Viaduct on 13th July with the 11:25 Arcow Quarry-Pendleton loaded with aggregates (Pic credit to Chris Powell) The ‘mecanicien’ looks on in dismay as the water crane attendant rather overdoes the watering of an SNCF 141TC at the Gare du Nord in mid-1969 (Pic credit to David Walker) Blackpool Transport Spot This week we’ll have a look at advert liveries: Advert liveries were introduced onto the tram fleet in 1975 and were expertly hand painted by signwriter Bryan Hamer and his assistants until 2004 when vinyl adverts took over following Bryan’s retirement. Between 1975 and the end of the traditional tramway operations in 2011 there were almost 200 all over adverts, many of which were classics and are still fondly remembered today. However, although thousands of photographs of these advert cars were taken out on the tramway over the years, what was much less recorded was the process, and the “half finished” adverts. Base colours were always applied by the coach painters in the Paint Shop, before Bryan worked his magic to complete the finished design. What follows is a selection of images of partly completed advert liveries. The man himself, Bryan Hamer, makes a start on the signwriting for the ‘Leonard Cheshire’” advert livery on car 680 inside Rigby Road depot during 1998. Balloon 721 leaves the Paint Shop in the base colours for its ‘Michelin’ advert livery in 1998. In March 2000 Balloon 704 sits on the depot fan in a black and yellow base coat for its second advert livery for the ‘Eclipse’ show at the Pleasure Beach. Brush car 622 is seen in the depot on 3/8/2006 in the base colours of its new advert for ‘Pontins’, awaiting the application of vinyls. Brush car 626 is seen outside the depot with a partially applied vinyl for ‘Blackpool Zoo’ – 18/6/2005. Jubilee 762 at the back of the depot in 2009 receiving a new vinyl wrap for ‘re-Blackpool.com’. 19/6/2007 - 630 receives a new vinyl livery for ‘Starr Gate Go Karts’. Orange vinyl applied to Jubilee 761 in July 2008 in readiness for its ‘Wynsors’ advert livery which is still carried today. That’s it folks for this week. Next time: Some more F2 action, plus a look around one of the most comprehensive collections of urban transport items anywhere in the world. It is situated alongside here if you know this location:

-
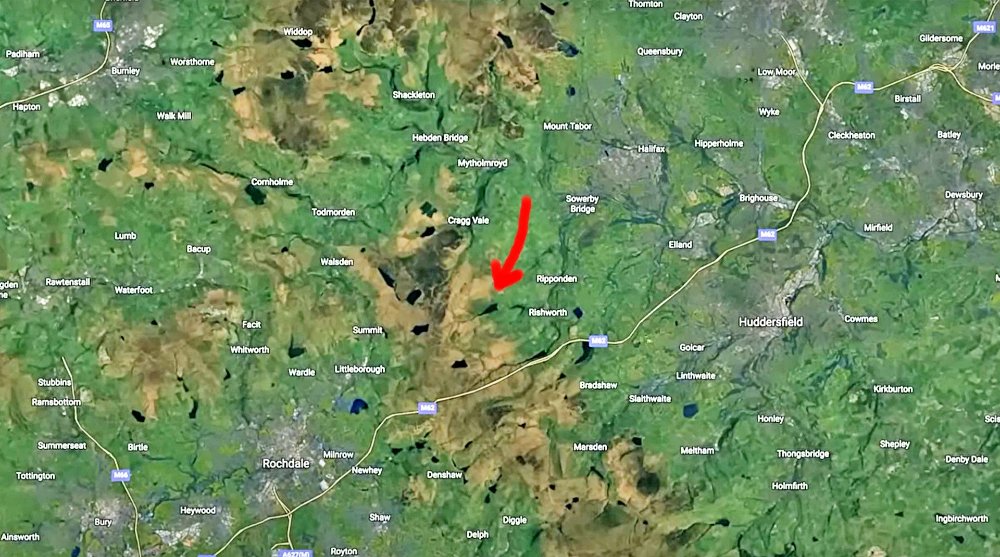
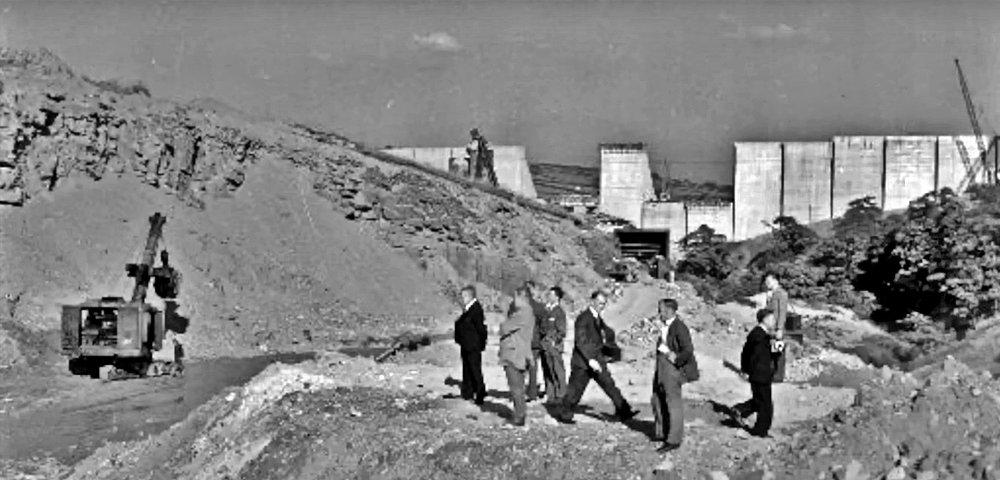
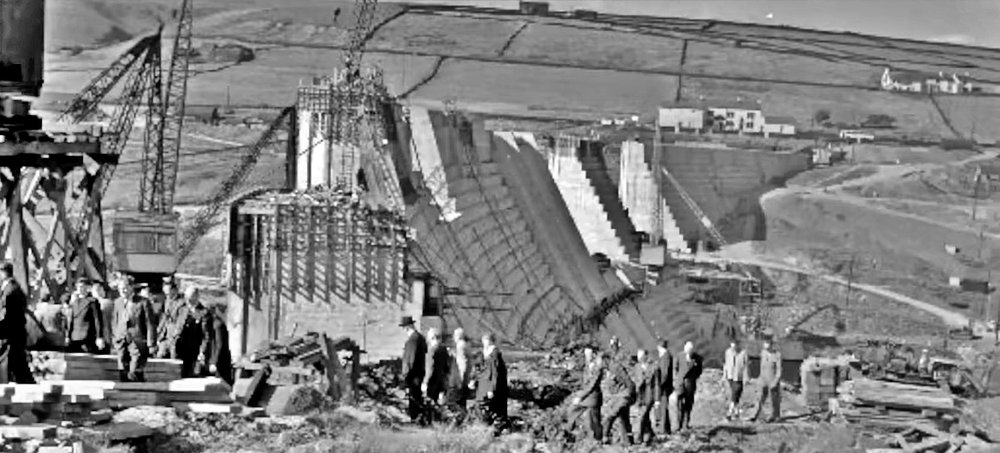
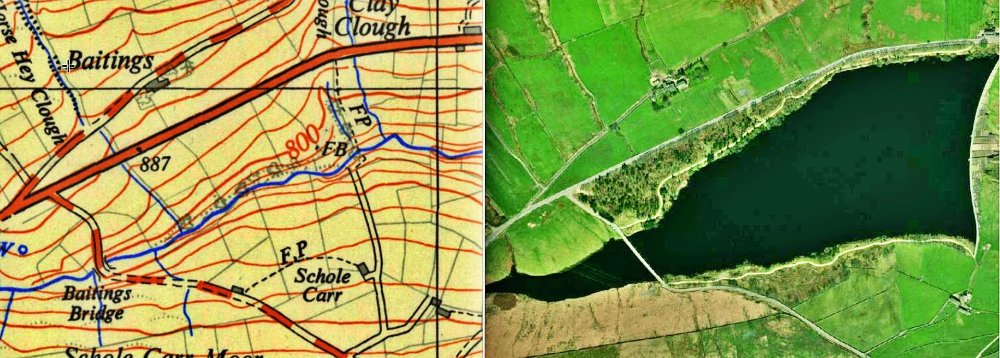
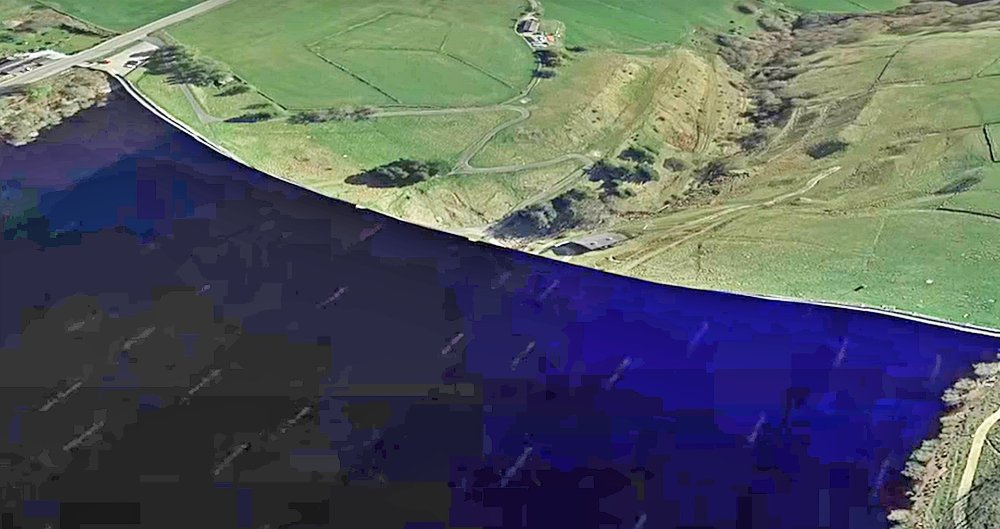
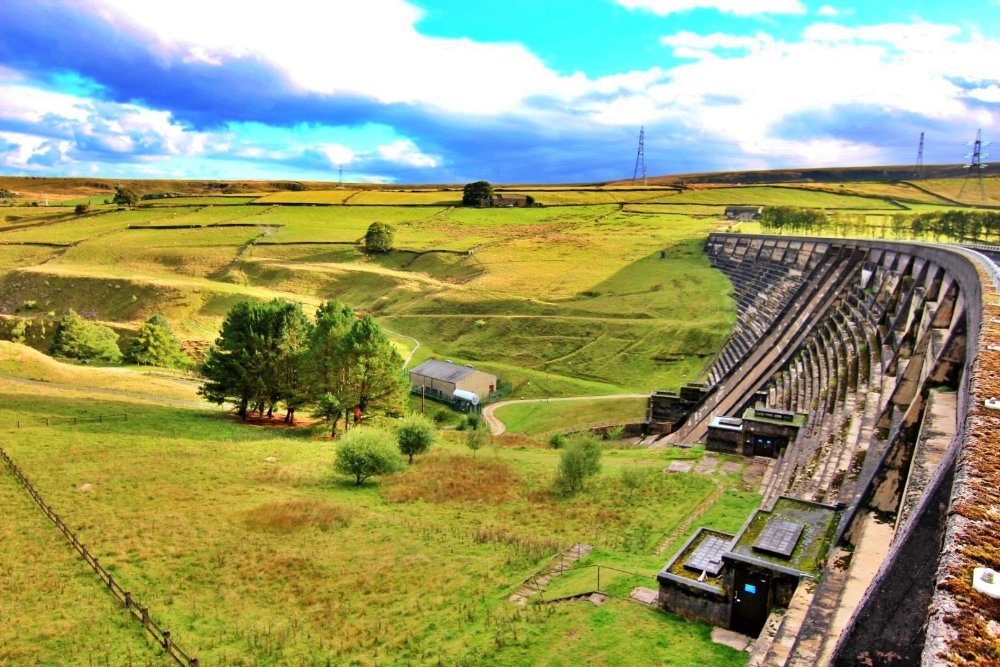
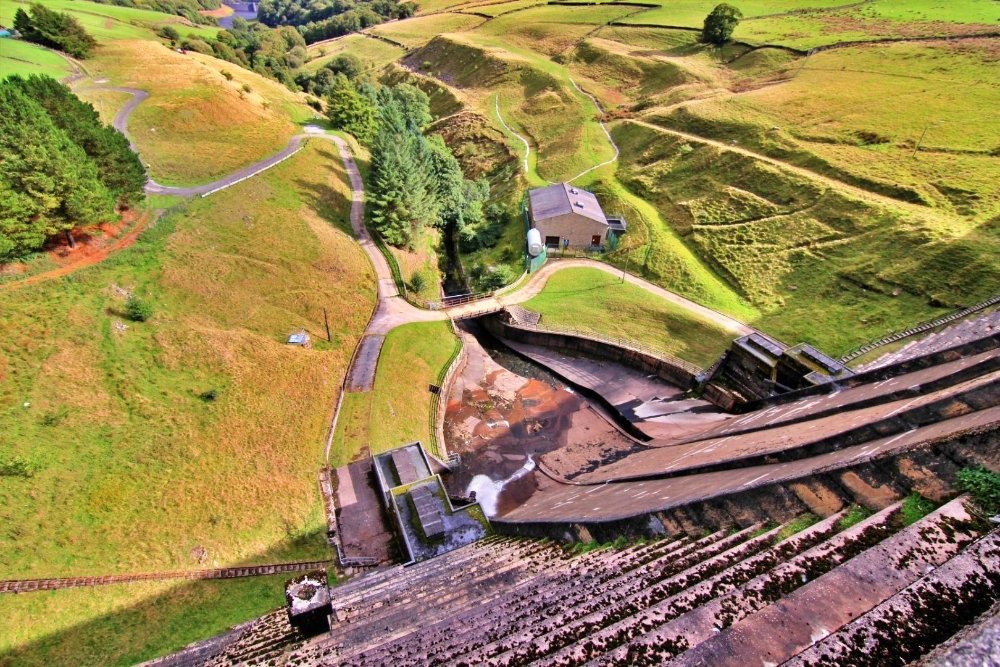
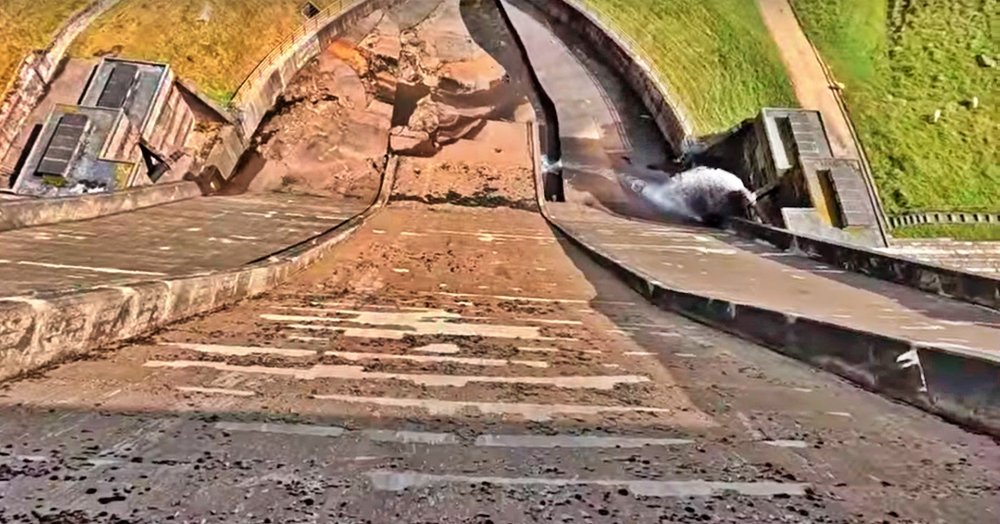
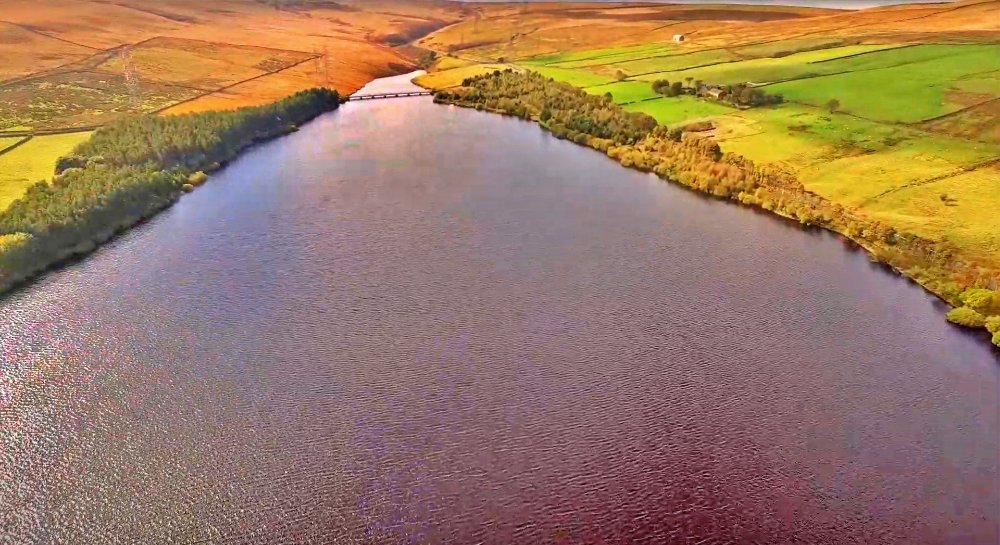
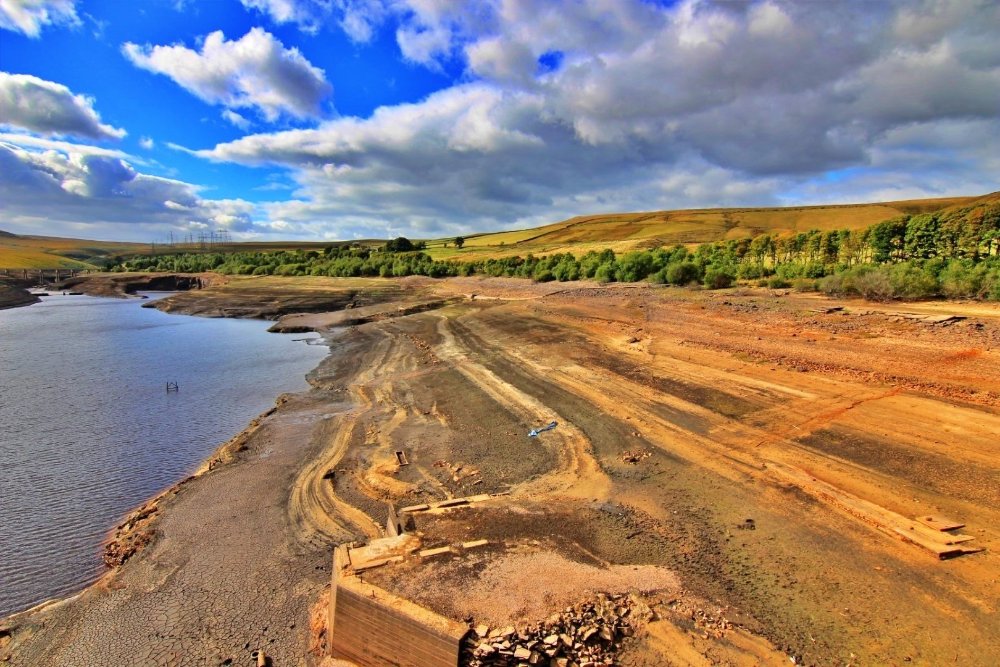
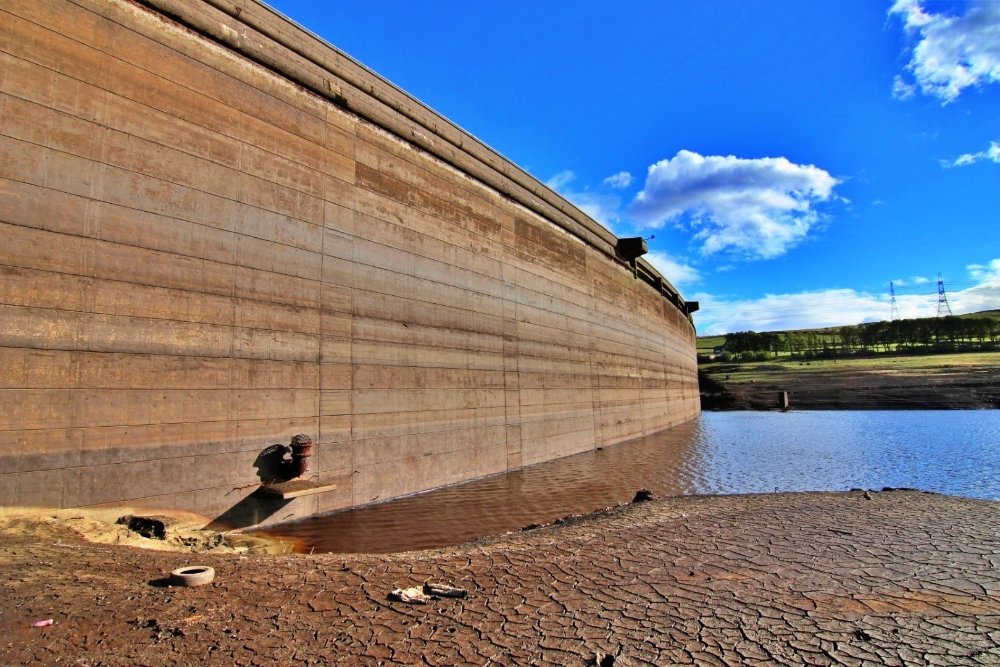
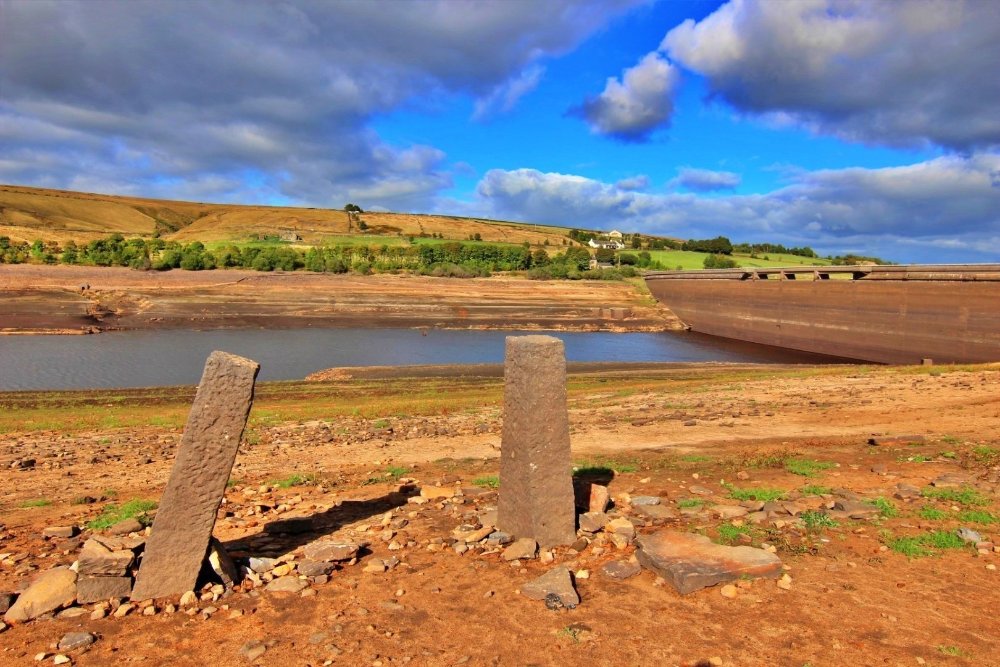
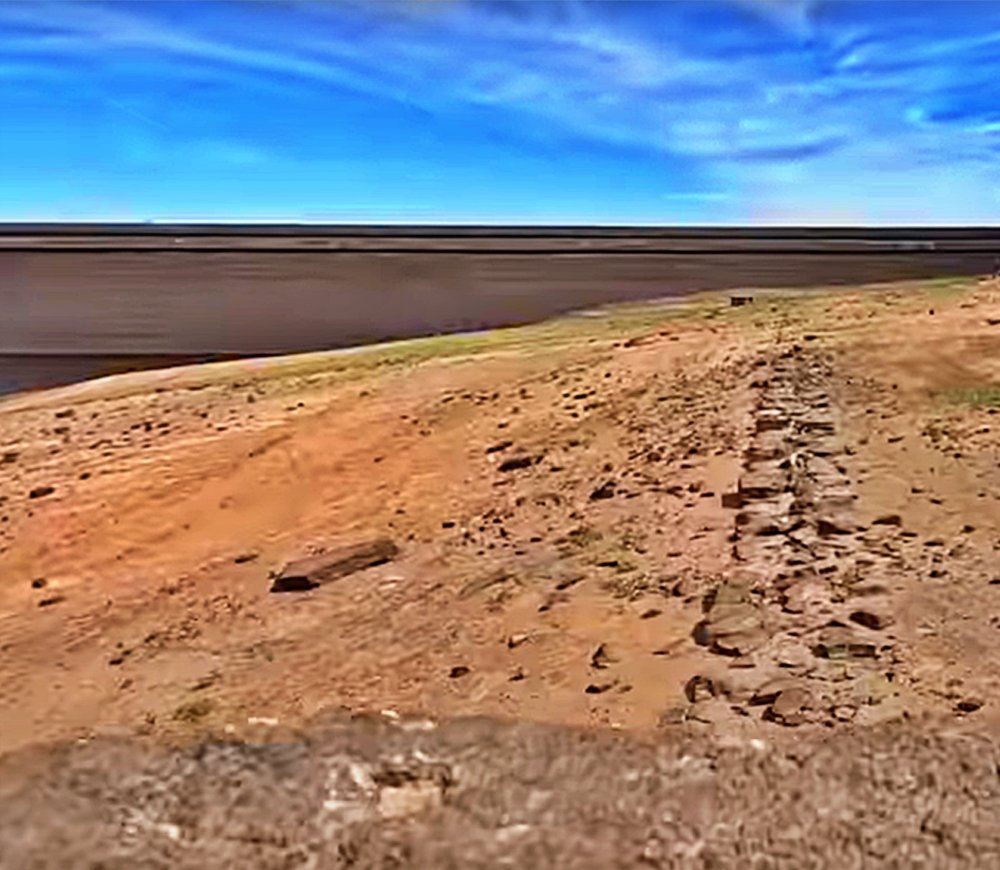
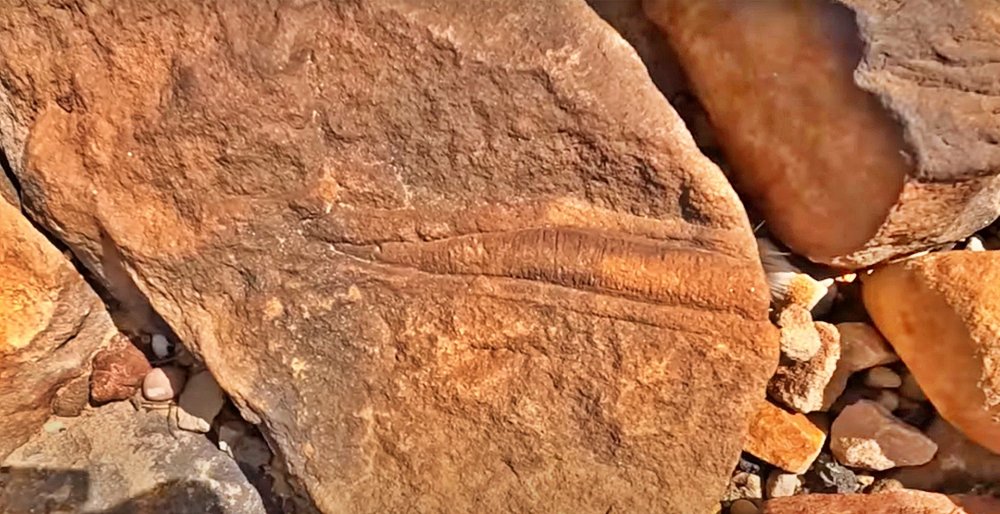
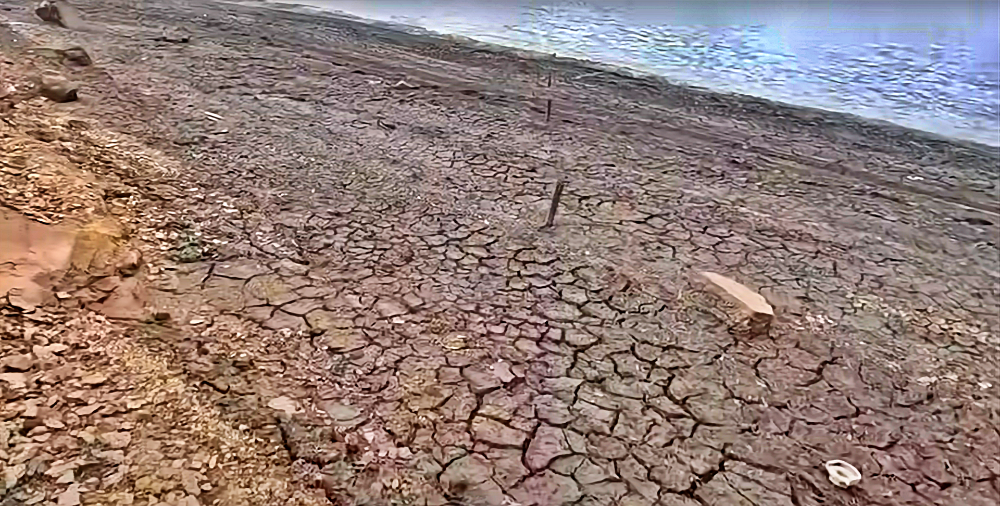
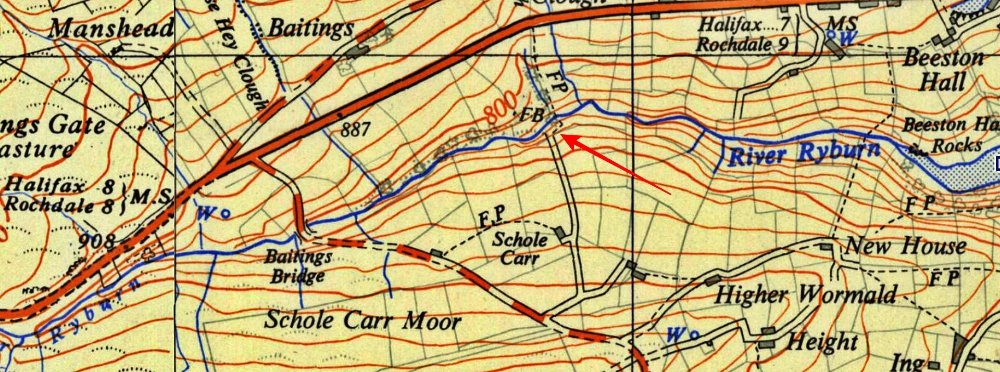
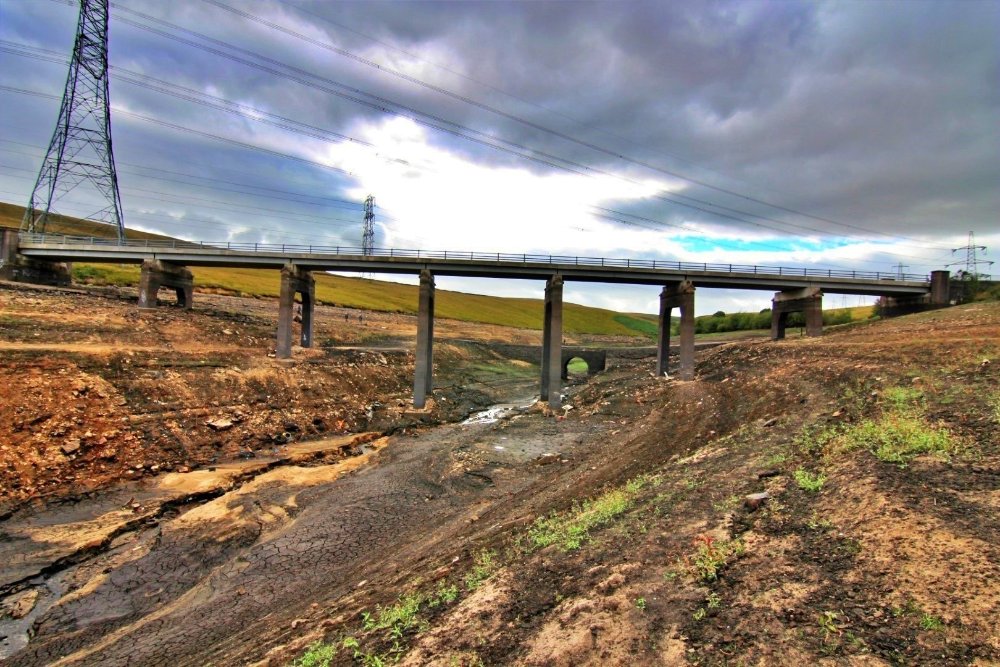
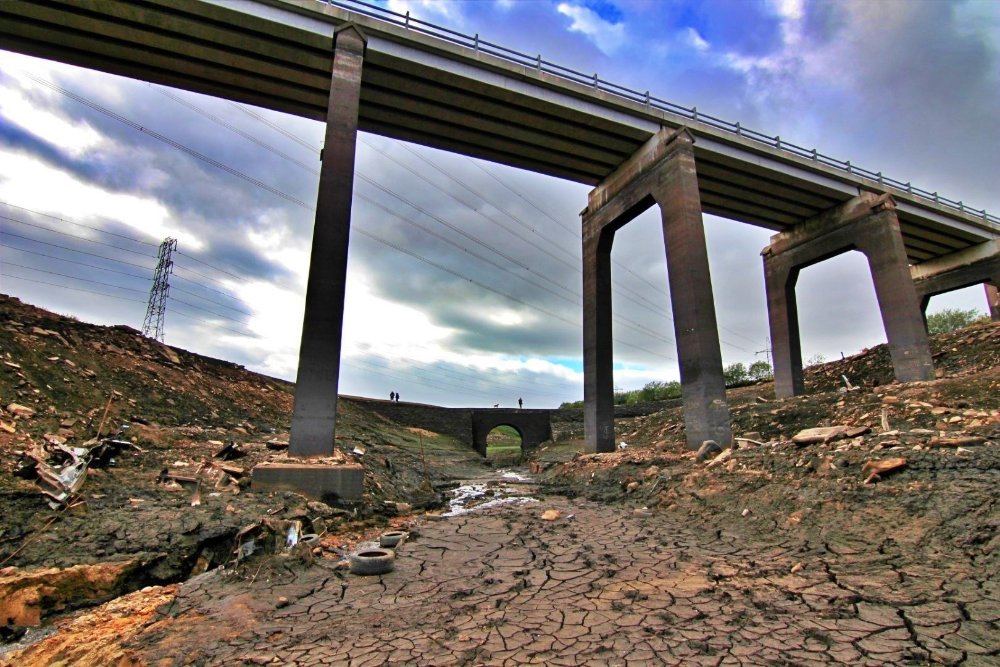
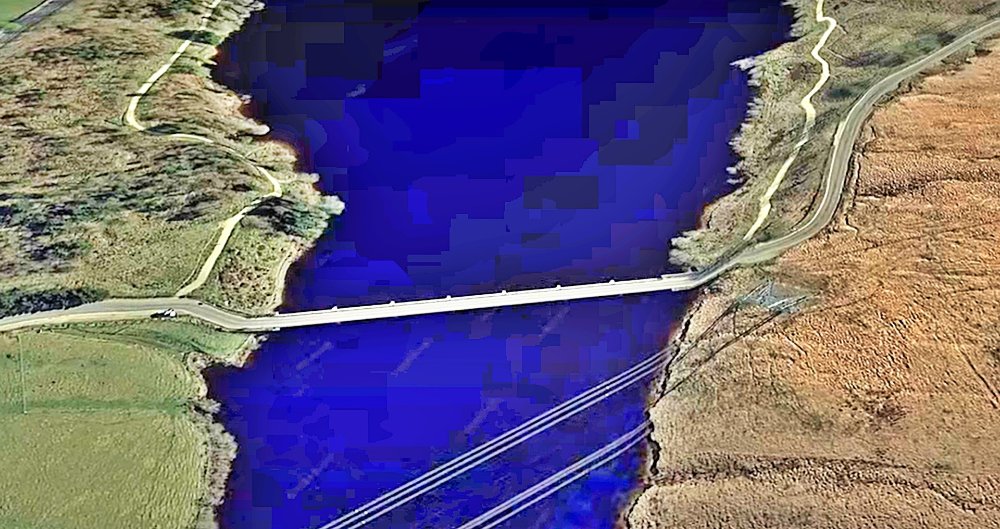
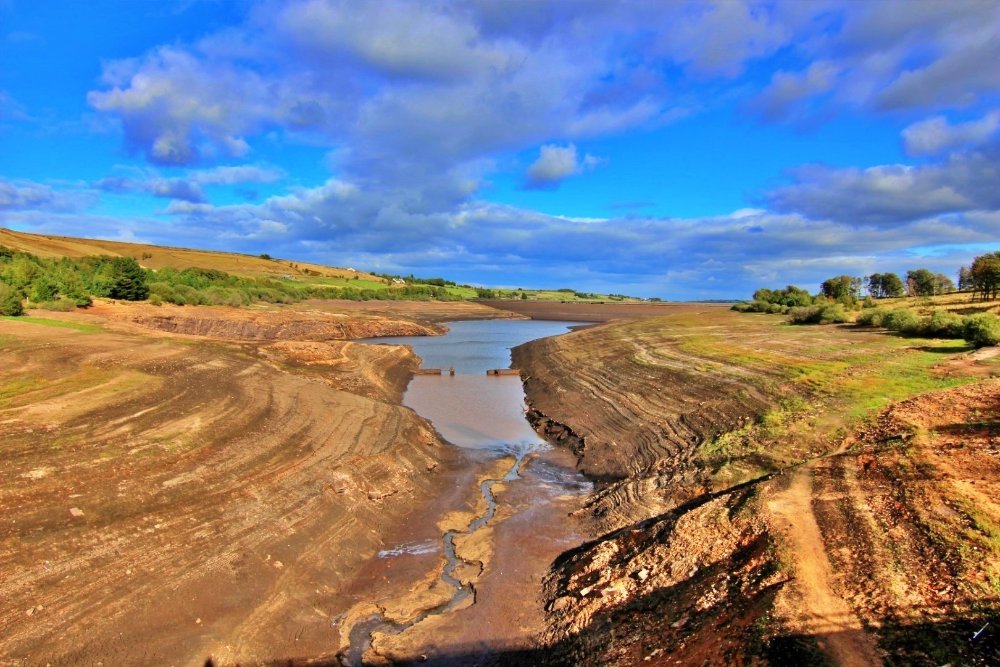
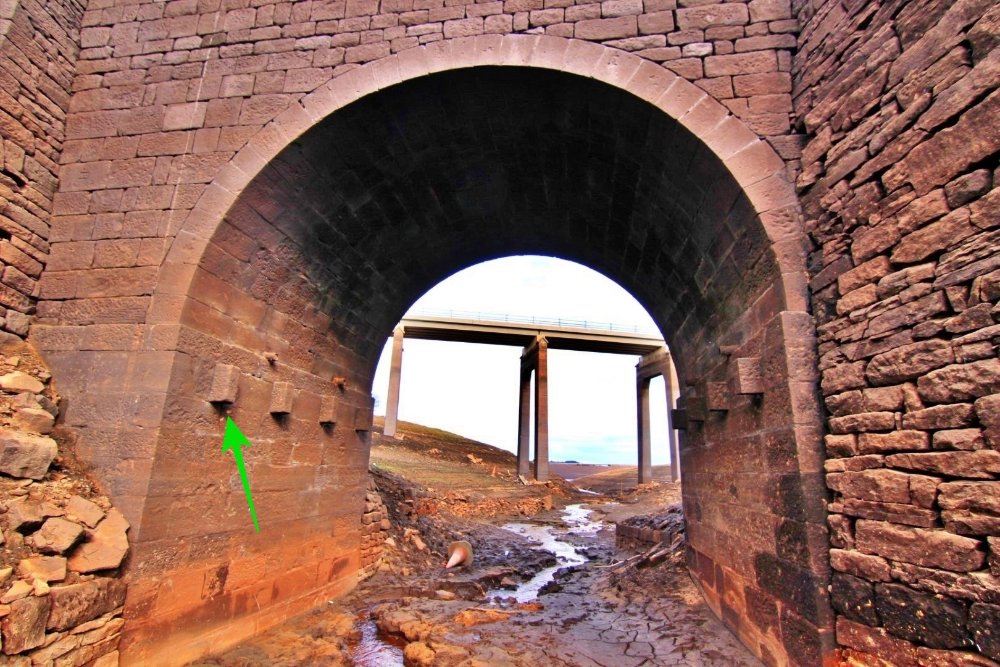
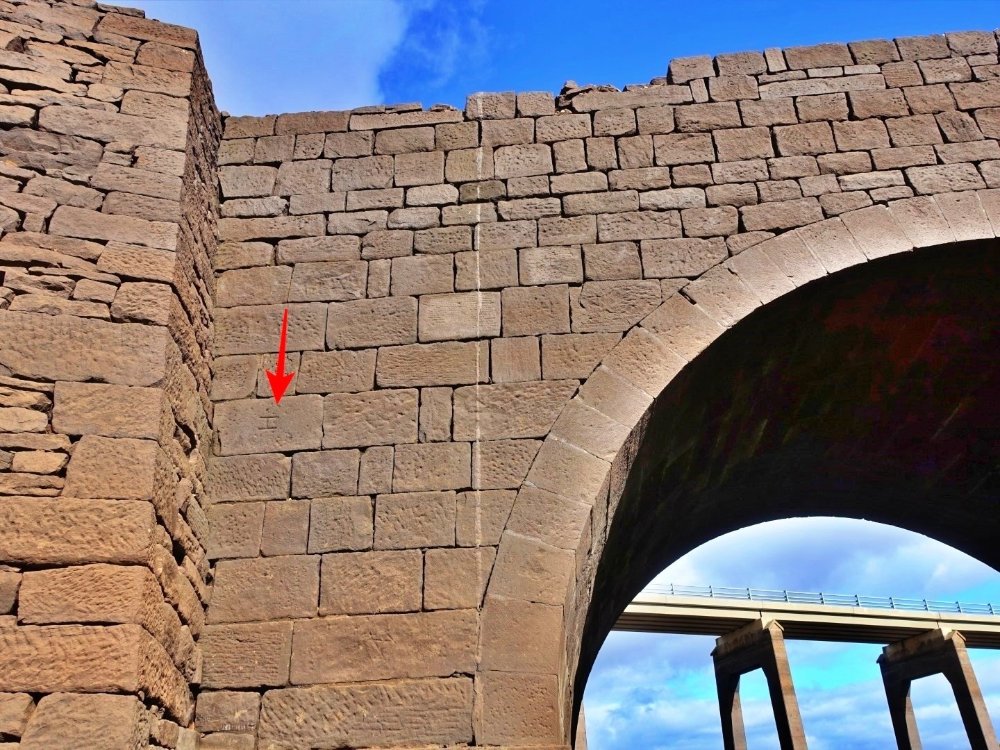
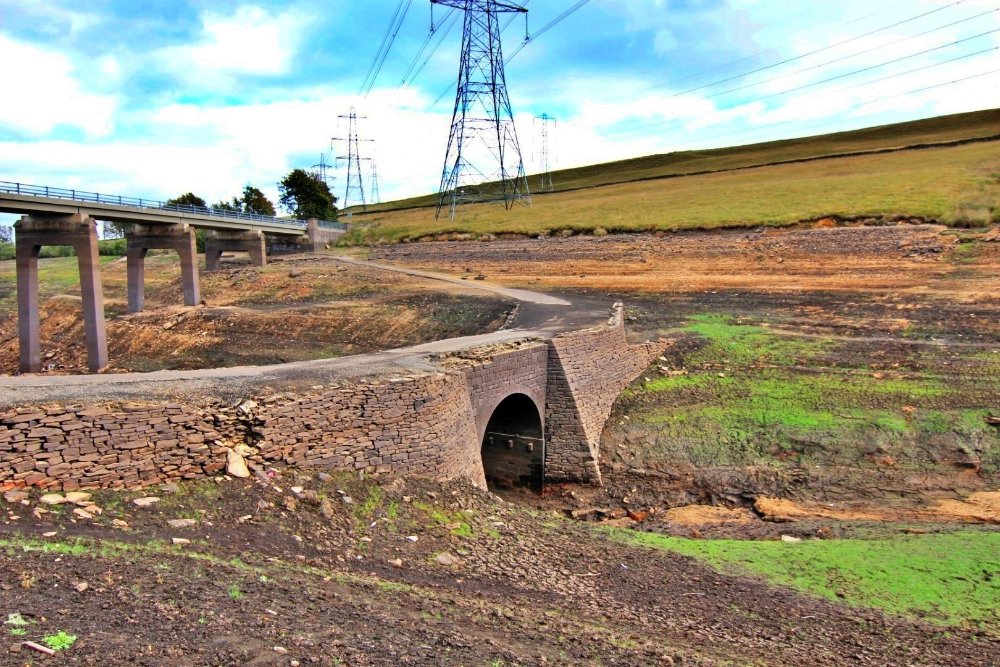
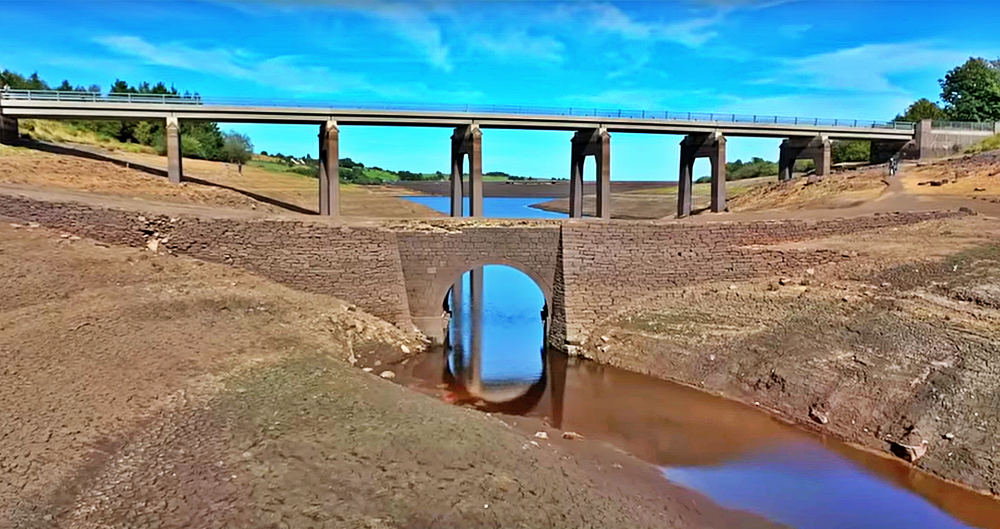
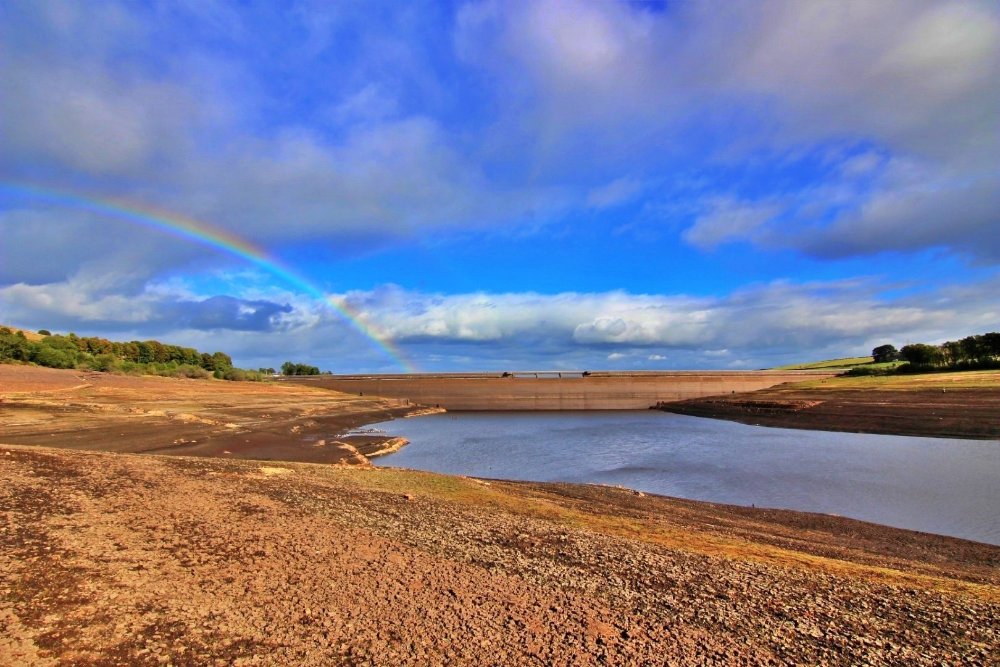
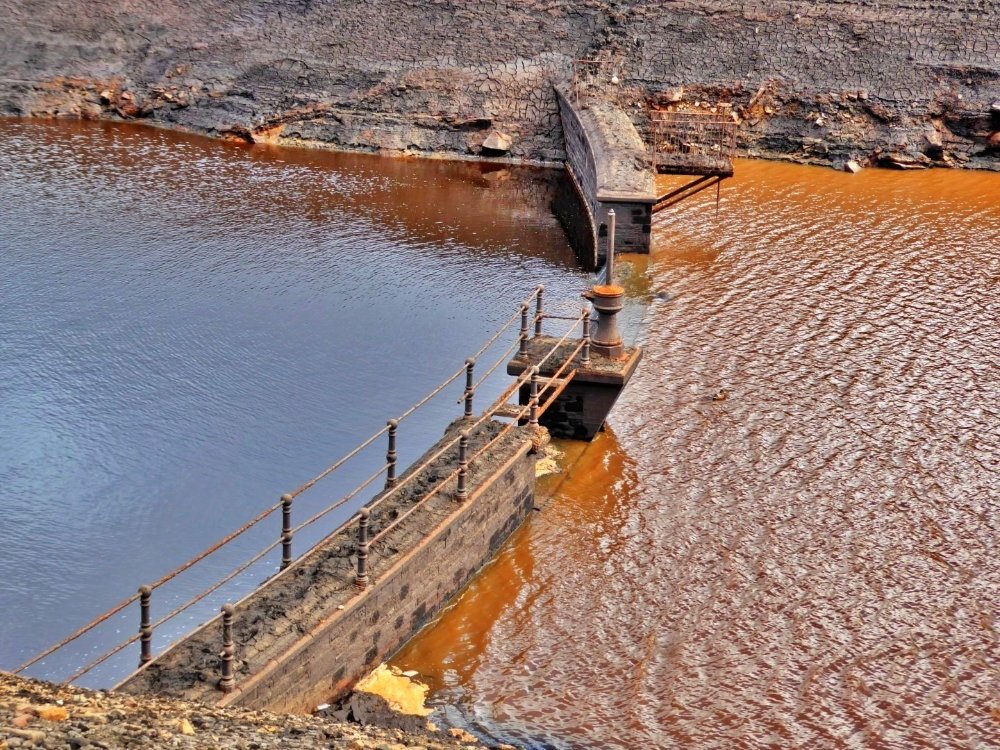
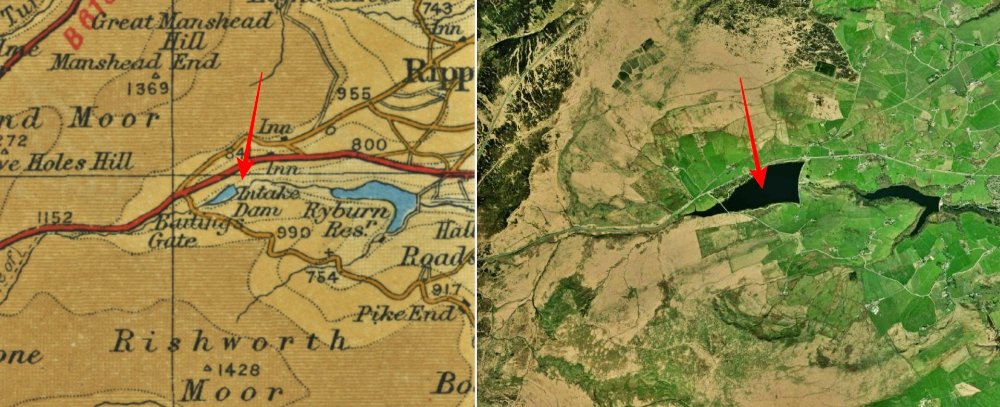
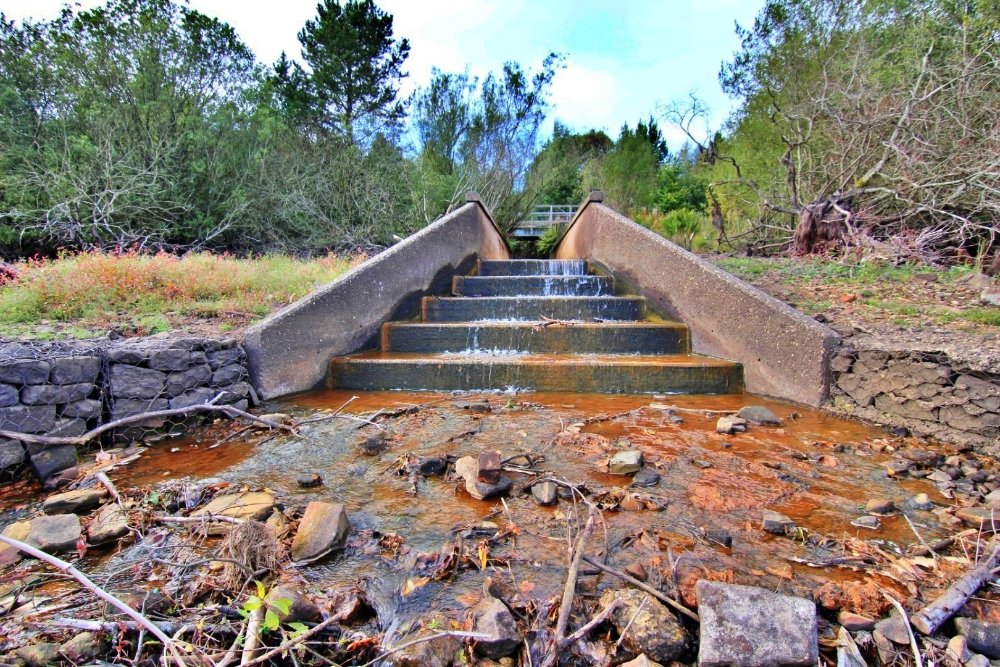
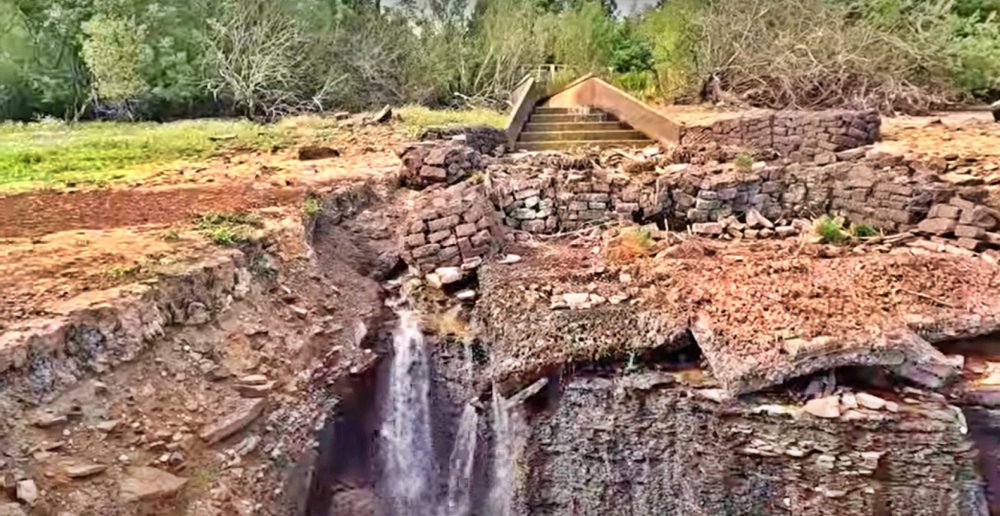
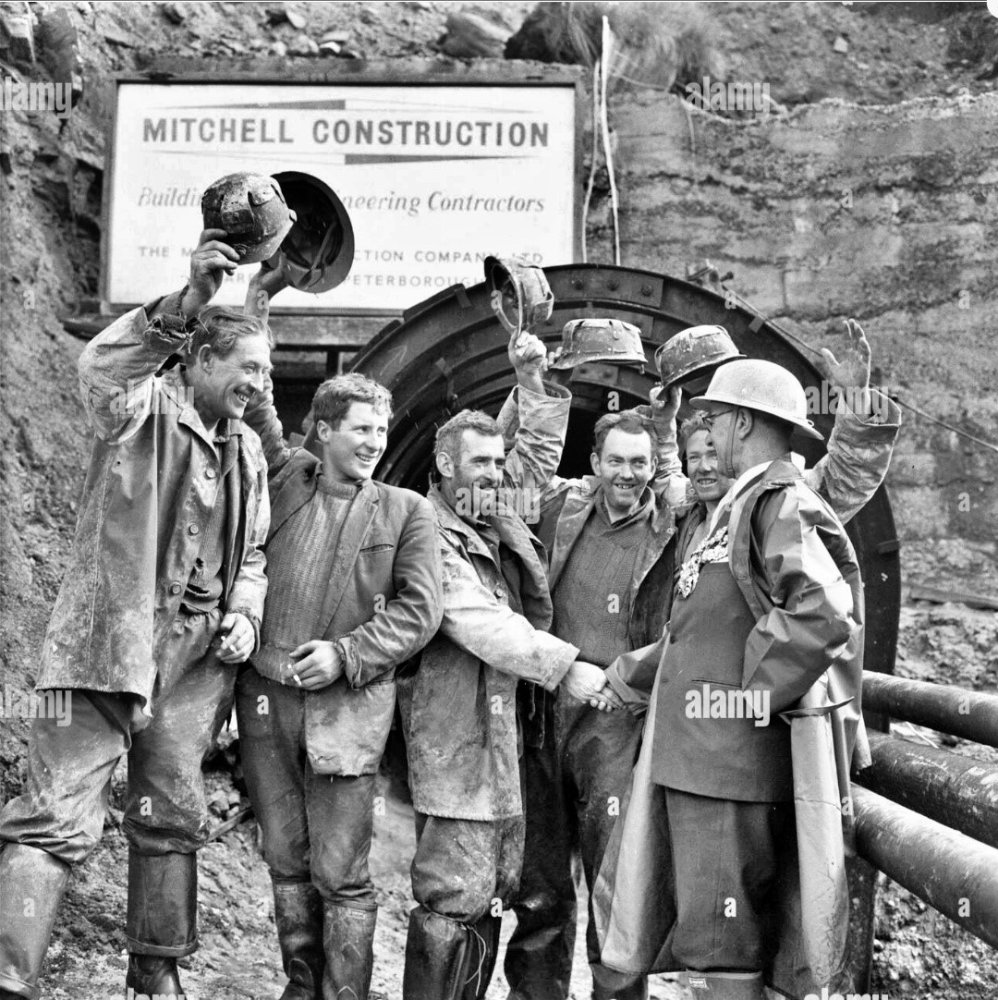
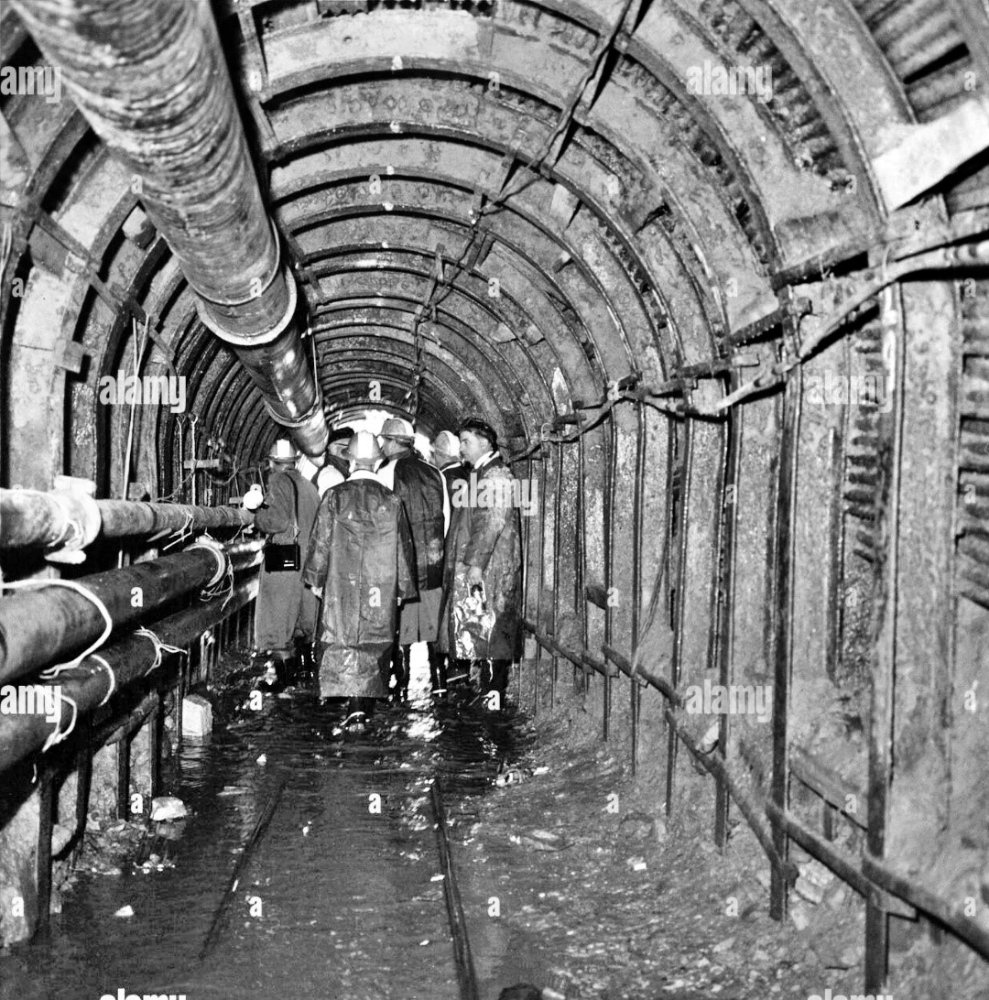
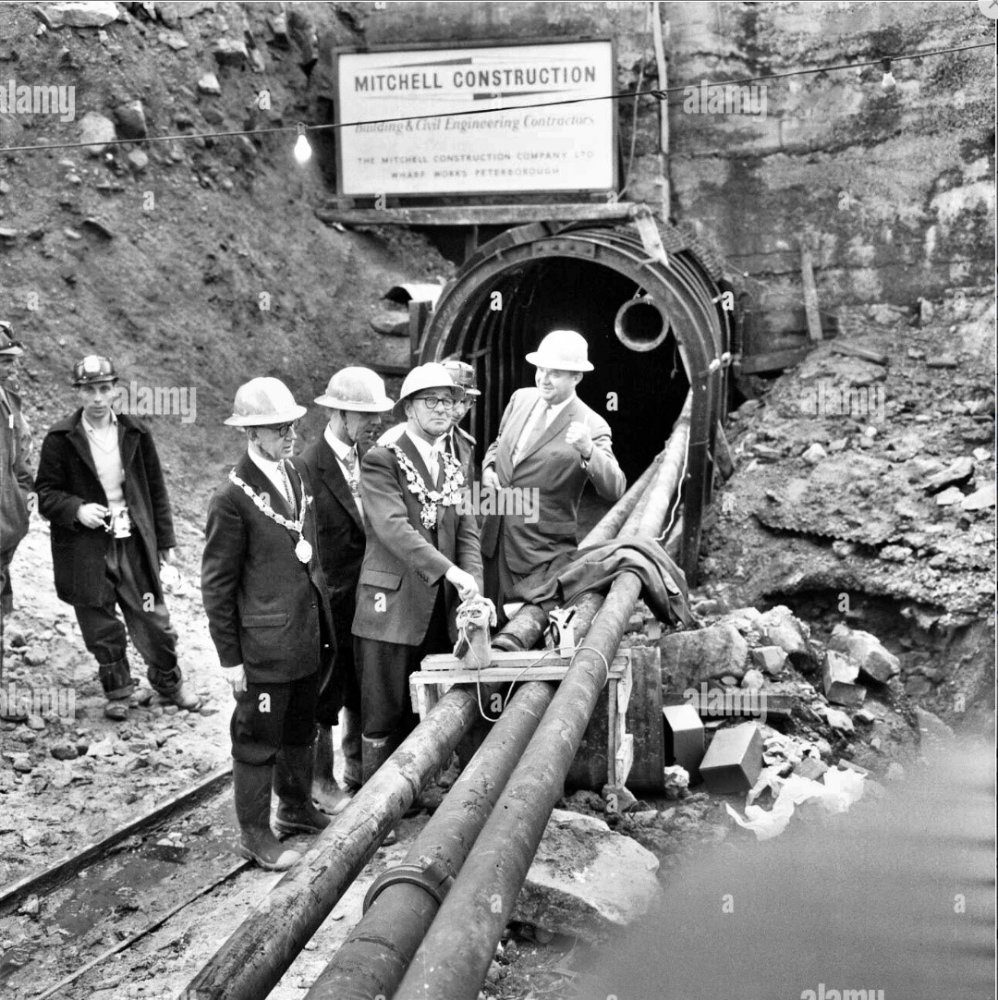
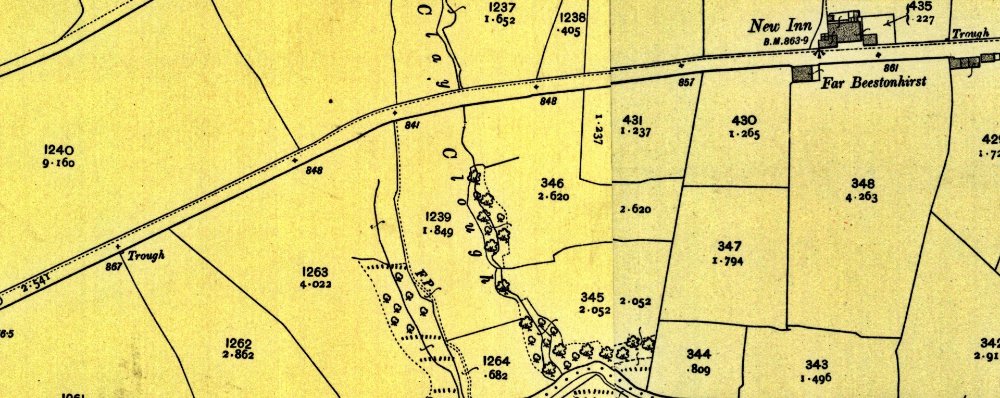
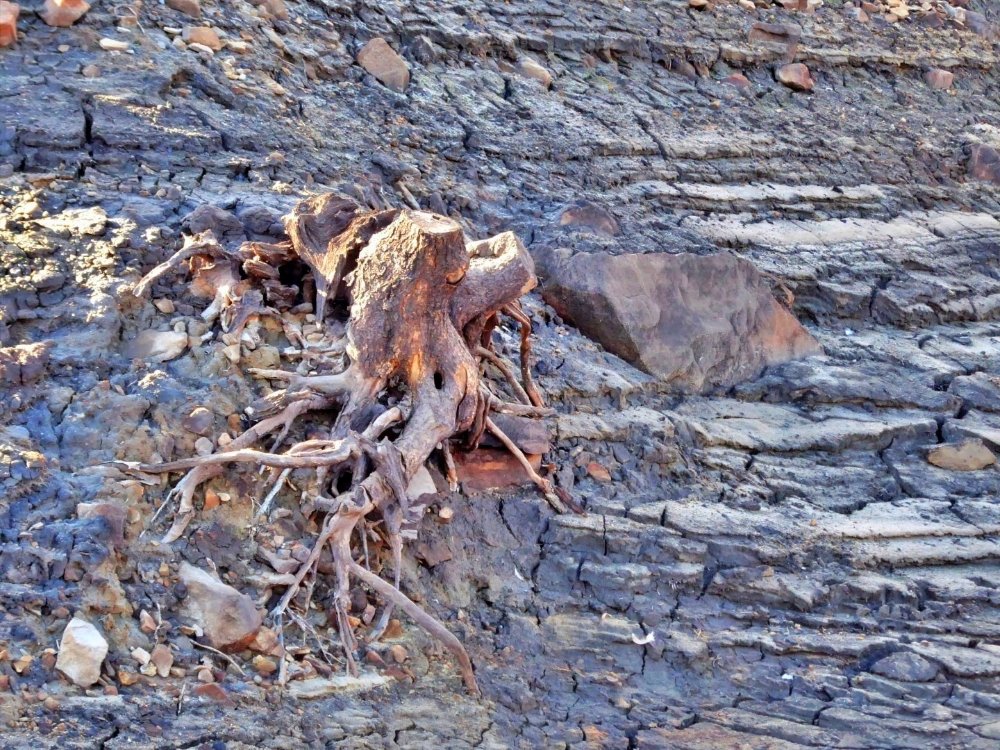
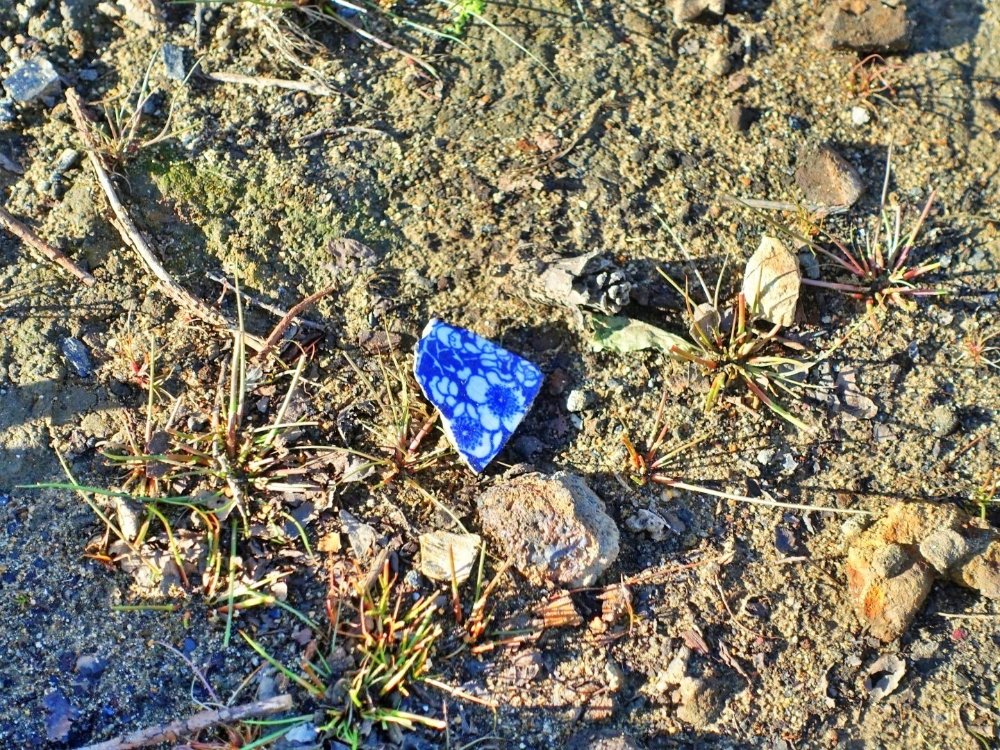
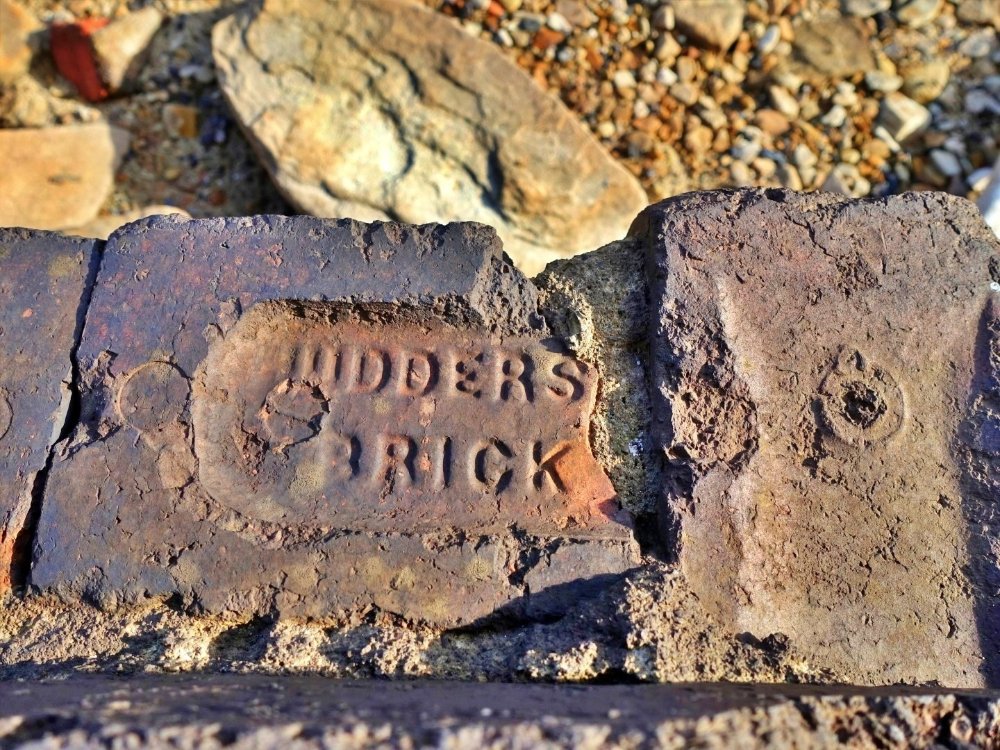
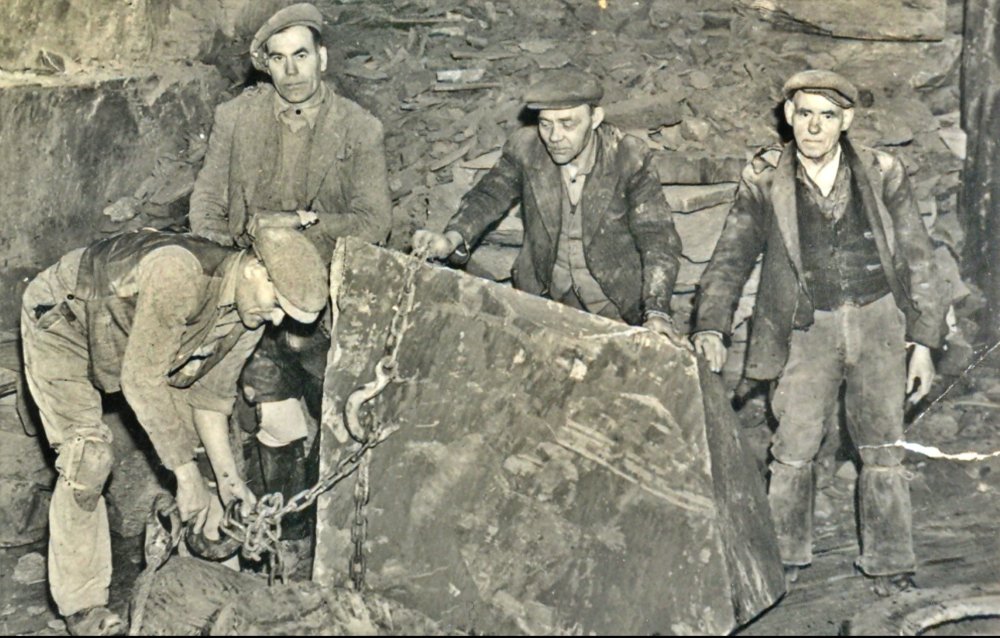
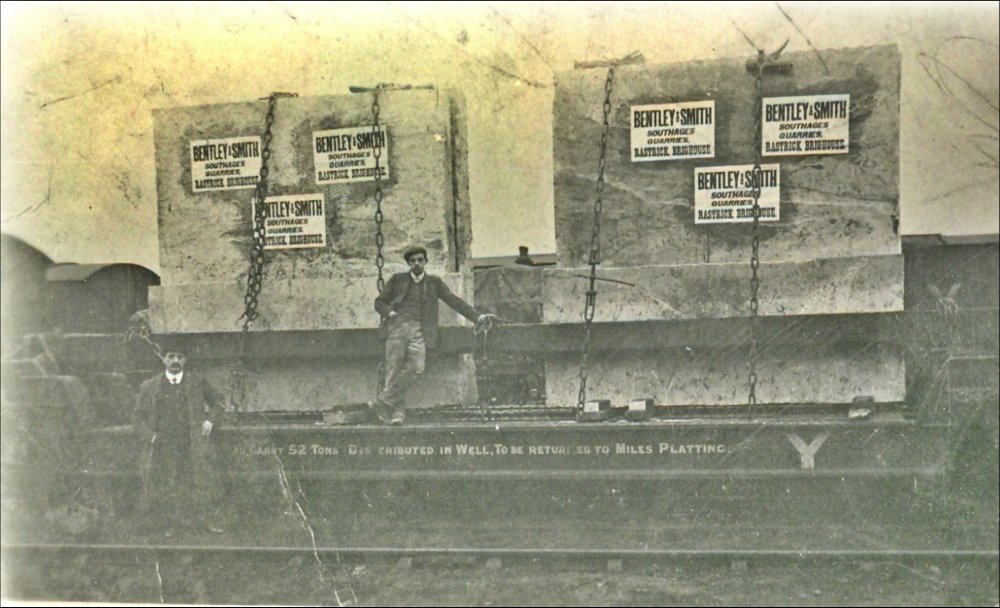
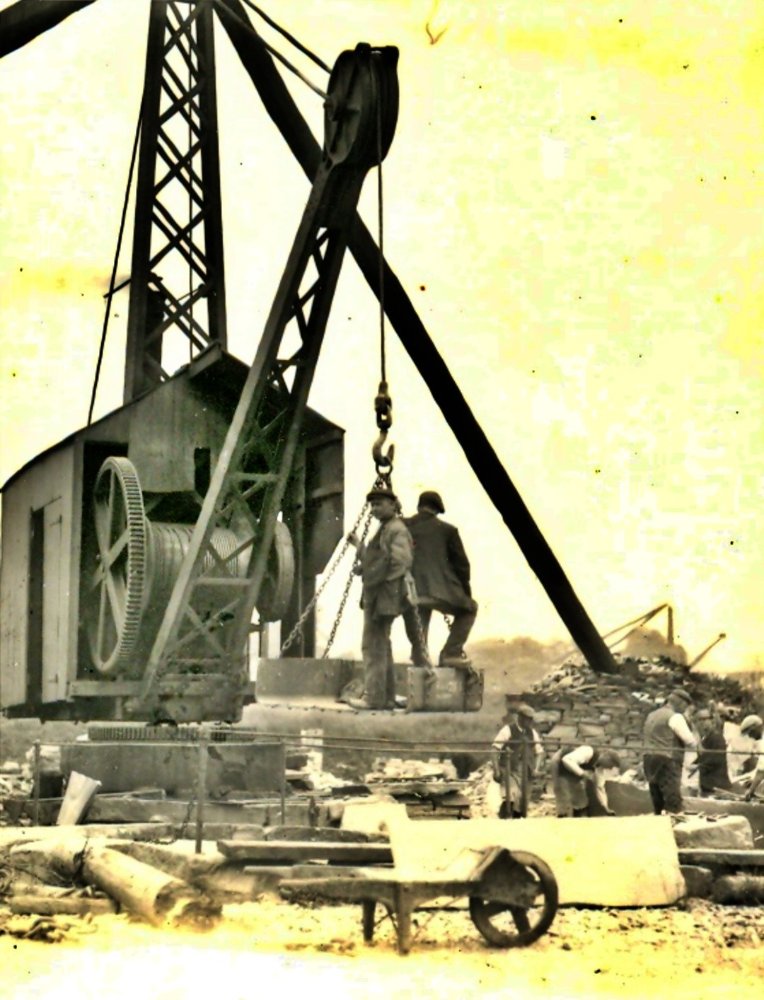
See above for section 1: F2's Section 2. Out and About: We’ll make tracks now up the M5, M6 and M62 to the Pennines in West Yorkshire. We’ve come to have a walk inside Baitings Reservoir. This is a large water supply reservoir operated by Yorkshire Water between Rochdale and Huddersfield close to Ripponden. It lies in the River Ryburn valley and was constructed in 1956 to supply Wakefield with water. Wakefield Corporation Waterworks started impounding the valley of the River Ryburn in the 1930s with a first reservoir (Ryburn) being completed in 1933. Construction of Baitings took place 20 years later. The reservoir takes the name of the hamlet nearby. The reservoir under construction: The hamlet of Baitings, whose name derives from the Old Norse of Beit (pasture) and Eng (meadow), was on an old road linking Yorkshire and Lancashire. The side-by-side view shows the area pre and post reservoir construction. Baitings Bridge on the map is the original and is usually under water. The new bridge follows a slightly straighter line over the water as on the right-hand pic. The reservoir covers 59 acres, and when it is full holds over 113,000,000 cubic feet (3,190,000 m3) of water. The full reservoir The back side of the dam Two views looking down from the top of the dam wall The new bridge at the far end just above the water Owing to the extreme heat this summer, water in reservoirs, streams and rivers had dropped dramatically exposing things that are usually hidden from view. I took this pic in October from the top of the dam. The water level is usually up to the tree-line on the right. Join me now as we look around the reservoir to see what clues from the past remain that are normally hidden in the depths. The curved dam wall is now exposed. Slats have been built into the top of the dam for when the water level rises to the very top to provide for an overflow. Measurements in feet These gateposts to a long-gone field still remain The wall is still visible leading away from one of the gate posts Even fossils in the rocks can be spotted On the old map a footbridge is shown crossing the valley Is this the outline of the path to it? Fence posts at the end of the path Further along is this wide trackway that originally went down to the river The 1937 map shows a lane leading to this point As we get to the far end the best bit emerges. An old packhorse bridge. This was on Baitings Gate Road, a packhorse route through the Pennines that linked Yorkshire and Lancashire, and the centuries-old bridge has been exposed by this year's dry summer. The new bridge was built when the valley was flooded. It towers over the wonderful old one behind. It’s amazing to think that the water is usually to the very top of this new bridge When full only the road is visible Looking from the new bridge shows how big the area is up to the tree-line that is normally under water A great vantage point to view the centuries-old packhorse bridge below. In the very bottom of the reservoir close up to the bridge. A testament to how it was built as it’s still standing and solid. The eight stones (one arrowed) protruding from the inner face of the bridge were the supports for the wooden arched framework that was used in the construction. A mason’s mark arrowed The disused Baitings Gate Road Old and new side by side Many years ago a coach crosses the old bridge with the new one still under construction behind The same view in 2022 Half a rainbow illuminates the scene These sluice gates were also revealed. They were used to hold the River Ryburn back when constructing Ryburn Reservoir in 1933 The arrows on the side by side images show the position of the sluice gates before and after Baitings Reservoir was completed. The feeder from a tunnel which connects reservoirs in valleys to the north with Baitings to allow for the transfer of water. Manshead Tunnel is 8,000 feet (2,400 m) long. The tunnel entrance is in quite an isolated position in the hills above Mytholmroyd, near Hebden Bridge. It was built back in the early sixties by the Wakefield & District Water Board to divert water from Turvin Clough and the adjacent moorland to the reservoir. In 1961, one man was killed and 3 injured by an explosion whilst the tunnel was being constructed. Cutting through 1,140 feet high Manshead Hill was completed when the Mayor of Wakefield, Alderman Nathan Hutchinson J.P. fired the two final charges to complete the tunnel. 24 men worked day and night cutting the tunnel, often waist deep in water. The conditions were very difficult, but the men cheered as they were congratulated by the Mayor. The bogey truck which took him 4,000 feet into the tunnel came off the track on the return journey, so Mr Hutchinson had to splash through the water which flowed through the tunnel. The tunnel ensures an adequate water supply to the people of Wakefield and the surrounding area. 21st August 1962 Workers cheering and shaking the Mayor's hand after firing the final charge Clay Clough in the centre of this map was a tree lined water course that entered the Ryburn valley Here are the remains of those trees Lots of pieces of pottery around Plenty of bricks too. Here’s one from the Huddersfield Brick Works which were on Hillhouse Lane, and at Birchenclough There were a few broken pieces from Greenwood’s littering the bottom of the reservoir too. In 1881 George Greenwood was brickmaking at New Bank. By 1908 it became George Greenwood & Sons, Builders Merchants, of New Brunswick Street, Halifax. This company came to own: Beacon Hill Brick Works (formerly Oates & Green), and Swan Bank Colliery and Brickworks, together with several quarries. They were still active in the mid-1930s. The quarrying of sandstone has always been of great value to the economy of the Huddersfield district. Coarse sandstone was shaped into millstones used for grinding corn. The value of the rock depends upon how it is bedded and jointed. The best stone has massive bedding, with blocks 7 to 10 feet thick, and is called freestone because stone masons can work it in any direction. Sandstones in beds 12 – 18 inches thick can also be used as building stone. The best local freestones are the Elland Flags, Greenmoor, Grenoside and Rough Rock sandstones. Irregularly bedded rocks are used as wall stones, and rocks with bedding closer than 2 inches are ideal for flags. The earliest quarries produced stone for local use only, due to the high cost of transport. The enclosure of fields in the late 18th century created a demand for stone walls. Quarrying for flagstones – Although much of this stone would have come from clearing the fields small quarries would also have provided stone for local buildings and flagstones for tracks and paths. The 1854 Ordnance Survey maps show hundreds of sandstone and flag quarries, called delve-holes (or delph-holes), throughout this district. Longwood Edge had 2 or 3 separate companies working from the 1880s until the 1920s. Crosland Hill quarries became increasingly important in the early part of the 20th century, and in 1937 Johnsons Wellfield advertised itself as having 11 different quarries that covered a large area and produced stone for a variety of different purposes. Bingley Quarry, at Holmbridge, was worked by F. Marsden and Sons. Low Edge quarry produced magnum for at least 20 years from 1881, and the neighbouring Alison Quarry was opened to produce stone to build walls and banks for nearby Digley dam. The Elland Flags were of such excellent quality at Fartown and Fixby, that they were quarried and mined throughout the 19th century as well as further north, towards Halifax. The photograph was taken at the bottom of a shaft at Carr Green as the men attached chains to a large stone block in readiness for it being raised to the surface. The blocks would be transported by rail from the site such as these from Southages. These quarries would have employed a large number of quarrymen with specific tasks. Delvers, who started the process, were skilled in removing stone from the various beds. Under their direction labourers used picks, wedges and crowbars in the quarry. Large blocks were split using plugs and feathers. A straight line (or race) of 2 feet deep holes were drilled into the rock. Feathers are metal flanges which fit into the hole, and then a metal wedge (or plug) was gradually knocked into each hole so that the pairs of feathers were widened by a series of mallet blows. The rock then split along the line of tension. This process is still in use today. Delvers Steam cranes often fired by local coal from thin coal seams nearby, were used to lift large blocks of stone. A stiff-leg derrick crane at Carr Green which was used to haul large blocks of stone from the bottom of the shafts. This crane consisted of an upright mast with a boom or jib from which the steel cable was lowered or raised from the shaft by means of the winding gear. This was powered by a steam engine housed in what looked like a large garden shed. Two ‘stiff-legs’ or ‘back-stays’ were made from timber and were secured to the top of the mast whilst the base of each leg was fastened to a huge stone block. These blocks were then surrounded by other large stones to increase the weight and give additional stability to the whole structure. It was designed to stop the crane from tipping over when lifting heavy loads. As you can see from the photograph, this didn’t always go to plan and on this occasion the crane toppled forwards due to the weight of the lift and the failure of one of the stiff-legs. One of the legs smashed through the roof of the engine house and no doubt, work was delayed for a few days until the crane could be secured back into position. Simple devices have been used, since the Roman era, to hold and lift stone blocks. A ‘lewis’ has a pair of half-round legs that grip the sides of a drilled hole. When the lifting ring is raised, an angled pull on each leg creates a secure hold. Iron lifting tongs, like over-size scissors, and chain dogs that are J-shaped hooks joined by a length of chain, grip a stone block using dog holes roughly chiselled into two opposite faces. In Huddersfield town centre, between the George Hotel and the railway bridge, the retaining wall is pockmarked with dog-holes. These lifting devices enabled the masons to place any stone block directly into its mortar bed, with the underside clear of ropes and slings. The ‘lewis’, tongs and chain dogs are still used by masons today to handle masonry blocks. Banker (or bench) masons worked at the quarries and shaped the stone as required. Most building stone was pitched with pitching chisels and a hammer that left a squared-off block with a rough surface. Better quality stone was dressed and finished (with a fine chisel and mallet) like ashlar, with tooling marks (on average 8 per inch) leaving fine lines on the stone. Dressers, who were skilled stone masons, shaped and dressed stone to produce sills, headers and lintels. The finest sandstone was cut by sawyers operating sawing frames. Next, planers finished the stone to produce ashlar blocks. Gate posts, wall-stone, lintels and mullions often have a variety of tooled surfaces, devised by the masons for decoration. Quarrymen sometimes came across marestones which are large balls of soft yellow, brown or red sand and clay. Sandstone containing marestone was worthless, but the marestone itself could be manufactured into donkey blocks which were used to colour the edges of doorsteps. Marestone from Cook’s Study quarry above Holmfirth was cut and used locally, or sent to Lancashire to be mixed with cement to make donkeystone blocks. With increasing use of artificial building materials demand for stone decreased, resulting in smaller quarries closing in the 1930s and 1940s. However, quarries are still working on Cartworth Moor, Crosland Hill and in the Shepley area. Ganister, a pure quartz-rich sandstone, has also been important in this district. It was used to make refractory bricks for lining steel furnaces and was widely quarried. The Chain quarries between Marsden and Meltham, and the large Royd Edge Quarry above Meltham, produced ganister for the Meltham Fire Clay Company. The ganister was ground down for fire-bricks at the company’s works near the old Meltham railway station. It employed 300 people but closed in the 1970s, when the easily worked ganister in the quarries became exhausted. Brick manufacturers and many collieries exploited the Coal Measure shales associated with the coal seams, to make bricks for their own use and local sale. The 1884 directory for Huddersfield lists brick makers at Lower Cumberworth, Fieldhouse (Fartown), Thurstonland, Kilner Bank (Dalton) and Hazelhead (Crow Edge). By 1909 the most important brick manufacturer was the Huddersfield Brick and Tile Co. at Birchencliffe and Hillhouse Lane, Fartown (where they used glacial clay). Elliott’s Bricks of Kirkheaton made high quality domestic bricks in a variety of colours and finishes using the shales below the Grenoside sandstones mixed with other shales from various quarries. Today, shales are extracted at Crow Edge and Shepley for pipe manufacture by Hepworth plc. Finally, we finish our Baitings explore with a gruesome story from an earlier low water level: Laurence Winstanley was shot in the head after having been partly burned and mutilated His body was found in Baitings Dam, just off the A58, wrapped up in a curtain and weighed down with a pick-axe head about a year after he vanished on 26 September 1989. At the time his body was found the water level in the dam had been unusually low due to the hot summer. At the time of his murder the police said that they thought that it was a targeted gangland execution and said that they thought that more than one person had been involved. The police said that it appeared that an attempt had been made to burn his body. He had lived in Ogden, Rochdale with his family but had previously lived in Cliff Hill Road in Shaw, Oldham the previous year. He was a part-time car dealer and car mechanic with his own garage, New Start Autos, in Sholver, Oldham. On the night that he vanished he had been out to a local pub, The Windsor, where it was heard that he received a telephone call that seemed to worry him. After that it was heard that he went off to his mother's house in Shaw which was a few minutes away, but that the journey took him over an hour. The police said that they were interested in finding out what he did during that hour. After visiting his mother, he then went back to the pub for a while but was never seen again. No one was sure what time he left after his return. Two days after Laurence Winstanley vanished, on 4 October 1988, a man giving the name of Burrows took Winstanley's red Ford Cortina estate car, registration number SAT 385W, to a scrap yard in Milnrow, Oldham, but the man was never traced. It was noted that Winstanley had recently bought the car for £350 and had been planning to sell it for £800 and so wouldn't have scrapped it. During their investigation, the police raided several homes in Rochdale and Littleborough in January 1990 and a man was questioned, but no arrests were made. Section 3: Odds and Ends/Miscellaneous follows below:
-
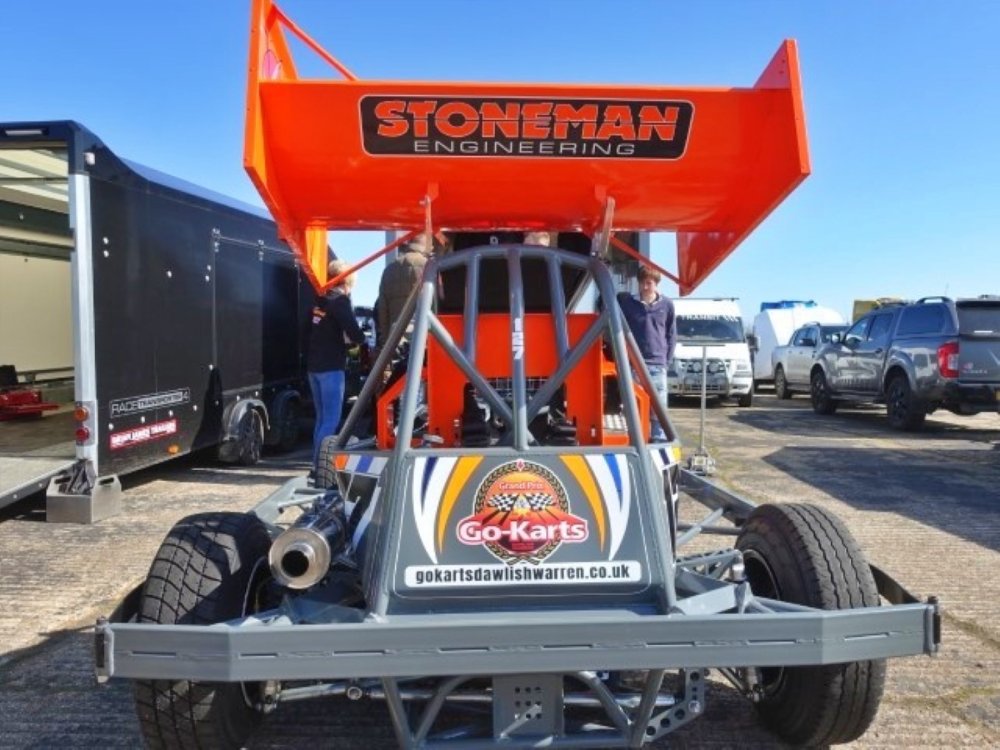
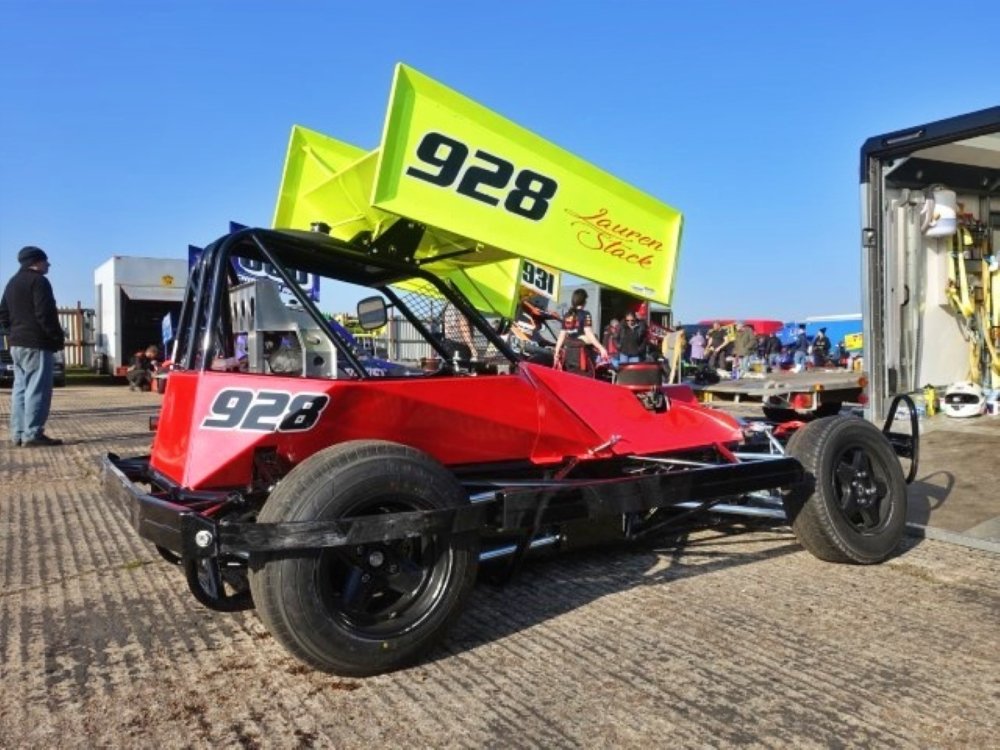
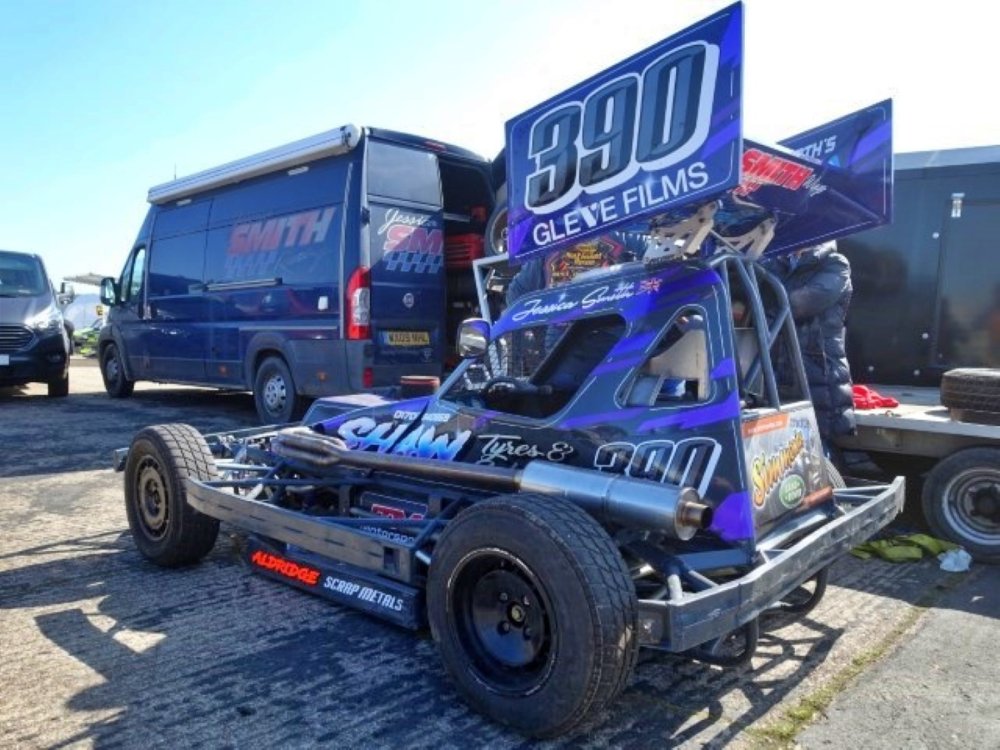
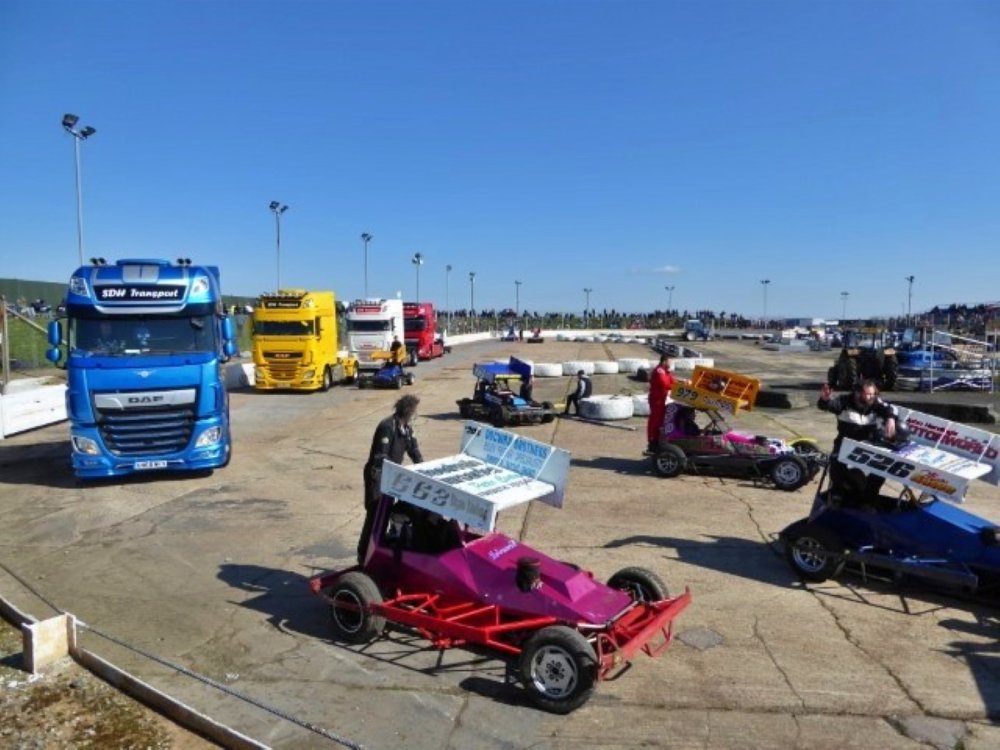
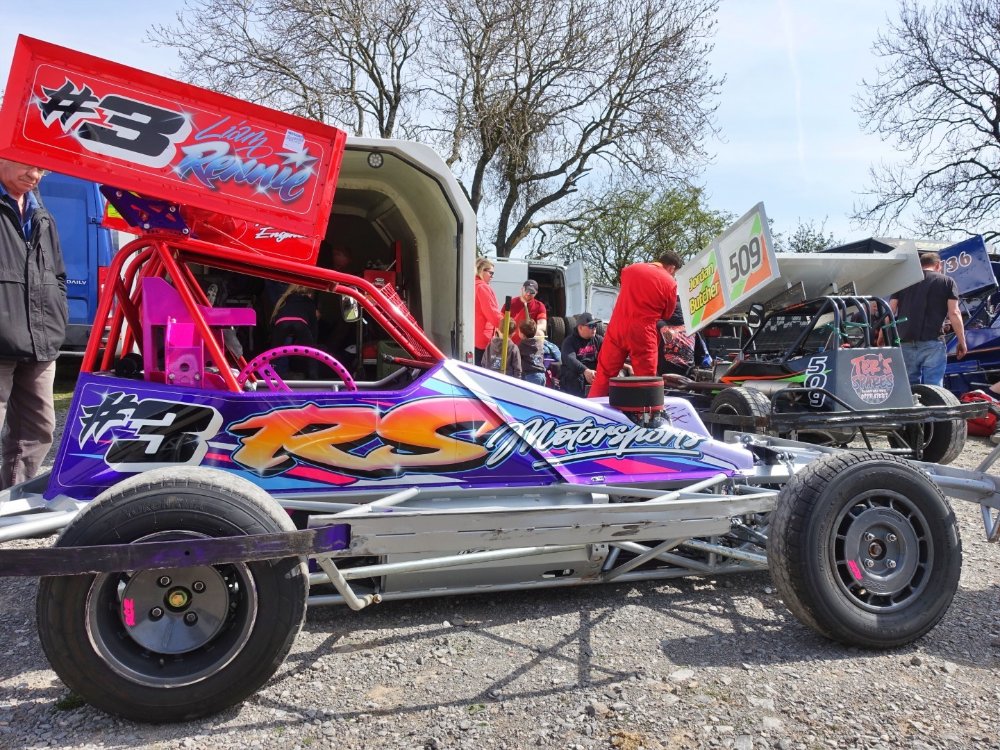
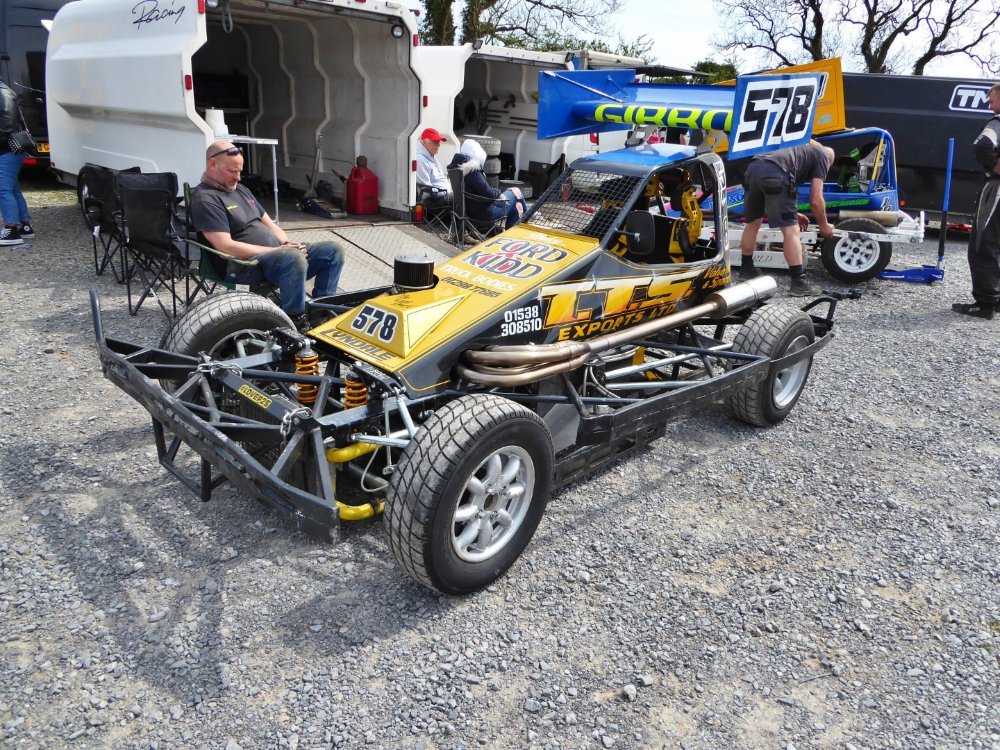
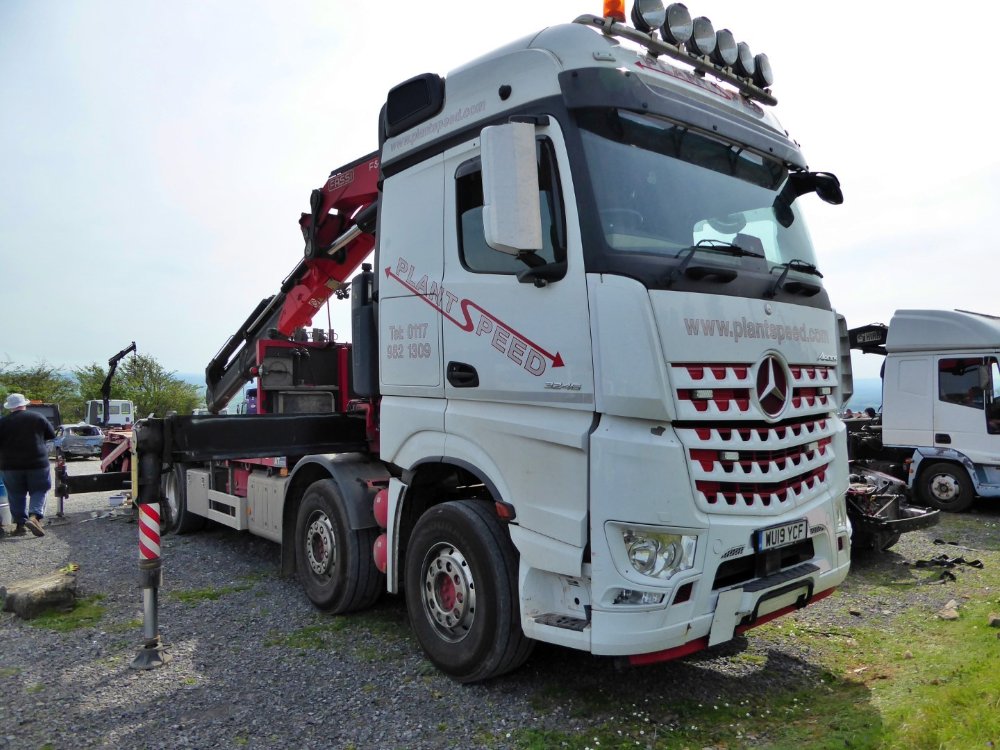
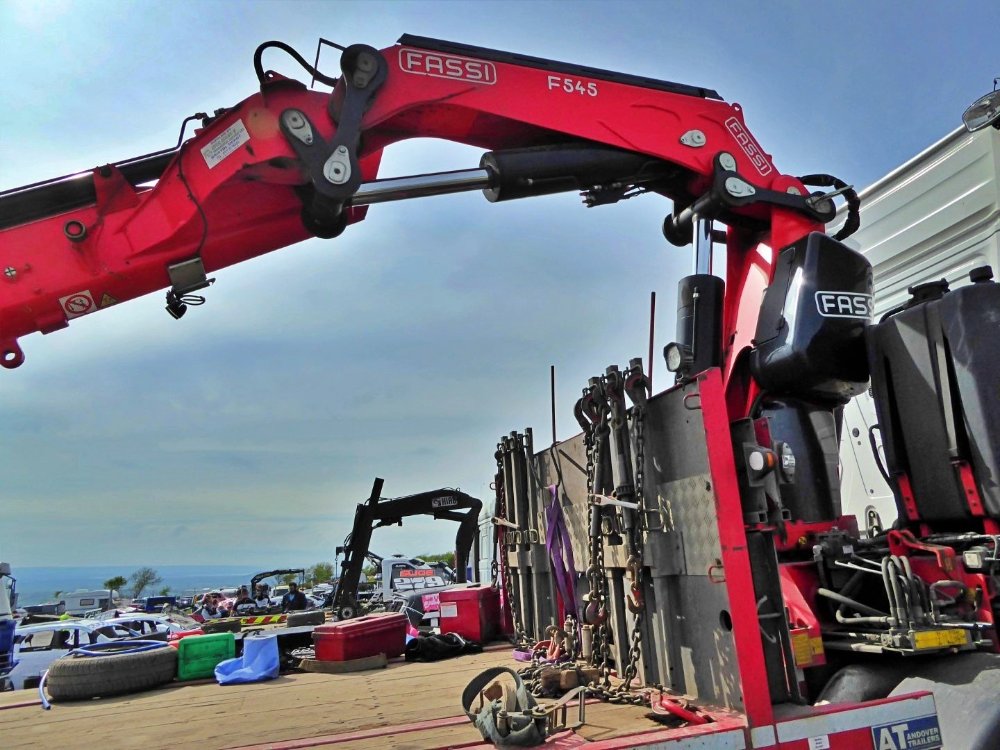
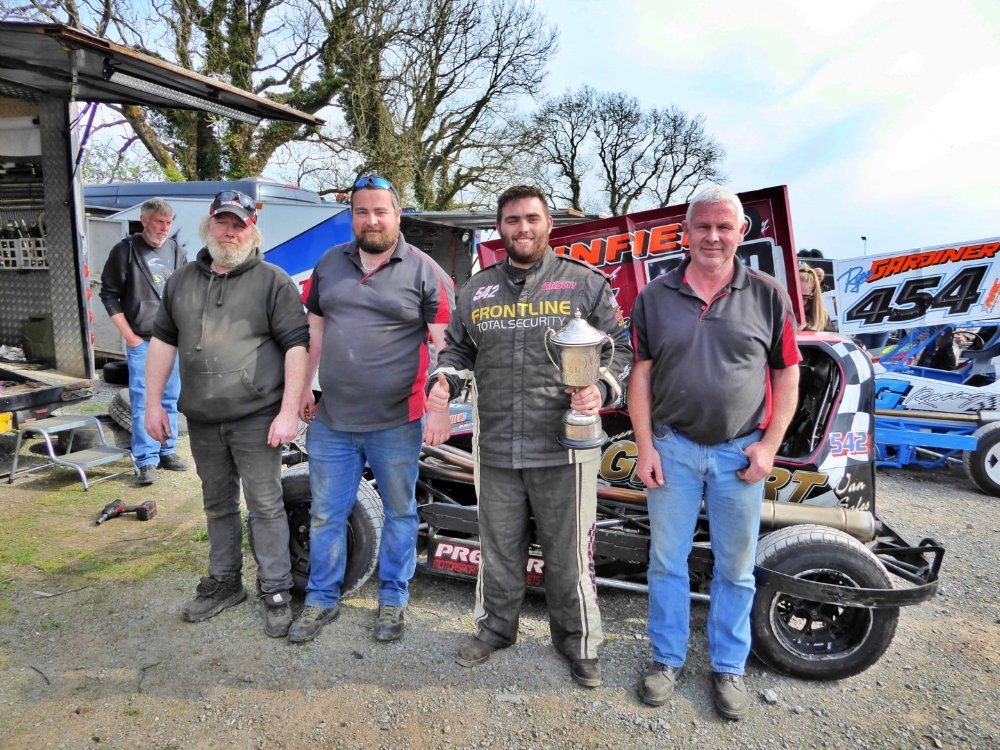
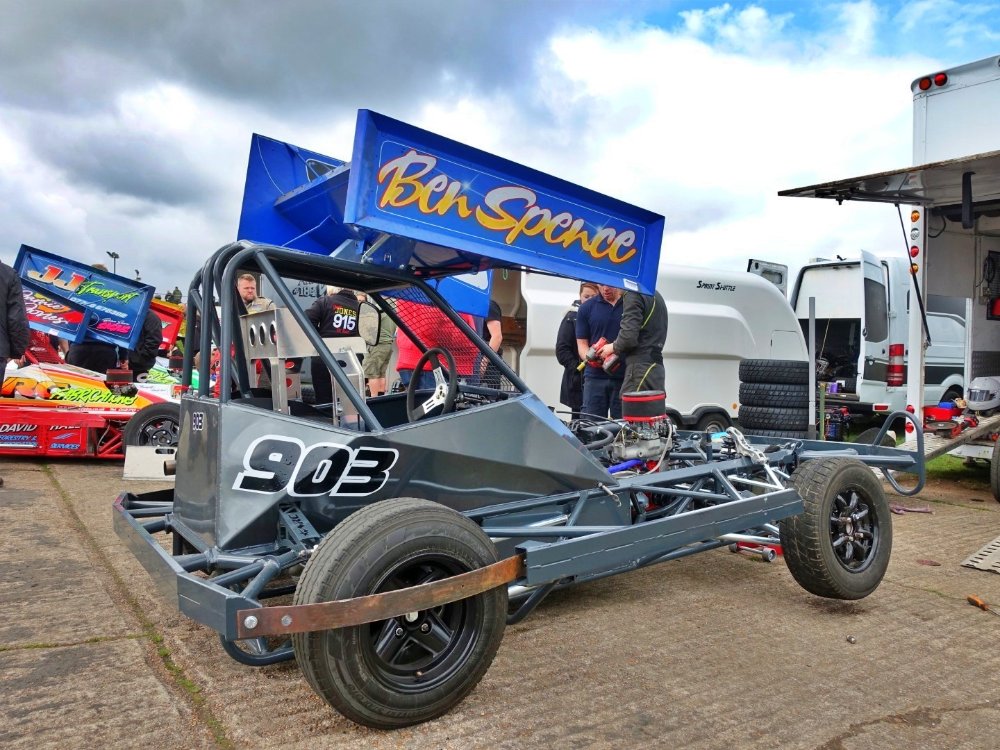
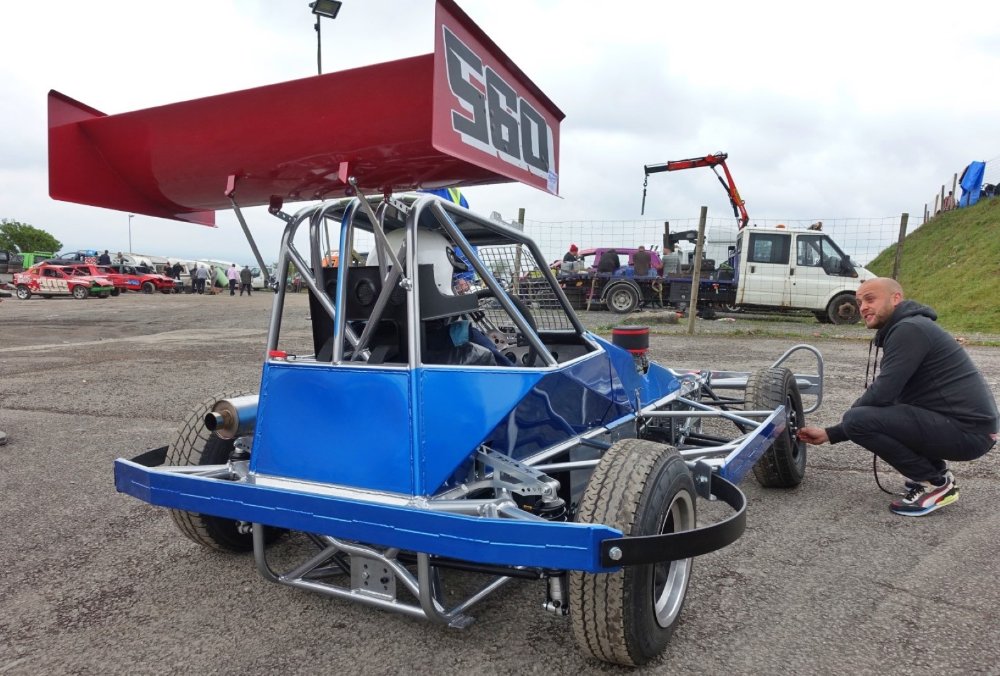
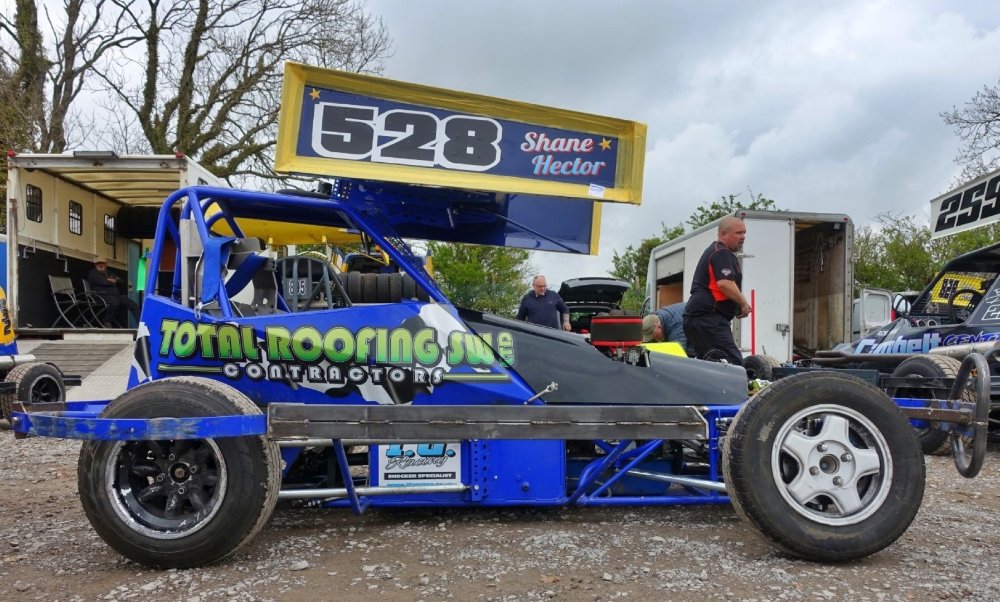
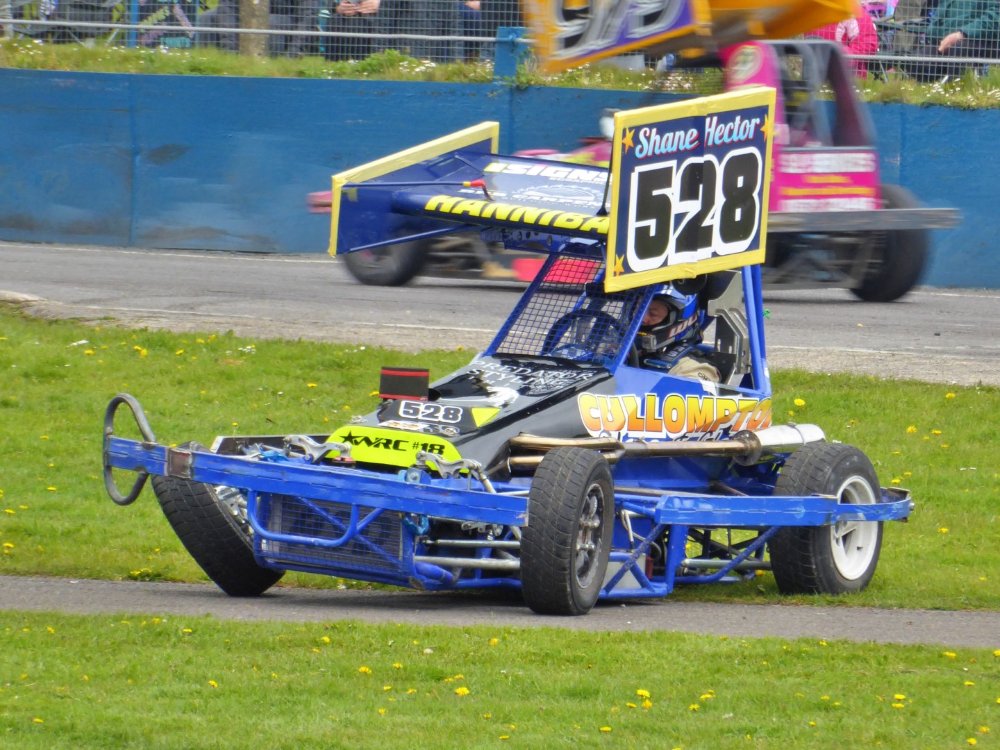
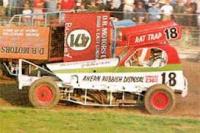
Hi there folks, Welcome back to another off season. As in previous years there’ll be a varied mix of things and places to have a look at. I'll do it in three sections: 1. F2 meetings 2. Out and About 3. Odds and Ends/Miscellaneous Section 1. F2's We start this week with a trip to the south-west for some early season F2 meetings, then head north to West Yorkshire to see what had been revealed by the drop in the water level during the summer at one of the many reservoirs in the area. Following this we’ll see what we can find in the Odds and Ends box before finishing with a look at the Blackpool Transport scene. Ok, let’s get going and head for Taunton. Taunton – Sunday 20th March 2022 The opening meeting of the new national season at Smeatharpe took place under clear blue skies with a very healthy turnout of both drivers and fans. SDH Transport had four DAF tractor units present in grade colours. Matt Stoneman's new RCE Lauren Stack's WRC Rebecca Smith Jessica Smith Junior Buster's new one Pre-meeting photo-shoot for the female young guns The DAFs joined in with the Grand Parade 40 cars raced in a two heat format with Dave Sansom (352) leading from flag to flag in the first 19 car race. Top 3: 352 542 27 The Semtex Kid took a victory lap on one of the DAFs Adam Pearce broke free from the 21 car field to win the second heat. Star grader Ben Borthwick (418) retired from this one after a tangle with Rebecca Smith (931). Top 3: 460 127 184 A 20 car field took to the track for the Consolation. Daz Purdy (259) led the opening stages until he spun around entering the back straight and was run into by two following cars who all hooked together. Harrison Bryant (91) took up the running, with a great battle for second place behind between Paul Moss (979) and Julian Coombes (828). Dave Simpson (208) spun in turn two right across the path of Moss who retired to the infield thumping his steering wheel in frustration. Coombes was then joined by Borthwick and Jessica Smith (390). Whilst Bryant secured the win, it was Borthwick who eventually came out on top for second with Smith following him home for an excellent third place. Top 3: 91 418 390 Dave Simpson's car took a hit to the side Hard up against the cab side The Final featured 28 out of the possible 30 starters and was soon brought under caution when Matt Stoneman (127) found himself turned around against the plating facing the oncoming traffic approaching at speed on the home straight. On the restart Sansom nipped past Matt Hatch (320) to claim the lead, but it was clear that 2013 World Champion James Rygor (783) was the fastest car on track and was slowly closing on the leader. As the last lap board was shown Rygor was within striking distance and heading into turn three he connected with Sansom’s rear bumper with sufficient force to move the yellow grader wide without taking either of them towards the fence. Rygor then had the line to snatch the lead on the drag race to the chequered flag, Sansom ruing his misfortune to lose the lead of a Final on the last bend. Top 3: 783 352 542 James Rygor won the MDP Services Trophy for the 3rd time The 28 car GN took place on a track that had become slippery after an earlier Banger race. Chaos reigned from the off within the star graders as they entered the home straight. Chris Mikulla (522) was sent into a spin with the car bouncing into the air as he tangled with Kieren Bradford (27), with Borthwick and Joe Marquand (789) also being caught up, the latter ramming the infield marker tyres at the end of the home straight. Sansom had again hit the front but for a time the race appeared to be a mirror of the Final, the time the chasing star grader was Stoneman. However, with the lack of grip Sansom looked to be the quicker of the two round the pit bend whilst Stoneman seemed to be able to close in at the Honiton bend. With his progress stalling, Stoneman had to make do with the runner spot behind Sansom to conclude a fine afternoon’s racing for the formula. Top 3: 352 127 736 Bristol – Easter Sunday 17th April 2022 This meeting was the traditional Easter Sunday F2 World Qualifying round. In addition to the local (and not so local… Cornwall is still 3hrs away) south-west drivers, there was a good showing of English drivers from the East and the North-West, together with a duo of Scotsmen. Gordon Moodie(7), a heat winner the previous evening at Cowdie was joined by Liam Rennie (3). Rob Mitchell (905), Aaron Vaight (184) and Phil Mann (53) came down from their bases north of the M62, while Jessica Smith (390) trekked across country from Essex, and Andrew Palmer (606) from Peterborough. Two good looking cars from Mark Gibbs, and Neil Hooper A Mercedes Arocs 3246LS from Plant Speed Fitted with a Fassi F545 crane The 37 cars present were split into two heats as they worked to qualify for the Gerry Dommett Trophy. Heats 1 & 2 were won by Tommy Farrell (667) and Gordon Moodie respectively. Harley Burns (992) made short work of the Consi as the lone red top, leading before halfway and taking a dominant win. Marc Rowe (526) led the opening half of the Final, underlining his current turn of speed. An early caution was required for medical attention to Tommy Farrell after a major coming together on the back straight. He was removed from the track by the medics in attendance, but to everyone’s relief was seen walking back to his transporter later in the meeting. Liam Rennie took up the running just after halfway in his stunning new car, but that lead was short lived as Steven Gilbert (542) muscled his way past with 7 to go. The top five places remained static for the remainder of the race as a red top benefit. Top 3: 542 783 3 The triumphant Gilbert team. Peter ‘The Undertaker’ Gilbert on the left almost cracking a smile! With a virtual carbon copy front end to the damaged 667 car the Jack Cave (801) team start the repairs. Marc Rowe finished the meeting with some reward for his turn of the speed on the day, taking third place in a lower-grade dominated GN behind Harrison Bryant (91) and Dan Kent (976) Taunton – Easter Monday 18th April 2022 Just three days on from the Good Friday evening fixture here the F2’s were back again. A couple of extras that were not there on the Friday were Andrew Palmer (606) and Harley Burns (992). The eventual 37 car entry at the end of a busy weekend was most welcome. A new one for Ben Spence The colour grey for Adam Pearce Heat 1: The opening stages saw Jack Prosser (844) and Daz Purdy (259) tangle on turn four with them both continuing to collide down the home straight. Prosser then spun and was collected by Harrison Bryant (91). Dave Sansom (352) had built up a big lead by the drop of the chequered. Behind, Steven Gilbert (542) went for an attack on Dale Moon (302) for second, but Moon was able to ride out the hit to maintain his position. Top 3: 352 302 783 Heat 2: The second heat required a full restart after chaos broke out on the home straight as Jamie Jones (915) clambered on top of a couple of low graders. Josh Weare (736) also got involved and as the chasing pack went in all directions to avoid the incident Richard Swales (162) was turned around and collected by the pack behind. That caused significant damage to the car and Swales exited the cab heavily winded. When the race got back underway Leah-Nicole Sealy (475), in only her second F2 meeting, drove a controlled race to take her maiden win. She had only made her debut three days prior on Good Friday. The teenager’s achievement was warmly recognised by the crowd. Top 3: 475 915 127 Consolation: As the race began a heavy rain shower passed overhead and as such the drivers struggled for grip having started the race with dry race set-ups. Bryant was the early leader but as he entered the second half of the race the back marking traffic proved an insurmountable obstacle and eventually Ben Goddard (895) found a way past for the win. Top 3: 895 91 53 Final: The Final saw the track mainly dry although very greasy on the outside line. 29 of the 30 qualifiers gridded. Sealy spun out early on but she was in good company as a large pile-up developed between turns three and four claiming Burns, James Rygor (783) and Matt Stoneman (127) amongst them. Charlie Lobb (988) navigated his way to the front managing to avoid a spirited last bend lunge by Paul Rice (890). Lobb had also won the Final at the Good Friday meeting here. Top 3: 988 890 542 GN: 28 cars took to the grid and once again Sansom headed the field, but he had Rygor closing in. The pit bend was proving difficult to navigate with a number of stationary cars scattered around. The pivotal moment came as Rygor looked to be within striking distance but lost grip and headed into the group of stranded cars and out of the race. An untroubled Sansom cruised home for the victory. Top 3: 352 542 127 St Day – Sunday 1st May 2022 At the United Downs Raceway new grades were in force. The headline changes affecting West Country drivers centred on Dave Sansom (352) and Charlie Lobb (988). A Good Friday Final win at Smeatharpe was enough to propel Lobb to red for the first time. This was Sansom's first appearance in the star grade since the summer of 1994. A Good Friday Final win at Smeatharpe was enough to propel Lobb to red for the first time. A couple who had fallen down the grades were Ben Borthwick (418) down amongst the blues, and a drop to yellow for Ben Goddard (895). Welcome regular visitors from the north-west were Phil Mann (53), and Aaron Vaight (184) who won the Final at the opening St Day meeting back in February. 26 cars turned out in pretty wet conditions. Borthwick and Paul Moss (979) won the opening two heats, with Borthwick looking odds on to win the third until an unforced spin left Steven Gilbert (542) to take the victory. The Final saw a chaotic opening half with cars spinning and tangling at various points around the raceway. Paul Rice (890) benefitted from a mid-race stoppage, after which he launched a charge for the lead. Rice went on to win from Joe Marquand (689) and Aaron Vaight. James Rygor (783) won the GN. Results top 3’s: Heat 1 418 979 542 Heat 2 979 35 689 Heat 3 542 352 184 Final 890 689 184 GN 783 689 35 Bristol – Bank Holiday Monday 2nd May 2022 The latest masterpiece from the Wrench workshops made its debut at this meeting. Luke had the help of Jon Palmer (24) for the day Shane Hector was in the much older WRC#18 Daz Purdy 13 cars took the green flag for the first heat, but after two complete restarts there were just eight runners left with Paul Moss (979) taking up an unassailable lead. Top 3: 979 895 542 Moss is too far ahead for the others to catch him in the second heat. Top 3: 979 783 542 The third looks like a shootout between James Rygor (783) and the returning Luke Wrench (560) until the former National Series Champion’s new car suffers mechanical woes leaving the 2013 World Champion to claim the chequered flag. Top 3: 783 976 127 A pile-up in the Final sees an early stoppage. The restart does not get much further before another yellow flag is needed this time for Josh Weare (736) in the turnstile bend plating. As the race finally builds to its conclusion Rygor forces his way past Moss to take top honours. Moss and Matt Stoneman (127) round out the top three. Stoneman wins the GN. Top 3: 127 542 560 Section 2. Out and About follows below:
-

Results for the 2022 Gala meeting from SkegVegas 19th November
Roy B replied to nic's topic in Essential Information
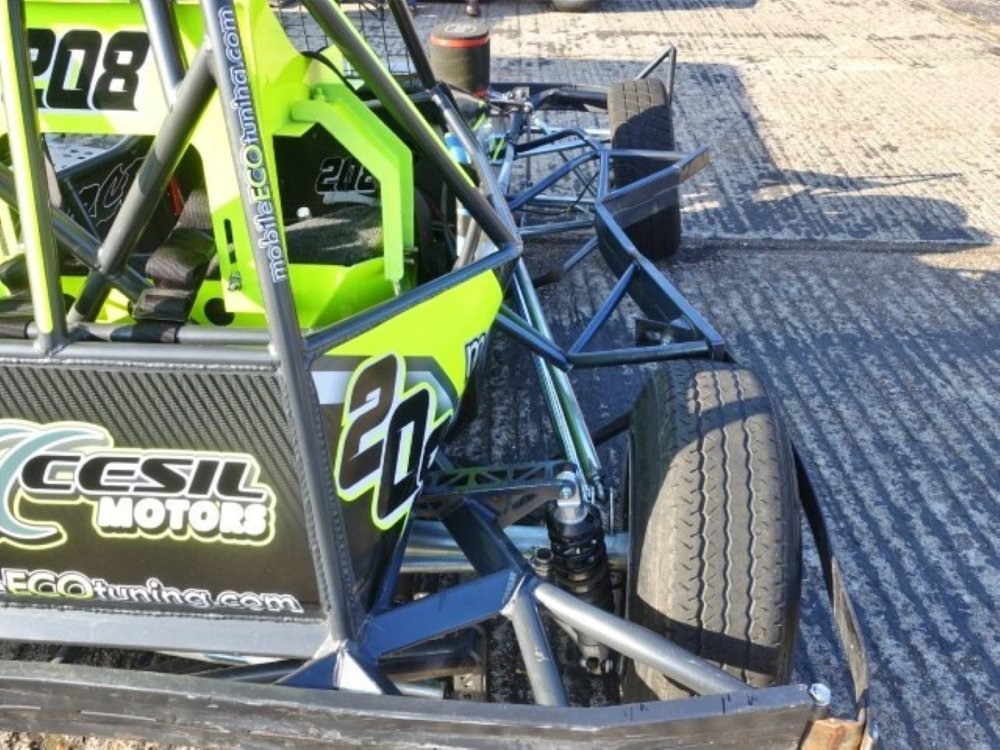
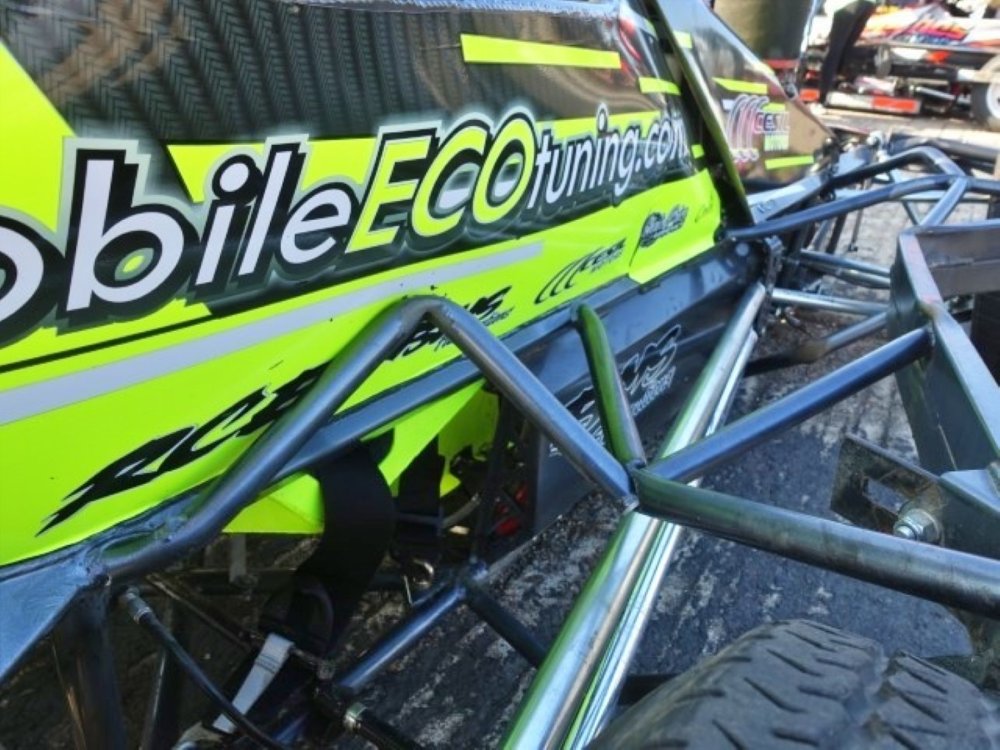
Pics in the gallery folks -
Results for the 2022 Gala meeting from SkegVegas 19th November
Roy B replied to nic's topic in Essential Information
Final Focus: 132 leads away. A big pile up in turn 2 starts the race off on the opener. 219 and 343 crash out in turn 1. 84 and 318 are carving through the field. The engine note of these two sounding superb. 195 stopped on the exit of turn 2 gets collected by 568. All ok. Caution for stranded cars. 318 fires it up the inside of 84 on the restart. 84 sends 16 sideways through turn 3. 350, 161 and 37 come to grief in turn 1. Caution flags. The restart sees a spectacular turn 1 battle with 8, 16, 84 and 318 all going for the same piece of track. Tom comes out first, with Speaky last! 68 and 324 clash exiting turn 1. 132 is in the lead. 175 fires 392 hard into turn 3. 84 now in 2nd. 5 to go has the Hitman in to the top spot. The last lap sees 8 go for a big last bender on 132, but she bounces off and lays a big smokescreen as she recovers from the ensuing spin. That's it for this year folks. Have a good winter everyone. Back from the King's Lynn 2023 season opener. In the meantime join me for the Off Season out and abouts which return next week 👍 -
Results for the 2022 Gala meeting from SkegVegas 19th November
Roy B replied to nic's topic in Essential Information
Heat Three Happenings: 86 leads away. The opening lap sees 84 give 318 a hurry up hit into turn 1. Rob takes on 16 into turn 3. 68, 16 battle with 318 through turn 1 next time around. 536 is leading. With 1 to go 381 puts a top class move on 536 entering turn 1 with a super hit to the back corner which spins Ben out mid-turn. Tyrone takes the win 👍 -
Results for the 2022 Gala meeting from SkegVegas 19th November
Roy B replied to nic's topic in Essential Information
Heat Two Happenings: 132 leads away. 560 and 526 spin out in turn 3. 21 moves through the field with good use of the front end. 43 goes around in turn 4. 536 has set sail up front for the win. -
Results for the 2022 Gala meeting from SkegVegas 19th November
Roy B replied to nic's topic in Essential Information
Pit News: 84 - Tom checking out the distributor cap and leads. 68 - Left rear links bent and shocker u/s. H6 (326) - Prop-shaft removed. -
Results for the 2022 Gala meeting from SkegVegas 19th November
Roy B replied to nic's topic in Essential Information
Heat One Happenings: 132 leads away. 532, 68 and H6 crash out in turn 3. 172 and 298 tangle in turn 1. 226 runs in the back. 157 pots 324 into the stationary turn 3 cars. Caution. 132 heads the restart. 84 up to third at this early stage of the race. 318 fires 175 into turn 3. 84 takes the lead from 132. As Tom takes the win 219 hits a backstraight infield marker tyre and comes to an abrupt stop. -
Results for the 2022 Gala meeting from SkegVegas 19th November
Roy B replied to nic's topic in Essential Information
Pit News: 350 - Porta power on the right rear corner. 489 - Front right corner cut off and right nerf rail bent up. 8 - Welding front right corner. Shocker top mount sheared off. -
Results for the 2022 Gala meeting from SkegVegas 19th November
Roy B replied to nic's topic in Essential Information
U25 Race Re-Cap: 489 leads away. 8, 350 and 343 get clattered into the turn 2 fence on lap 1. Caution to remove the cars. The restart sees 381 ride the kerb into turn 1 to take the lead from 489. 555 pulls off with a flat right rear. 147 and 132 put a combined hit in on 489 who whacks the turn 2 fence and remains there. 381 and 368 have broken clear up front. 20 hold off a fast charging 124 for a number of laps. The 124's rear left brake disc glowing. 381 has pulled away from 368 until with 2 to go the left rear tyre lets go putting Tyrone into a spin into turn 1. Callum takes the flag from 124 who makes a heroic try at a last bender but is way, way back and drifts wide through the turn. -
Results for the 2022 Gala meeting from SkegVegas 19th November
Roy B replied to nic's topic in Essential Information
Welcome to Skegness folks BTCC Race Re-call: 389 leads away. 326 and 544 tangle on the inside of the backstraight and remain there. 524 now leads. 47 piles 389 into turn 3, followed by 73 in turn 1. 73 tried a comeback hit but just missed. With 3 to go 47 catches 524 and hits him wide in turn 1 and heads for the chequered. All the lads had good speed and it would have been great to see them race the whole meeting. -
Shoot Out Finale - Bradford 12th November 2022 Results
Roy B replied to nic's topic in Essential Information
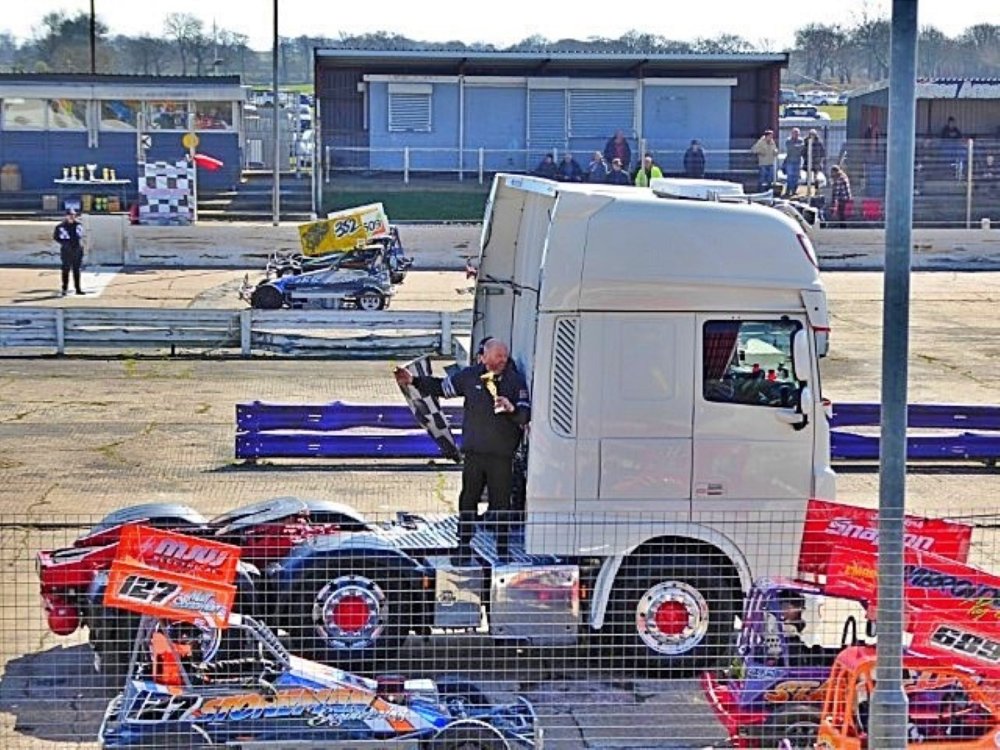
Pics in the gallery folks -
Shoot Out Finale - Bradford 12th November 2022 Results
Roy B replied to nic's topic in Essential Information
HS Summary: 136 leads away. 289 scatters the tyres along the backstraight on the opening lap. 345 rides up the inner wall on the homestraight with a train of cars pushing. Caution to help Jakey to safety. Shortly after the restart 21 goes for a spin in turn 2. 34 puts a hit in on 166 into turn 3 but ends up half spinning himself. Caution for a stranded 211 in turn 3. 78, 216 and 217 are the top 3. 216 and 78 drift wide in turn 1 which lets Lee through to the lead. 338 takes 555 to the homestraight concrete blocks and JJ spins out at the entrance to turn 1. 463 is stopped in the middle of turns 1 & 2 for the remainder of the race. Everyone has to make the decision to go inside or outside as they approach. 55 has a right rear let go with 2 to run. 78 jumps a tyre with 338 on the last lap. Congratulations to Tom on retaining the silver roof 👏 That's it folks. Back from Skegness 👍 -
Shoot Out Finale - Bradford 12th November 2022 Results
Roy B replied to nic's topic in Essential Information
Final Focus: 548 leads away. 84 on it from the get go. An attempt to shift 217 with a nerf hit came to nothing though. Next lap 217 puts a hit in on 212 into turn 3 which slows him slightly. 16 delayed by 21. Mat pulls off soon after. A turn 3 pile up involving 166, 212, 21, 545 and 45 brings out the caution. 93 leads off the restart with 217 and 84 in 5th and 6th. 84 gets past 217. Lee then lets rip with two spectacular hits on Tom. He straightlines it into turn 1 to make contact with the 84 rear corner, but eclipses this with a killer blow into turn 3 which has the 84 car facing the wrong way with a deflated front tyre. Caution to remove stranded cars. Lee gets a big cheer from the grandstand and encourages the crowd on. Restart has 93, 249 and 217 as the top 3. 55 and 21 tangle exiting turn 4. After getting by 249, and slowly closing on 93 the 217 car cruelly has a right rear tyre let go entering turn 1. Lee continues but obviously drops down the order. Sam takes the win. -
Shoot Out Finale - Bradford 12th November 2022 Results
Roy B replied to nic's topic in Essential Information
Pit News: 555 - Front axle damaged, both front shockers u/s, and link bars bent. 364 - Assessing the rollover damage. -
Shoot Out Finale - Bradford 12th November 2022 Results
Roy B replied to nic's topic in Essential Information
Consolation Catch Up: 424 leads away. 555 goes around in turn 3 coming to the green. 84 is pulling away from 515. 238 tangles with 268 in turn 2 bringing out the caution. On the restart 34 gives 289 a hurry up into turn 3 who connects with 351 which removes an engine bay panel from John's car. Caution for debris. The restart sees a huge 'payback from Sheffield' hit from 216 on 364 entering turn 3. Both bounce off the fence. 555 gets caught up in the melee and spins in avoidance. Caution. At halfway 84 has a small lead over 515. 364 catches the backstraight fence and gets launched into a roll. The car comes to rest right way up with flames coming from the engine bay. Caution to get Rob to safety. All ok. The restart sees 84 open up an immediate gap to 515 who is left to fend off a determined 216 until Jack gets a flat right front. -
Shoot Out Finale - Bradford 12th November 2022 Results
Roy B replied to nic's topic in Essential Information
Pit News: 235 - Porta power on the right rear corner. 84 - Cleaning an accumulation of shale out of the left rear brake assy. 136 - Working on the front hub. 351 - Sledgehammer being used on the front left corner. 44 - Replacing right front upper link rod. 2 - Losing oil pressure. -
Shoot Out Finale - Bradford 12th November 2022 Results
Roy B replied to nic's topic in Essential Information
Heat Two Happenings: 44 leads away. The left rear tyre parts company from the 84 car who gets black-flagged a few laps later. Stationary 44 and 351 create a chicane through turn 3. 515 suffers a flat right front and pulls off. 4 to go sees 55 through to the lead. -
Shoot Out Finale - Bradford 12th November 2022 Results
Roy B replied to nic's topic in Essential Information
Welcome to Odsal folks. Heat One Happenings: 136 leads away. 338 spins it on the homestraight on the first lap. 389 gets out of shape next time around and finishes on his roof in turn 1. Caution. 548 heads the restart. 18 climbs over 78's bonnet in turn 2. 34 ends up underneath 211 on the exit of turn 2. Phoebe is left pointing skywards. Caution. 587 tries an inside move on 548 coming to the green who holds his line which forces Sam into the fence. The 587 car then rolls it with 364 piling in and finishing on top. Caution. 18 goes around in turn 3 and 217 is through into the lead. Lee takes an outside line around a backmarking 136 through turn 4 which momentarily slows him and allows 16 to close in. 217 gets held up by 78 which lets 16 through for the lead. From halfway the top two remain this way until the chequered. -
Hednesford NPC Shootout Round 9/2023 WCQR 7
Roy B replied to calamity507's topic in Essential Information
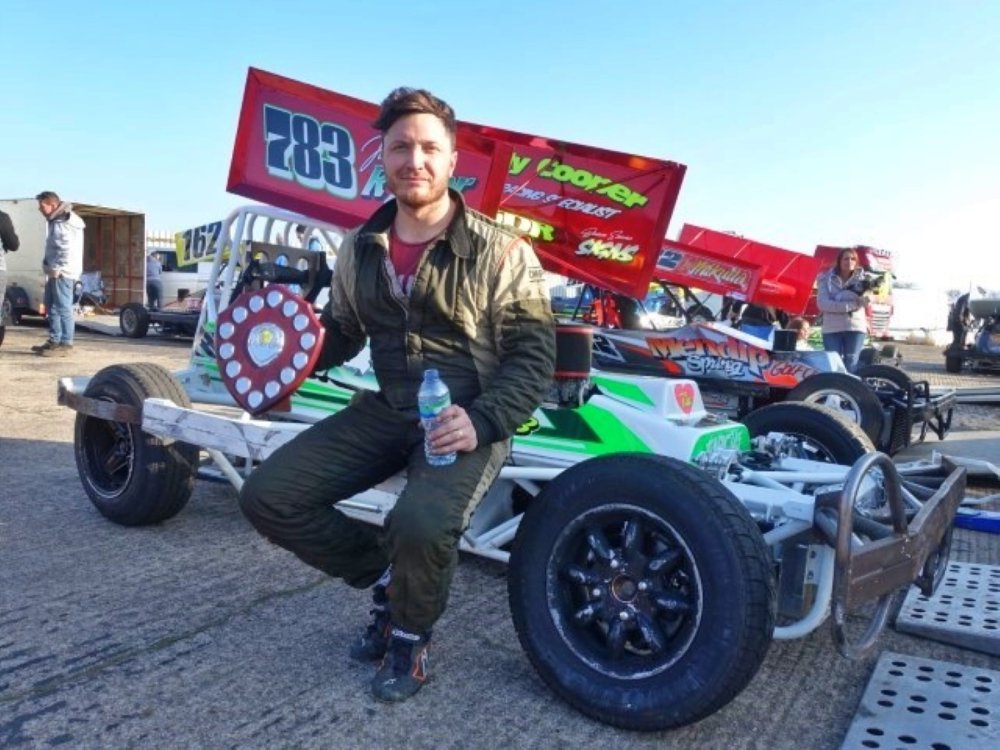
Pics in the gallery folks 👍 -
Hednesford NPC Shootout Round 9/2023 WCQR 7
Roy B replied to calamity507's topic in Essential Information
HS Summary: 87 leads away. 501 and 25 tangle on the exit of turn 4 on the opening lap. A big pile up in turn 1 sees 157, 175, 345, 8, 5, 217 end up in a heap which brings out the yellow flags. 87 heads the field after the caution. 211 spins it and stops broadside in turn 1 on the resumption bringing out the caution. The restart sees 381 into the lead. Turn 1 claims a few on the greasy/oily surface. 16 spins out. 12, 2, 73 and 87 all slide into the fence. 217 drifts wide and hits the fence. 501 hits the fence hard followed by 524. 87 runs into the back. Caution flags. 515 heads the restart from 381 and 84. 16 pulls off with a flat front right. 166 up to 6th. 5 to go sees 515 extend his lead over the now 2nd placed 84 car to claim the win. That's it folks. Back from Odsal 👍 -
Hednesford NPC Shootout Round 9/2023 WCQR 7
Roy B replied to calamity507's topic in Essential Information
Pit News: 319 - Changing front left shock. 2 - Adjusting left rear shock. 498 - Removing a damaged front wing. 381 - Tyrone missed the Final owing to a broken lift pump. 464 - Distributor under investigation after the car kept cutting out in the Final. 217 - Changing alt.belt. 47 - Rear panhard rod to change. 157 - Suspecting a dodgy starter motor. Adam giving it a few clouts with a 2lb hammer. -
Hednesford NPC Shootout Round 9/2023 WCQR 7
Roy B replied to calamity507's topic in Essential Information
Final Focus: 489 leads away. 157 and 498 clash into turn 3 on the opener and end up locked together losing laps. 175 and 25 pile in the next time around which separates the two cars. 25 hits the turn 1 fence with 47, 20 and 211 going in with him. 47 hits the turn 1 fence on the next lap which brings out the caution to help Simon to safety. 489 heads the restart. A lap down 20 sends 489 wide into turn 1 which costs Harrison the lead. After being passed by 84 in the first part of the race 515 takes the place back with an inside move into turn 1. 84 repasses on the next lap with Frankie getting the place back next time around. 217 is the next on the scene to challenge the 84 car until a close following 8 puts a big hit on Lee into turn 3. 84 is ahead of 515 again before a caution for a stranded 489 in turn 1. 166 heads the restart. Tom loses a place to 515 in turn 3 before taking it back entering the backstraight by easing Frankie wide who brushes the fence. 166, 84 and 515 are the top 3 and remain in this order to race end. All three are equally spaced out with just enough of a gap to prevent any last benders between them. -
Hednesford NPC Shootout Round 9/2023 WCQR 7
Roy B replied to calamity507's topic in Essential Information
Pit News: 368 - Rear bumper sheared off and right rear shocker u/s. 524 - Adjusting torque rod.