Roy B
-
Joined
-
Last visited
-
Days Won
188
Everything posted by Roy B
-

Skegness Results - Saturday 19th September 2020
Roy B replied to nic's topic in Essential Information
Many thanks to Ben for volunteering and doing a sterling job at the track, & to Nic for being Jane. -
Thank you Jane, but you have to work equally as hard giving up your free time to post them. Also folks thanks for the kind words regarding the mini race reports. Hopefully these can go some way to fill the gap owing to the obvious loss of the pit news. Pics now in the gallery. If anyone can post a few, plus results from Skeggy next Saturday it would be a great help as i'm at Taunton for the two-dayer. You'll have no problem hearing them as Speaky has got the the p.a system spot on.
-
I've sent you a pm Jane
-
Yes that's fine Neil. Just let me know as and when 👍
-
Great pics, and a very tidy workshop. What compost are you using to grow those two wings in the back garden? 😃
-
I have some results from 1993 Neil if you still require them. Also i have 1992 stuff but it's mainly Heat and Final winners only, and not from every meeting, if that's of any use to you.
-
Pics now in gallery
-
Pit news using night vision goggles: 401 - Left half shaft sheared inside diff. Loading up. 147 - Straightening the front axle. 127 - Adjusting the brake balance bar.
-
Pit news using binoculars: 217 - Adjusting outside rear spring 43 - Changing front hub. Stub axle bent.
-
Pics now in the gallery. Only a few unfortunately owing to the restriction on pit access.
-
The cream has risen to the top folks. In the new gradings Jon is up to Superstar, and Harley goes straight from white to red! Subject to confirmation V8's are on the bill too, so we'll be halfway to seeing an F1 around there.
-
( continued from above) Before heading up to Taunton for day two a repeat visit to the disused tailings dam close to the United Downs stadium. It resembles another planet with all sorts of weird colours and eroded gulleys. Smeatharpe – Monday 17th August 2020. Torrential rain proceeded the meeting up to start time leaving the track very wet. 36 cars containing travellers from all corners of the UK filled the pits. One of which was Luke Wrench (560) who had got his dummy back in, and realised that maybe he had been a bit hasty in his views. Heat one: Thanks to Luke’s attendance a feature of this race was a tremendous duel between the 560 car and Sunday’s Final winner Jon Palmer (24). For lap after lap the WRC built cars raced side by side with Jon on the outside gaining the extra traction coming out of the bends. Luke would draw alongside at the end of the straight and Jon would edge ahead again. It was resolved in the 24’s favour as 560 backed off near the end. In the meantime, up front, Ben Goddard (895) had worked his way into the top position and claimed his second win of the season. Result: 895, 24, 560, 126, 736, 538, 539, 488, 251 and 992. Heat two: Dale Moon (302) and Matt Linfield (464) battled for the lead in this one with wet track specialist Linfield not willing to risk a last bender on the 302 car. Result: 302, 464, 572, 542, 184, 783, 320, 183,890 and 828. Consolation: Wayne Wadge (920) led from flag to flag to win by a quarter of a lap from Paul Moss (979), who had the attentions of Justin Fisher (315) and Ben Borthwick (418) to contend with. Result: 920, 979, 315, 418, 210, 325, 387, 411, 731 and 835. Final: A couple of caution periods in the early laps of this one. Scottish visitor Jason McDonald (387) was left stranded across turn three. Within short order Sam Jacklin (731) needed the waved yellows after being cannoned into the plating by Jon Palmer to slow himself down after a hit from Steven Gilbert (542). At the restart Harley Burns (992) led the field away in confident style. Nothing seems to faze young Harley and he is a joy to watch. Eventually the 24 and 542 cars overhauled Burnsy, but Gilbert was unable to relax as 992 tracked his every move. He even rode out a last bend hit from Jamie Avery (126). Great stuff! Wrench, the track points leader saw his hopes ended after he had a spat with Guinchy (183). It ended with Luke making sure Charlie would go no further. Payback will be very interesting! “Really dry yesterday, really wet today,” a jubilant Palmer said. “Gilbert had a go early in the race but I offloaded his hit into Jacklin” Result: 24, 542, 992, 126, 539, 418, 464, 736, 302 and 783. GN: This race was for the Ash Sampson Memorial Trophy. Sampson’s grandfathers, Roy Goodman and Mick Whittle led the first of two rolling laps in Ash’s old cars. Roy who is in his nineties jumped in and out of the car like a young’un. Incredible! Another victory chalked up to Harley in this with Wadge following him home to claim the August Accumulator title. JP’s charge through the field from the lap handicap was spectacular with the front bumper seeing prodigious use. Result: 992, 920, 184, 539, 736, 890, 210, 126, 560 and 783. Hard luck story of the meeting goes to Bolton’s Phil Mann (53). He was unable to race owing to a hose blowing on the van which mean’t the first half of the meeting was spent trying to sort it. Saloon numbers were a bit thin on the ground. Billy Smith (161) has attended every meeting in the country since the start of the year. He was by far the entertainer tonight. Junior Buster (902) was on the receiving end of some very big hits every race as Billy went on the rampage. “He’s going up the wall all night,” were Billy’s words. Final top three: 980, 476 and 28. So ended yet another superb couple of meetings. Many thanks once again to all. A few pics in the gallery from St.Day.

-
MR “BOX OFFICE” BAGS BACK TO BACK FINAL WINS Jon Palmer (24) at the United Downs Raceway with the first of his two weekend Final wins In the latest F2 racing action in the south-west Plymouth’s Jon Palmer (24) makes a clean sweep of the meeting Final’s at United Downs, & Smeatharpe in the third Sunday-Monday double. United Downs Raceway – Sunday 16th August 2020. With the non-appearance of the predicted thunder storms a very entertaining afternoon’s racing took place on a dry track. 35 cars were on hand to do battle around this tricky five cornered Cornish pasty shaped track. Furthest traveller this week was red roofed Jason McDonald (387) from Turriff in Aberdeenshire. A mammoth 1400 mile round trip, with 12 hours driving each way. That is total commitment. From northern England Phil Mann (53), Aaron Vaight (184) and Sam Jacklin (731) also put the miles in to support Autospeed’s endeavour to get the racing scene back to some normality. No, you haven’t misread Sam Jacklin in an F2. He’s sold the F.1’s and is making life a bit easier running the smaller cars. A neat reversal of his racing number and job sorted. Heat one: Teenage sensation Harley Burns (992), on his track debut, led from early on to record the victory. 184 ended piled up with Dale Moon (302) and Matt Westaway (835) on the inside of turn four. Result: 992, 920, 572, 24, 736, 542, 663, and 828. First 8 to the Final. Heat two: Steve Hartnett (539) took another win for the lower grades in this one. A tremendous no-holds barred battle was raging in the mid pack culminating with Charlie Guinchard firing Joe Marquand (789) into the plating with a last bend hit for 5th place. Result: 539, 315, 895, 126, 183, 689, 979 and 325. Consolation: A fair few blue and red graded drivers had to try for a second chance to qualify in this race. 302 got the victory, whilst a battle between Paul Rice (890), Matt Hatch (320) and McDonald ended with the Scotsman claiming the last qualifying place. Result: 302, 127, 184, 418, 538, 251, 464, 196, 820 and 387 Final: Twenty-six cars gridded to try and win the Nostalgia Trophy. The race was punctuated with caution flags such was the fierce action. Justin Fisher (315) ended up side on to the traffic by the start line, Julian Coombes (828) climbed up Phil Chapman’s car (196) with both jammed up against the turn four plating, and then Ben Goddard (895,) and Craig Driscoll (251) repeated the trick. Whilst all this had been going on young Burnsy had been maintaining the lead. Another caution flew when Josh Weare (736) hit the stranded cars of James Lindsay (572) and Chris Hatch (820) who were stuck in turn four. Just prior to the yellows Guinchy launched British Champ Steven Gilbert (542) into the pile. This led to much gnashing of teeth and finger waving at Charlie from Steve’s dad Peter. The star men had worked their way closer to the front by this stage and at the drop of the green Harley had but a couple of laps before Jon Palmer (24) appeared in his mirrors. Having bashed his way through the field Jon passed the 992 car cleanly. As much as he tried he was unable to shake the youngster off, but owing to his unfamiliarity with the circuit, and not wanting to throw away a secure 2nd place Harley decided against a last bender. JP commented after his victory that the 992 car was the quicker of the two. Despite his incident with 183 Gilbert finished in 3rd place. He wasn’t too complementary about Charlie in the post-race interview either. He needn’t have been worried about more of the same in the GN though as the engine blew up in the 183 car before race end. The Guinchard team are going through some rotten luck at the moment. Result: 24, 992, 542, 302, 689, 538, 387, 126, 325 and 539. GN: Burns took his second victory of the day with Gilbert following him home. Result: 992, 542, 302, 184, 418, 538, 920, 24, 320 and 251. Last week Luke Wrench (560) stressed his desire to claim all three track championships in the south-west. This week he spat his dummy out and cancelled his bookings for both meetings. He wasn’t happy about the lower graders earning more points than him in the August Accumulator series owing to the multiplication factor. He knew the point scoring system of the series at the start so to criticise it when it’s over halfway through doesn’t make much sense to me. Fifteen Saloons were in attendance. Notable incidents were the continuing entertainment between 161 v 902 which saw Billy spin Buster out in heat one, and then the rear end destruction of the Phil Powell (199) car at the front of a four car train entering turn four in the Final. This required the attention of the Autospeed fence repair team to fix the plating. Final top three: 902, 161, and 00. (continues below)
-
Thanks lads!
-
Cheers Hary. It's good to have you back.
-
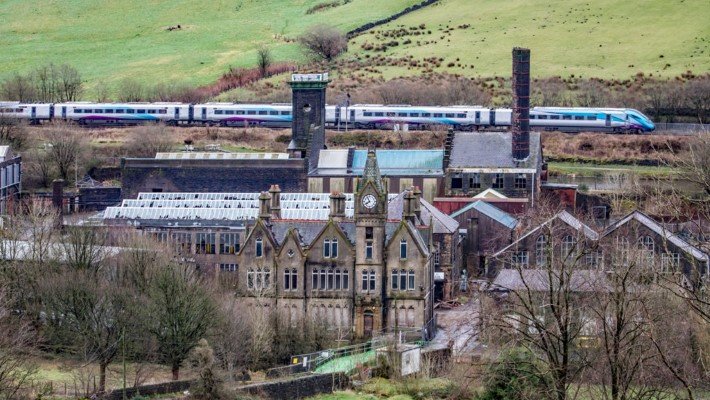
(continued from above) The W.H.Shaw Loom Works site before demolition. Pic credit to the Lone Ranger. Up until a few weeks ago you would have come to the old W.H.Shaw’s Dobcross Loom Works on your left hand side. This was the most impressive building in Diggle. The loom works were built in 1860, with the main chimney added in 1863. The centre-piece was the office building built in 1890.It was known locally as “The Cathedral” and had a Gothic style 4-stage clock tower. This was connected to the works by a link bridge. The works were extended between 1890 and 1900. The company was a world leader in the manufacture of textile machinery, and the “Dobcross Loom” was exported worldwide in the late 19th century. A lot of the original buildings were lost due to a huge fire in 1925. Serious reconstruction followed with the addition of a water tower. The buildings were used for munitions in World War 1, and for making parts for Russian submarines in World War 2. Between 1969 & 2006 the site became the one of the largest pallet works in Europe. It last saw use as an injection moulding business. There was a huge auction at the site in March 2007. Just a few of the items sold: Eight fork lift trucks, pallet trucks, Climax 90 Sideloader, Rolls Royce diesel generator, Ford tractor, gas fired steam boilers, Atlas air compressors, pressure washers, Mig Tig welders, power hacksaws, three Scania sleeper cab tractor units, Leyland Daf 85 330 shunter and a Ford Transit 190 dropside tipper. The factory even had its own buses. In 2015 an application for planning permission to demolish the existing buildings on site, and construct a new school were submitted. In July 2019 the plans were approved with the exception of demolishing the office building, clock tower and link bridge. These have been given Grade-II listed status. On an earlier visit to the area to do a reccy for access to the tunnel i had a look around the works. Much to my now deepest regret I didn’t have a camera with me on that day. The industrial delights this place had to offer were superb. There was a mixture of different buildings all with their own character. Some of the floors were like a skating rink with all the plastic beads left behind from the injection moulding business. The ground floor of the admin block was simply stunning. Plush carpets throughout, tiled walls, stained glass windows and a very high standard of fixtures and fittings. A wonderful decorative cast iron spiral staircase led to the upper floor. The owner of the pallet business was offered thousands for this but would never sell. He appreciated the grandeur and history in that part of the site. The Victorian clock in the tower was a thing of beauty. This had been looked after by Maurice Brayford, a retired chap who used to enjoy keeping it going even after closure. He would visit the clock three times a week to keep it wound and check everything was in order. He managed to replace a worn out part of the clock mechanism by fettling a metal insert from an old Wellington boot. It fitted perfectly to within a thousandth of an inch! Time is standing still now though. In 2015 vandals smashed and bent a major part of the mechanism. The internal workings have been left irreparably damaged. Maurice was left devastated as the clock had become part of his family over the years. It got him out of the house and gave him something to look forward to doing. It literally brings tears to my eyes to think how heartbroken he must have been. Metal thieves have ransacked the site over the years and lead flashings/slates have been removed from the buildings. When I returned to photograph the tunnel i planned a repeat visit to the works. Too late!! The demolition gang were on site which made access highly dangerous. Conveniently the listed connecting bridge between offices and works “accidently” ended up being torn down. Apparently one end of it was attached to an unlisted building and when that went down it took the bridge with it. This great pic shows the old tunnel arrowed, the canal, and the W.H.Shaw's site as a train heads for Manchester I’ve been back since and the site is now cleared apart from the clock tower etc. I’m kicking myself for not having a camera with me that first time. A missed opportunity for sure. This is the second time this has happened. I went (with camera this time!) to have a mooch around inside 10 Shop at the Crewe Locomotive Works. Guess what? Demolition day again!! Pics of all this write up in the gallery. That’s it for now folks. Thank you for coming along with me on these travels through this extended close season period. Back with plenty more at the end of this short F1 season. Nic isn’t going back racing just yet so Jane and I will be doing the results. Whilst the pits are out of bounds i’ll try and get a bit of pit news, and a few pics using binoculars and a zoom lens! Cheers, keep safe, Roy
-
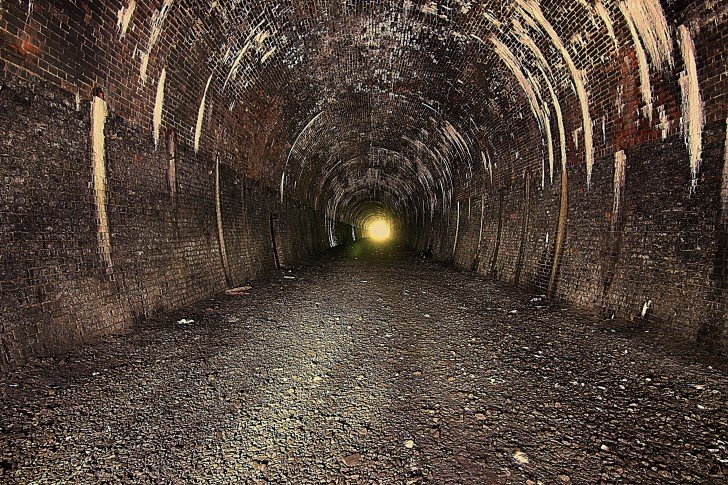
(continued from above) Let’s go and have a look at the tunnel then. We make our start from Diggle which is in a very picturesque setting in the foothills of the Pennines. It was an important centre of the woollen and textile trade. The Huddersfield Narrow Canal enters Standedge tunnel here. The tunnel took sixteen years to build using only gunpowder, picks and shovels. It was opened in 1811 and was used extensively until the last working boat passed through from Dewsbury to Mossley in 1921. Its decline for goods movement came about with the advent of the railways. In addition to this there is no towpath so the boats had to be legged through by the crew. They had to lie on the top of the boat and walk it through along the walls or roof of the tunnel. It is the longest and deepest in the country, and can take a modern diesel powered narrow-boat up to two hours to get through the three and a quarter mile distance. In the mid 1800’s there were inevitable delays as queues formed at both ends. By the mid 1970’s the canal was derelict and partially filled in, but thankfully a team of volunteers were successful in obtaining funding to restore it. Re-opening came in 2001. Walking alongside the canal and the main line we come to Diggle Junction signal box. Opened in 1885 it is still functional today, but living on borrowed time. A staff redundancy occurred in 2005 when Marmalade the signal box cat was given early retirement. He had transferred from Brewery Sidings box at Miles Platting in 1998. This was at a time when the railways still looked after their valued employees! As we get closer to our goal we cross under the main line via a brick built foot tunnel. This was constructed by the railway company to enable farmers and mill workers access to both sides. The disused track-bed now becomes very overgrown. In winter it is a quagmire and you invariably end up wading through a thick layer of muddy soup. As the tunnel comes into view the first thing you’ll notice is the absolute blackness within. Time to get those torches out folks. To be honest they will only illuminate a very small area in front of you as the darkness just swallows the light. I take a construction site floodlight alongside a Lenser P7 (other makes are available). The only way to get decent photos in these places is to use the light painting technique. I’ll go into what’s needed and how in a future post. The roof of the tunnel has a nice layer of soot interspersed with calcite straw stalactites. These form from the minerals leaching through the brickwork/mortar. At ground level there are flowstone deposits forming on the old track-bed. They are a brilliant white colour and are made by calcite rich water dripping from the tunnel roof. There are high-level rows of cable hanger brackets attached to the walls, and rail chair screw bolts lying around. The tunnel is 329 yards (300 metres) long and has a gentle curve to the south end. This far end has been back-filled and landscaped externally. An eerie mist appeared very briefly when I was down that end. There was no change in temperature, or any holes through the brickwork to the outside. It disappeared as quickly as it came so can only surmise it was a ghostly presence from the past! A lot of these tunnels saw death and injury when they were built and have a reputation for being haunted. I didn’t turn around when i heard the footsteps!! At regular intervals there are refuges set back into the walls to enable the platelayers and permanent way gang to get to safety when a train came thundering through. A number on a ceramic plate attached to the back-wall of the refuge helped to identify how far into the tunnel the gang were. Back outside we can climb up the embankment and have a look at the parapet over the tunnel portal. The coping stones have become dislodged and part of it has fallen onto the track-bed below. Walking back to Diggle gives an opportunity to see the skill of the canal builders with a number of locks alongside us. There is an even older foot tunnel (late 1700’s) here which goes under the canal. (continues below)
-
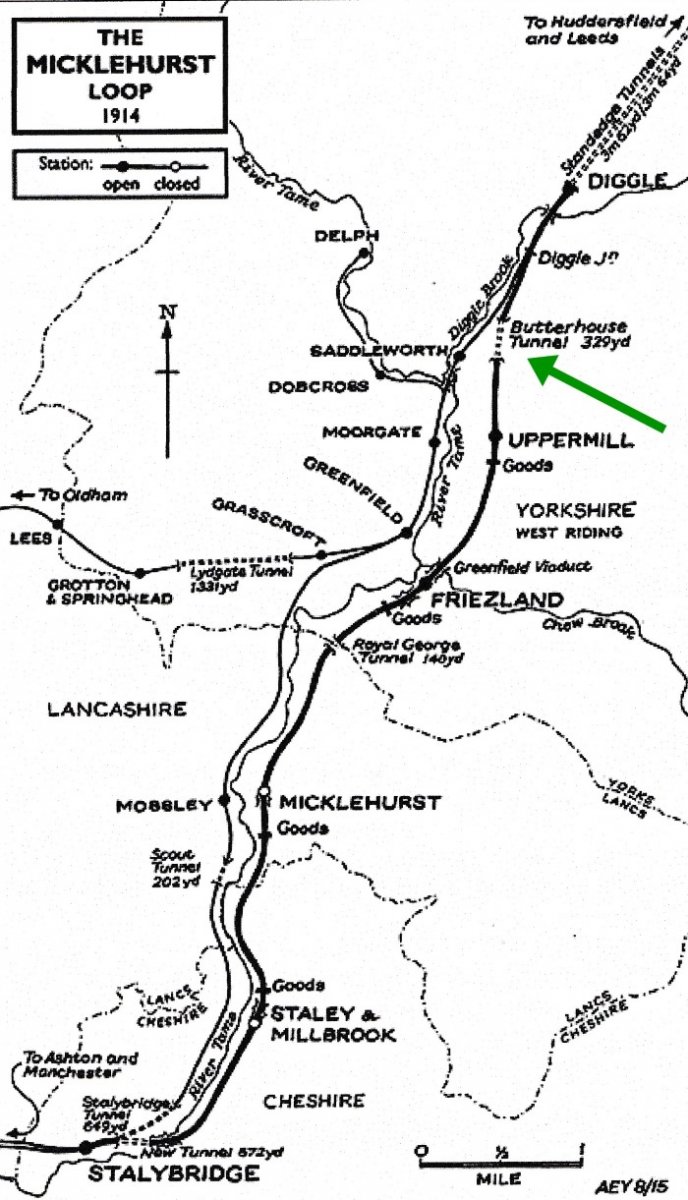
(continued from above) The Micklehurst Loop was a double-track, six and three quarter mile alternative route between Diggle and Stalybridge on the Huddersfield-Manchester line. The loop was spread over the borders of the West Riding of Yorkshire, Lancashire and Cheshire. The attached route map shows our tunnel marked by the green arrow. Why was the loop constructed? The Huddersfield and Manchester Railway Company (1844) was amalgamated into the London and North Western Railway in 1847 after the LNWR had recognised the potential of the line. It provided an economic link between Leeds, Huddersfield, Manchester and Liverpool. The textile manufacturers of the Colne and Thame valleys would also add to the line’s profitability. The history of this major line would cover many pages so we’ll just concentrate on its association with the loop. Such was the success of the Huddersfield-Manchester route that two tracks proved totally inadequate to handle the traffic. The original single-track Standedge Tunnel (1849) had been quadrupled by 1894. Further south, industry and housing on the western side of the valley crowded the route. It was impossible to squeeze extra railway tracks into the space without extensive demolition and expensive engineering. The solution was to layout an entirely new route on the eastern side of the valley. Even this involved some complex engineering challenges. Three tunnels, five viaducts and four stations all had to be constructed. The industrial nature of the valley required goods depots and sidings to be provided at regular intervals along the route. All of this needed expanses of flat and level land which had to be created from the steep valley sides by cutting or tipping. During the construction there were some engineering setbacks and accidents, and customary outbreaks of violence involving the navvies. An innovative method of working through the night illuminated by powerful electric lamps was trialled here. It attracted onlookers to the scene who thought it was like Blackpool prom! The line opened fully to passengers on May 1st 1886. The loop’s passenger service soon proved to be little used as the four stations were in effect duplicated and served by the main line. All four had closed to passengers by 1917. The loop remained very important, however, for goods traffic, and as a relief line for summer excursion trains. BR’s north-eastern region timetable actually used this route as a priority over the main line in busy periods. The four former stations remained in use to handle the goods traffic until the 1960’s. Freight was now switching to road transport and the line’s use declined. It was decided that the original double track on the western side of the valley would be sufficient for the Huddersfield-Manchester route. The last passenger train to use the loop was a Pennine Railtour on Sunday October 2nd 1966. The line was closed to through traffic the next morning. The track was lifted by 1970 with the exception of about a mile at the southern end of the loop which remained in use to carry coal to a power station. This ceased in 1972 and the remaining track taken out of use by July 1976. We’ll have a look around another part of the Micklehurst Loop in the future. (continues below)
-
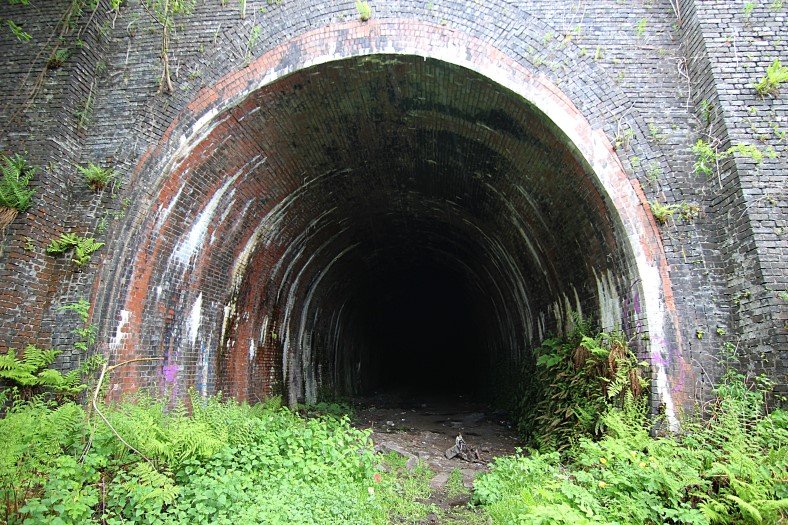
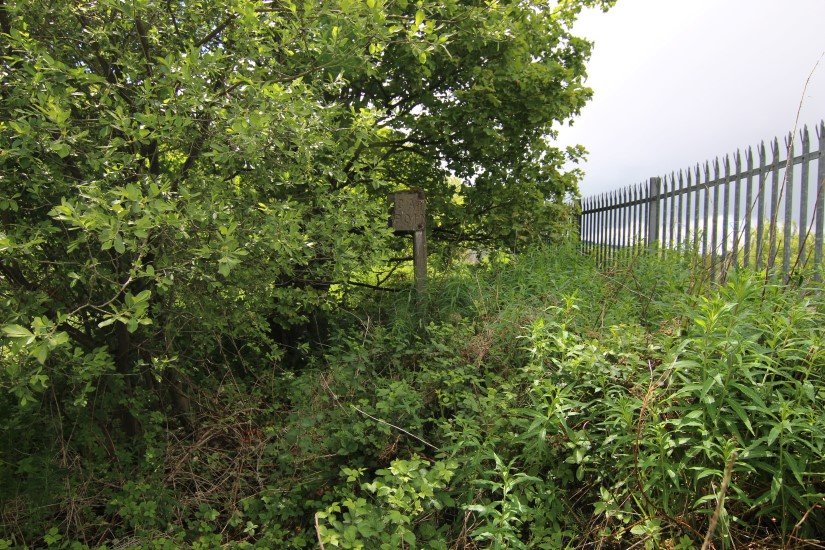
Hi there folks, There’s plenty to read this time. Get a brew, feet up and get stuck in. For this last one before the F1 mini season begins we’re heading to the border between Greater Manchester and West Yorkshire. Did any of you manage to get the clue from the pic last time? I’ll admit it wasn’t the easiest to see but it shows an old catch point post. This can only mean one thing: It’s railway related. You can’t beat a bit of old railway abandonment! We’re going to be exploring the disused early 1880’s Butterhouse Tunnel on the Micklehurst Loop. Constructed in engineering brick (known as blue brick), its main lining is seven courses thick at the crown. Towards this end you can see three to six rings of red brick which have been inserted as a secondary lining for strengthening purposes. (continues below)
-
LUKE ‘WRENCHES’ THE WIN FROM THE WESTCOUNTRY Cheshire’s Luke Wrench (560) takes victory in the Final at Taunton on Monday the 10th Aug. Since being given approval to return to racing this was Autospeed’s seventh meeting in three weeks. With eight Smeatharpe meetings lost owing to the lockdown conditions an attempt has been made to reschedule as many of them as possible. The extra dates are being run in August and September in the hope of more favourable weather than later in the year. There's no better place to spend a warm Monday evening. The south-west has seen the majority of race meetings since returning to racing and I bet there’ll be a strong westcountry flavour to the new grading list. I would expect to see many more red tops in this part of the country come September 1st. There has also been tremendous support from drivers who have travelled great distances. In addition to Luke, Liam Bentham (with John Dowson Jnr on spanners) (488), and Aaron Vaight (184), both Ormskirk based, continued their ever-present run for these Monday night fixtures. They were joined tonight by Manchester’s Ant Riley (282) for the second week in a row, Market Drayton’s Tristan Claydon (210), and Bolton’s Phil Mann (53). The journey down from the north was not a good one on Monday. At least three hours was added on owing to a crash between junction’s 16-15 on the M6, and another on the M5. The meeting was also round three of the Autospeed August Accumulator. Five rounds, two tracks (here, and the United Downs Raceway at St. Day), one month. All drivers score 10 attendance points for each round they race in, with multiplication factors for the grading points thrown in. White x 5, yellow x 4, blue x 3, red/superstar x 2. There will be sixteen prizes ranging from a Zetec exhaust system, Weber carb, Zetec water pump kit, porta power, trolley jacks, link bars, tyres etc. This was the tenth year for the Remembering Rog memorial event. Owing to the need for social distancing the Grand Parade at the start of the meetings has been temporarily put on hold. A feature of this meeting was always a presentation of cupcakes and mementoes to all the participants. It is now twenty years since Roger Willcock (95) made his debut at St. Columb. This was also the first meeting in Cornwall that Autospeed under the tenure of Crispen, and Andrew promoted. Roger had a reputation for being a lively lad with a quick temper. His short fuse when things didn’t go to plan was evident on many occasions. A trademark fling of the steering wheel out of the cab was witnessed many times. It was this that inspired the creation of the Remembering Rog trophy - a steering wheel mounted on a wooden plinth. When Rog set out on his F2 career it was in an ex Mike James car. Four years later he unveiled a brand new Motorworld car built at John Harding’s workshop. Over nine seasons he appeared 141 times winning seven races in the car. Smeatharpe was the venue he attended the most, with appearances at St. Day and St. Columb. A few trips to Bristol, and a quartet of the Good Friday meetings at Ringwood also featured. 2008 was his last season, and it was not long after that he became ill and sadly passed away in November 2010. Onto the meeting then. On a glorious summer’s evening another very respectable entry of 37 cars were on hand to do battle. The evening began with a white top race which had a prize fund of £100, plus a gallon of oil for the top three. Ten cars took the green with Wayne Wadge (920) taking an early lead until the race was brought to a stop after a three car tangle. Wadge led off at the restart only to be passed by Josh Weare (736), and Mike Priddle (14) near the end. The 920 car successfully fought back however and took the victory. Result: 920, 736, 14, 663 and 903. N.O.F. Heat One: 18 cars. Priddle and Wadge disputed the early lead in this one allowing the pack to close in. Chevy Mills (538) was on a charge from the yellow grade, with new red top Chris Mikulla (522), and the British Champ Steven Gilbert (542) in close range. With three to go Mills pushed Wadge aside to take the lead with 542 and 522 also passing the 920 car. Entering turn three on the last lap Mills took a tight line as a big hit from Gilbert made contact. In the run to the flag 542 edged over the line first with 538 holding off 522. Luke Wrench (560) had delayed himself firing Ryan Sheahan (325), and Jon Palmer (24) into the wall early on but still came home in 4th. Result: 542, 538, 522, 560, 920, 24, 302, 539, 325 and 91. First ten to the Final. Heat Two: 16 cars. A caution early on in this one as Ben Farebrother (115) drifted wide coming out of turn two and ended up turned across Phil Mann (53) and into the back straight wall. Josh Weare (736) led off the restart until halfway when Aaron Vaight (184) took over. Liam Bentham (488) and Ben Borthwick (418) tried in vain to catch the 184 car who duly took his third win in ten days. The 418 car rode out a last bend hit from Matt Stoneman (127). Result: 184, 488, 418, 127, 464, 126, 890, 736, 210 and 196. Consolation: 14 cars. The small field for this one was reduced soon after the green flag as Marc Rowe (526) and Bryan Lindsey (663) piled into the pit bend fence, at the same time as Farebrother clouted the Honiton end. James Rygor (783) relieved Ant Riley (282) of the lead to take his fourth win of the month. Result: 783, 282, 14, 320, 53, 115, 720 and 903. Final: A 28 car field around this tight Taunton track made for some hard hitting action. Rygor made the early break to get the lead before halfway. Mills was in second behind a lapped 418 who had been dumped out of the battling red tops early on. Weare (the early leader of heat two) was turned sideways across the following Wrench and Palmer (24). In the ensuing melee Ant Riley hit the unsighted 736 car at full speed. Fortunately there were no injuries to either driver but the 282 car ended up with a severely rearranged front end. The 560 car was gaining on the leaders after the mid distance restart and moved ahead with some skilful use of the front bumper. The red tops behind were battling amongst themselves, the 24 car putting a big hit in on the 542 car via a backmarker. Luke duly took the victory from Rygor and Vaight. In his post-race interview Luke said his target this year is to claim all three south-west track championships. Result: 560, 783, 184, 538, 24, 522, 542, 127, 488 and 302. What can happen with 28 cars around Taunton! Every credit to the 282 team for getting it fixed for the GN. GN: 25 cars. With only a one race gap a superhuman effort by the 282 team and others to repair the damage saw Ant take his place on the grid. Unfortunately a leaking brake pipe scuppered his chances to score any points. Wadge led most of the race until moved out by a backmarking Mikulla. Mills took over a lead he kept to the finish. The one lap handicap certainly didn’t hold the 560 back as he blasted through for 4th. Result: 538, 184, 783, 560, 920, 302, 539, 542, 24 and 488. That was the end of another belter of a Monday meeting. I thought i was seeing things in the pits as all the way from Rochdale was the Team Smith Motorsport bus. Stuart has sold it to an F2 driver. When the new owner picked it up Stuart told him that apart from routine maintenance he hadn’t had to take a spanner to it. Within half an hour of heading south the throttle linkage sheared! It obviously didn’t want to leave its old home. To see who’s bought it head to the gallery. Check back here at the weekend for the last of our off season escapades until the F1 mini season finishes. Don’t forget that torch.
-
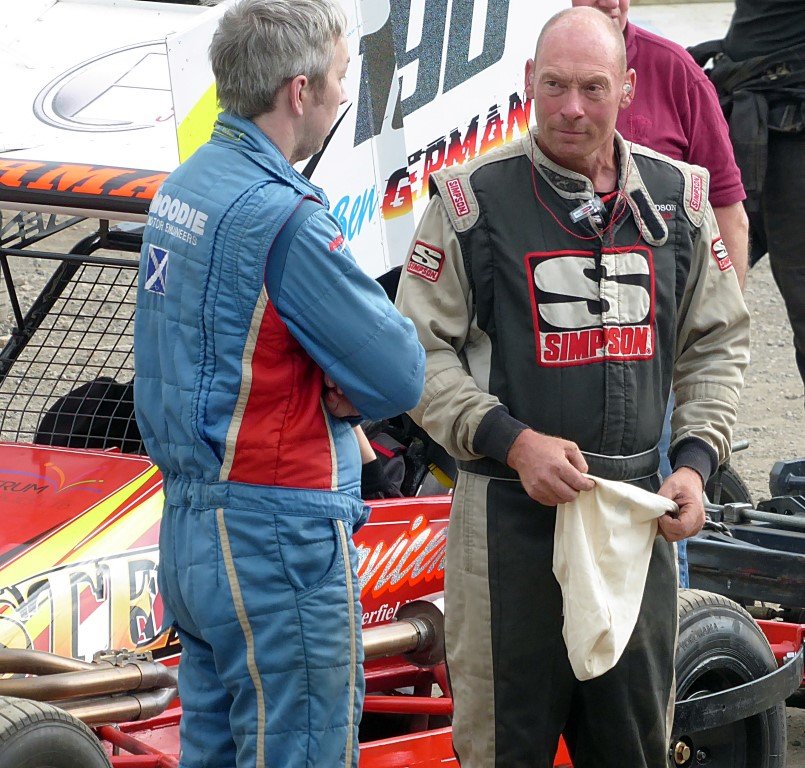
THE SALTIRE SWEEPS SKEGNESS Gordon Moodie races to a dominant Heat and Final at Skegness on Saturday. Gordon's giving Rob some tips on how to win Heat and Final at his own track! Every credit to Rob and the team for meeting the challenge of re-opening the stadium. All was in place for a top night of action. Richard Kaleta announced a few changes over the p.a concerning race winners presentations. There wouldn’t be a pace car, trophies, or driver interviews. No drivers or mechanics to go to race control. Spectators to clap or sound air horns. There was a one way system in and out of the pits for anyone who qualified for access. Heat one for the F2’s saw Billy Webster (226) race his tar car. Speaky got a rear flat. Brad McKinstry (NI747) and Dave Polley (38) were up front early on, and joined by Neil Hooper (676) who was dishing out the front bumper with gusto. Another hitting hard was Dan Fallows (581). Ministox graduate Harley Burns (992) drove a fine race to claim the win. Result: 992, NI747, 676, 190, 9, 376, 38, 226, 581 and 960. First ten to the Final. Heat two saw an epic battle for the lead between Aaron Vaight (184), Gordon Moodie (7), Jon Palmer (24) and Liam Bentham (488). James Riggall (527) was fired into some parked cars in turn four by the 24 car. An emotional Gordon dedicated the win to his Uncle Jimmy and Auntie Anne. Result: 7, 184, 488, 24, 606, 183, 390, 42, 731 and 319. The Consolation had Speaky and Mark Gibbs (578) trading some big hits. Result: 783, 527, 282, 200, 482, 524, 618, 161, 218 and 578. The Final began with Guinchy (183) being steamrollered into the turn 3 plating by a hard charging pack of star men. The resultant damage couldn’t be repaired in time for the GN. Gordon piloted the 7 car to the front in supreme fashion. That youngster Harley Burns took some catching though. Definitely one for the future. The two Polley built cars finished together in 4th and 5th. Result: 7, 783, 992, 38, 488, 218, 581, 190, 9, and NI747. The GN had good pals 184 and 24 take the top two placings, with 488 following his car builder 38 home in 5th and 6th this time. Result: 184, 24, 783, NI747, 38, 488, 190, 578, 226 and 218. Ministox top three results: Race one: 180, 68 and 277. Race two: 45, 269 and 180. Race three: 68, 45 and 269. Final: 68, 180 and 27. V8's top three results: Race one: An all girl top three – 154, 525 and 8. Race two: 288, 154 and 8. Final: 288, 154 and 438. GN: 176, 466 and 222. In the Saloons Karl Hawkins (75) was having a go in a hire car racing from the yellow grade. Deane Mayes was well and truly cannoned in by Simon Venni. Speaky (318) was one of the fastest all night. He passed Diggy (116) and Billy Smith (161) with ease and was so much quicker coming out of the corners. He was really getting stuck in with some big hits being dished out. He was enjoying himself immensely especially fighting back after getting spun out a few times. Top three results: Race one: 120, 600 and 116. Race two: 902, 349 and 161. Final: 368, 341 and 120. An excellent night of incident packed tarmac racing at its very best. Many thanks to all the drivers for the entertainment. Pics in the gallery.
-
(continued from above) With the impending return of F1 (fingers crossed) we’ve just time for one more before this extended off season ends so, Next time: You’ll need to bring a high powered light for this one. There is a clue in the centre of the pic as to what it concerns. I’ll put a few pics from Skeggy in the gallery later this week.
-
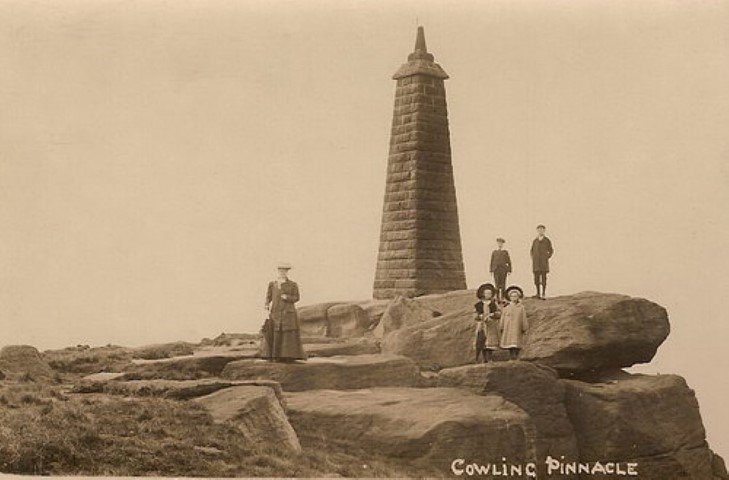
(continued from above) Now let’s go to the other end of the crag. Wainman’s Pinnacle was built in 1898 by a member of the Wainman family of nearby Carr Head Hall. The family had lived in the hall for over 300 years. There are many stories concerning the reasons for the monuments construction. One tale goes that a member of the family at Carr Head was possessed by the Evil Eye, and the column was built so that it was the first thing she saw each morning, and thus her gaze would cause no misfortune to those around her. A secret ledge containing a witch’s broomstick is rumoured to exist. There is said to be a charm buried under the pinnacle to rid Carr Head of ghosts. Other theories are that it was part of a network of beacons that were used to warn of marauding Scots invaders, and also as a landmark for aeroplanes. One of the old roads originally went over the high ground which was surrounded by bogs and pot holes. Shepherds and travellers used the two towers to guide their way as it was very easy to get lost on the moors. It was often said the monument dated back to the Civil War, but the most likely explanation is that it was built by William Wainman to commemorate the battle of Waterloo in 1815. Wainman’s son had served in the campaign against the French so the monument would also have celebrated his safe return home. Whilst the pinnacle serves its purpose as an eye-catcher the exposed position on the edge of the crag means it’s at the mercy of the Yorkshire weather. It has been struck by lightning numerous times. It was struck twice in one year and a large stone block was dislodged. It left it looking as if it had a large piece bitten out. Many thanks to Bob for the suggestion to check these out. Pics in the gallery include some scenes of the surrounding area. It sure is a nice spot. (continues below)
-
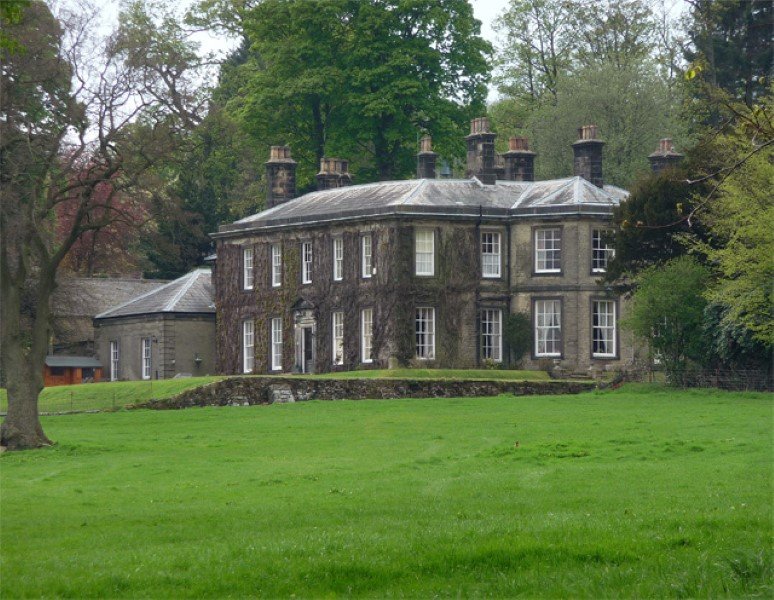
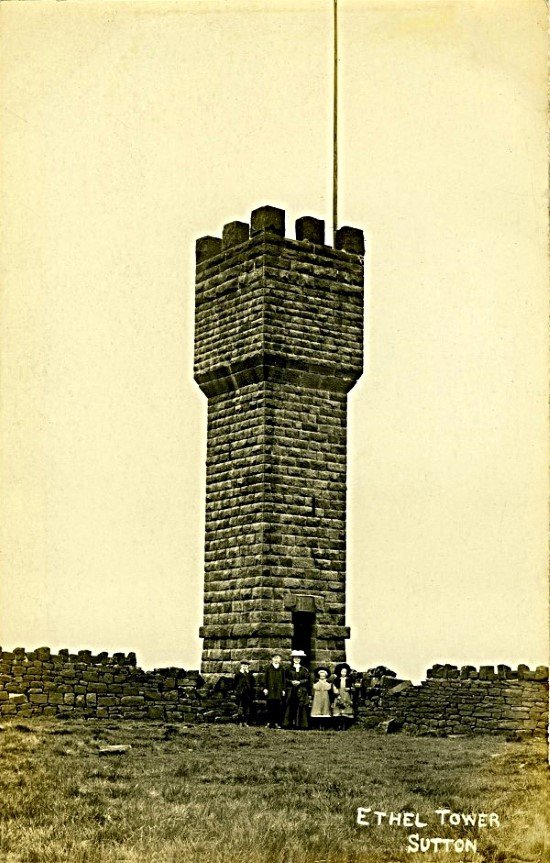
(continued from above) Notwithstanding a connection they both have an interesting history attached. They both sit at opposite ends of a rocky outcrop known as Earl Crag. Let’s start with Lund’s Tower (additionally known as Sutton Pinnacle, Ethel’s Tower and Jubilee Tower). William Lund had made his fortune in the textile manufacturing business. His son James bought Malsis Hall across the valley in 1860 and replaced it with a vast mansion. Malsis Hall was replaced with this fine mansion. In 1887 he commissioned a firm of local architects to design a monument that could be seen from the grounds. The tower was believed to have celebrated his daughter Ethel’s 21st birthday. It gets its Jubilee name from the commemoration of the jubilee of Queen Victoria. The tower played a role in the celebrations for another of Lund’s daughters. To mark the occasion of Marion Emmeline’s marriage a huge flag was floated from the top. The flagpole remained for a number of years afterwards. Amazingly the doorway is not blocked and you can climb the dark and narrow steps to the top. The old flagpole on the tower. Pic credit to Dave Martin. (continues below)
-
(continued from above) Now what do the Lund’s and Wainman’s have in common? Well the answer is in the pic below. High on a ridge above the villages of Cowling and Sutton- in-Craven in North Yorkshire are two stone monuments. The left one is Lund’s Tower, and the right is Wainman’s Pinnacle. They are known locally as the Salt (right), and Pepper Pots (left). I have asked Annette, Frank Snr, FWJ and JJ if they know of any link to their families. They are not aware of any, but it would need their respective family trees studying to confirm it one way or the other. With the two Johns (53 and ex95/153) residing in Lancashire 15-18 miles away there probably isn’t a connection. However, Silsden is only 5 miles distant so the possibility is far greater. There is also a Wainman Close in Cowling itself. Cowling was once the largest community for miles, and an important centre for weaving with six mills in the village. (continues below)
.jpg.991d2eb070444d2d3f8d57bc08c21ccb.jpg)
.JPG.49411e48acc1e4510aae127cadcf1d4a.JPG)
.JPG.279e2b596ecc5bf4ded71252bbc46adf.JPG)
.jpg.0a52316b89d23f9197399f483b0c1993.jpg)
.jpg.4f6891894646f4620e2f94e364814258.jpg)