Roy B
-
Joined
-
Last visited
-
Days Won
188
Everything posted by Roy B
-
Continued from above: The pit was also linked underground to Bank Hall Colliery a half mile away. The underground link The colliery was sunk next to the Brooks and Pickup fireclay works less than a half mile from Towneley railway station which served Towneley Hall. Brooks and Pickup began coal production from the main shaft, the Alice Pit in late February 1869. For 75 years coal was extracted from the Arley, Dandy, King and Yard mines. In 1923 the colliery was owned by Brooks Collieries and employed 770 men working the colliery which included the Towneley Drift. In 1933 the Towneley Coal & Fireclay Company employed 672 men, 480 of them underground. The colliery produced fireclay as well as coal used for household and manufacturing use, coking, and for producing gas. Wagons lined up at the colliery wash-screens The colliery was nationalised in 1947 after which the National Coal Board worked the Yard, Dandy and Lower Mountain mines. Its satellite pits were abandoned in 1949. The colliery closed on 6 March 1949. Its shafts were used for pumping until 1971 when Bank Hall Colliery closed. Little remains of the colliery today. A residential development occupies a small part of the site, and the rest comprises steep, mossy hillocks and woodland. This woodland is as good a place as any to see if we can find any remains. There is part of the original access road that leads away from the A671 onto a well-made track. It is very overgrown on each side so it’s a slow process in trying to find a sign of anything. After about 20mins a piece of rail sticking upright came into view, and a pile of old bricks from an earlier building. Nearby was a short brick built tunnel which had a stream flowing through it. An old track-bed went across the top. A flight of stone steps partially hidden in the undergrowth appeared close-by which led to an old coke oven. This was in good condition inside with a well-constructed curve to the brickwork. Apart from this I couldn’t find anything else other than an arched tunnel that had been filled in. Still, at least something remained. Returning to the main road we’ll cross over and walk through Towneley Hall’s parkland. Just inside the grounds there is evidence of past industry alongside a fast-flowing stream which is culverted underneath the A671. I definitely need to have a walk through that culvert at a future date. There are the remains of a stone footbridge which used to cross the stream here. Between here and the hall is Foldys Cross. This was constructed in 1520 under the direction of a local chaplain. It was originally sited in the centre of Burnley in the church yard. Debate surrounds its purpose however as it has a flight of steps surrounding it which indicates it was used as a market cross. The market traders would stand on and around the steps. After it was demolished by a drunken mob in the late 1800’s it was rebuilt and brought to its present location in 1911. Next we come to Towneley Hall. What does an antiques collector, a renowned scientist, and the last man to be hanged, drawn and quartered in Britain have in common? They all lived at the historic Towneley Hall over the last 500 years. They were: Charles Towneley, whose collection of artefacts led to a gallery at the British Museum being named after him, Richard Towneley, who was a pioneer of meteorology, and co-founded the Greenwich Observatory, and Francis Towneley. He wasn’t so lucky. He was executed for high treason for his role in the Jacobite rebellion in 1745. His head was placed on a pike at London’s Temple Bar before eventually being stolen and returned to Towneley Hall, where it was hidden behind a secret panel in the chapel for over 200 years. The first hall was built in 1380 and was a large open barn-like medieval building, similar to the ones still seen at Smithills in Bolton, and Warton Old Rectory near Carnforth. Seventy years later the huge south wing with its very thick walls was constructed. When Queen Elizabeth I ruled England the Towneleys like so many land holding families in Lancashire fell foul of the government’s anti-Catholic laws. John and Mary Towneley were determined to continue to worship as Catholics, but this had been made illegal. John was known to have kept Catholic priests who performed Mass for the family. The couple were punished with heavy fines from the Protestant Inquisition Council. Despite the persecution, John refused to give up his faith and went to prison many times for his beliefs during the next thirty years. A family portrait in the hall lists the various places he was imprisoned which included Chester and York Castles, Blockhouses in Hull, Gatehouse in Manchester, and prisons in Oxford and Cambridge. In 1601 after his last gaol sentence he was fined over £5000 and was ordered not to venture beyond five miles of Towneley. Over the next few decades the family debt hugely increased. The first reason was their ambitious building program. Richard ‘The Builder’ Towneley had the Great Hall constructed, and eight years later the present North Wing was added. The second reason for the debt was because the family were frequently fined for the refusal to worship as a Protestant. On the eve of the Civil War their debts were huge - three times their annual income. Charles ‘The Cavalier’ Towneley stored arms and ammunition for King Charles I’s forces at the hall. In 1643 Charles was involved in defending Preston which was under siege from Parliamentarians. When the town surrendered he escaped, but his wife was taken prisoner. After hiding out near Towneley, he went on to fight at Marston Moor but died in the battle. For being on the losing side of the war, the family had a large portion of their estate seized at Cliviger, and Hapton, and put up for sale. Through the rest of the 1600s and into the 1700s successive generations of members of the Towneley family were involved in plots to overthrow whichever Protestant king was on the throne, and continued to worship as Catholics. In 1707 Ursula Towneley listed seven hiding places in the house (including priest holes). Five years later Richard Towneley cut down a woodland of oak trees at Parks Wood Fields to pay his expenses after his treason trial. It wasn’t until the early 1800s that all the anti-Catholic legislation was abolished. The last Towneley at the hall was Alice Mary, known as Lady O’ Hagan after her marriage at 25 years old to Thomas Baron O’ Hagan, aged 59. In their fourteen years together they had seven children. She was a patron of the local blind and deaf societies, helped fund a military hospital in South Africa, was a keen campaigner on votes for women, and set up mother and child welfare schemes. She was the driving force behind a new convent to “rescue young girls from bad surroundings and train them to be thorough domestic servants”. After the death of her husband, much of the Towneley estate had to be divided between the remaining extended family, and she only retained the hall and 62 acres around it. It became clear that the estate could not be self-sustaining anymore and in 1901 she sold the building and grounds to Burnley Corporation. The use of the grounds over the decades has been very varied. Parts of the park have been: small holdings, plant nurseries, tennis courts, bowling green, greyhound course, speedway track, golf course, playing fields and a bird sanctuary. A war memorial was erected in the grounds in 1926. It was designed and sculptured from Portland stone by Walter Gilbert, of Birmingham. Amongst his other works are the gates to Buckingham Palace. The unveiling ceremony was performed by the Earl of Derby, and the memorial was surrounded by a tremendous throng. It was not until three hours after proceedings began that the long queue of people laying wreaths finished filing past. After all was over the base of the memorial was more than knee-deep in wreaths. It is sculptured into three figures symbolic of the Navy, Army and Air Force. At each side at the base is a female figure. On the left, representing a mother bringing a wreath, and on the right, a wife or sister bringing garlands. We now leave the park through a superb archway which is all that remains of the gatehouse from 1797, and make our way to the Leeds and Liverpool Canal. We join it at the Burnley Embankment, known locally as the ‘Straight Mile’. When the canal was being built here, Robert Whitworth the Leeds and Liverpool Canal Company Engineer decided that an embankment, almost a mile long and up to sixty feet high, straight to the opposite hillside should be built. This negated the need for the canal taking a long detour following the contours around the valley, Although it was costly to construct, it meant the Calder Valley could be traversed by the canal without the need for two systems of locks which would only slow boats down and thus industrial production. The almost perfectly level embankment which necessitated an aqueduct over Yorkshire Street below (more on that later) was built between 1796 and 1801 (before the invention of the steam shovel). This innovation through the centre of town high above the rooftops is the result. It is regarded as one of the seven wonders of the British waterways. Halfway along here stands a crane. This was installed to lift heavy ‘stop planks’ into place. The stop planks would slot into gaps in the towpath and stop flood water should the embankment breach. At the rear of Sainsbury’s car park below this elevated section are the remains of two lime kilns. These were built by the canal company to produce lime for use in mortar, and the clay lining to the canal bottom. Limestone, coal and timber would have been loaded into the firing chambers above, and the resulting quicklime raked out and separated from the ashes under the arches. We leave the canal here and have a walk through Thompson Park. The idea for a park in the area came from James Witham Thompson. He is said to have spied the spot from an open top tram and thought it would be a good place for a public park. The park was conceived in 1920 when he left £50,000 in his will for the Council to build a public park. The Council obtained an option to purchase the site, adjacent to Burnley College, from local mine owner Sir J O S Thursby in 1920, and approved the purchase in October 1922. The land was the site of Sand Holme farm, a plantation, and allotments, with the area to the north-west of the River Brun formerly part of the grounds of Bank Hall, the home of General Scarlett, a hero of Balaklava in the Crimean War. Work on the park began in 1928 and the official opening took place on 16 July 1930. Construction workers were largely recruited from the unemployed. The River Brun runs through the park and a dam was formed to enable water to be diverted to the boating lake and children's paddling pool. The park also included a boathouse, a 75ft by 30ft conservatory, a tea-room pavilion, a rose garden, herbaceous garden, Italian garden, a lodge house, an ornamental bridge over the lake, and two further bridges over the river. Over 5000 trees and shrubs, plus about 7000 privets of different varieties, and 5000 rose trees were planted in the park, in addition to bedding and exotic plants in the conservatory. During the Second World War the park was used for growing vegetables, and the only bomb to fall on Burnley landed near the conservatory on 27 October 1940. In 1972 Bank Hall Open Air School, adjoining Thompson Park to the north, was demolished and the area incorporated into the park. The 1893 OS map shows glasshouses on this level area which had formerly been part of the grounds of Bank Hall. In the early 20th century Bank Hall became a Maternity and Children's Hospital and the site of the glasshouses was developed as the Open Air School. In 1998 improvements were made to the herbaceous garden, shrub beds, rose beds, and flower beds, and in the winter of 1999/2000 tree planting was carried out under the Forest of Burnley project. The Burnley & Pendle Miniature Railway Society constructed the Thompson Park Railway here in 2001. Its nick-name is the ‘Lollipop Line’. Land clearance and track bed construction commenced in the winter of 2000/2001. As part of the work, an area was levelled to allow for the placement of two forty-foot shipping containers to initially act as storage for tools and equipment; later to be used for the storage of rolling stock, and a workshop for maintenance. Using the skills of the small group of members, steaming bays, a loading ramp, and a turntable were constructed at an early stage. 2003 saw the completion of the outer loop. This required more manual labour to form the track bed through the wooded area and the installation of the bases for a 100ft, 5 section, girder bridge. On 17th January 2007, Cyclone Kyrill hit the shores of the United Kingdom bringing gusts of wind up to 80mph and heavy rain fall. Unfortunately, the railway did not escape the stormy weather unscathed. The newly opened outer loop took the brunt; with the girder bridge suffering substantial damage to two of its five sections. Overall, repairs took 3 weeks. Luckily because of the way the bridge was designed the plates that connected the sections together split, resulting in damage to only two of the five sections. Minor damage was also caused by the falling of a tree from the banking shortly after the bridge; however it was only a case of clearing the line and replacing any damaged sections of track. Continues below:

-
Continued from above: We’ve arrived now in Burnley. The town is located near countryside to the south and east, with the smaller towns of Padiham and Nelson to the west and north respectively. It has a reputation as a regional centre of excellence for the manufacturing and aerospace industries. The town began to develop in the early medieval period as a number of farming hamlets surrounded by manor houses and royal forests, and has held a market for more than 700 years. During the Industrial Revolution it became one of Lancashire's most prominent mill towns; at its peak it was one of the world's largest producers of cotton cloth, and a major centre of engineering. The name Burnley is believed to have been derived from Brun Lea, meaning "meadow by the River Brun". In its early days, Burnley was a small farming community, gaining a corn mill in 1290, a market in 1294, and a fulling mill in 1296. Little survives of early Burnley apart from the first Market Cross, erected in 1295, which now stands in the grounds of the old grammar school. In the second half of the 18th century, the manufacture of cotton began to replace wool. Burnley's earliest known factories – dating from the mid-century – stood on the banks of the River Calder, close to where it is joined by the River Brun, and relied on water power to drive the spinning machines. The first turnpike road through the area was begun in 1754, linking the town to Blackburn and Colne eventually leading to the area of Brun Lea developing into a town, and by the mid-19th century, there were daily stagecoach journeys to Blackburn, Skipton and Manchester, the latter taking just over two hours. The 18th century also saw the rapid development of coal mining on the Burnley Coalfield: the drift mines and shallow bell-pits of earlier centuries were replaced by deeper shafts, meeting industrial as well as domestic demand in Nelson, Colne & Padiham, and by 1800 there were over a dozen pits in the modern-day centre of the town alone. The arrival of the Leeds and Liverpool Canal in 1796 made possible transportation of goods in bulk, bringing a huge boost to the area's economy and the town of Burnley was born. Dozens of new mills were constructed, along with many foundries and ironworks that supplied the cotton mills and coal mines with machinery, and cast and wrought iron for construction. The town became renowned for its mill-engines, and the Burnley Loom was recognised as one of the best in the world. A permanent military presence was established in the town with the completion of Burnley Barracks in 1820. Disaster struck in 1824, when its only local bank (known as Holgate's) collapsed, forcing the closure of some of the largest mills. This was followed by a summer drought, which caused serious problems for many of the others, leading to high levels of unemployment and possibly contributing to the national financial crisis of 1825. By 1830 there were 32 steam engines in cotton mills throughout the rapidly expanding town, an example of which, originally installed at Harle Syke Mill, is on display in the Science Museum in London. In 1848 the East Lancashire Railway Company's extension from Accrington linked the town to the nation's emerging railway network for the first time. This was another significant boost to the local economy and, by 1851 the town's population had reached almost 21,000. The Cotton Famine of 1861–1865, caused by the American Civil War, was again disastrous for the town. However, the resumption of trade led to a quick recovery and, by 1866, the town was the largest producer of cotton cloth in the world. By the 1880’s the town was manufacturing more looms than anywhere in the country. The start of the 20th century saw Burnley's textile industry at the height of its prosperity. By 1901 there were 700,000 spindles and 62,000 looms at work in the textile industry. Other industries at that time included: brass and iron foundries, rope works, calico printing works, tanneries, paper mills, collieries, corn mills and granaries. By 1910, there were approximately 99,000 power looms in the town, and it reached its peak population of over 100,000 in 1911. By 1920, the Burnley and District Weavers', Winders' and Beamers' Association had more than 20,000 members. However, the First World War heralded the beginning of the collapse of the English textiles industry and the start of a steady decline in the town's population. Following the Second World War there was large-scale redevelopment in the town. Many buildings were demolished including the market hall, the cattle market, the Odeon cinema and thousands of mainly terraced houses. The town's largest coal mine, Bank Hall Colliery, closed in April 1971 resulting in the loss of 571 jobs. The area of the mine has been restored as a park. However, Burnley has retained a strong manufacturing sector, and has strong economic links with the cities of Manchester and Leeds, as well as neighbouring towns along the M65 corridor. In 2013, in recognition of its success, Burnley received an Enterprising Britain award from the UK Government, for being the "Most Enterprising Area in the UK". For the first time in more than fifty years, a direct train service now operated between the town's Manchester Road railway station and Manchester's Victoria station, via the newly restored Todmorden Curve, which opened in May 2015. Let’s have a walk around and see what we can find. Parking on the A671 close to Towneley Hall we’ll see if we can find any remains of the coke ovens that were part of the Towneley Colliery and Brickworks. Towneley Colliery was a coal mine in the Burnley Coalfield. An early picture of the colliery Sunk in the late 1860s, it was linked to the Lancashire and Yorkshire Railway's Burnley to Todmorden line which became known as the Copy Pit route. The Copy Pit line The colliery had sidings on either side of the line. A half-mile long tramway linking it to the Leeds and Liverpool Canal went through four tunnels. Boggart Brig Pit beside the A671 Todmorden Road was also linked by a tramroad. An interesting incident related to Boggart involves a farmer whose land lay above the colliery. He watched in amazement as one of his duck ponds suddenly drained, so that one minute the ducks were merrily swimming around, and the next they were walking on the muddy bottom of the pond. The colliery fireman had to rush to the coalfield to tell the miners to stop coaling immediately. At this point the workings were some 40ft beneath the surface and the farmer routinely heard the miners every time they fired a shot. Continues below:
-
Hi there folks, Let’s first go back to Taunton for day two of the Speedweekend, and then we’ll head north to Burnley to see what treasures the town has to offer. Taunton -‘Under the Sun’-Sunday 20th September 2020 The second day was held in glorious conditions under a bright blue sky. 53 F2’s again with the first appearances of the weekend from Chris Mikulla (522), Stuart Deacon (228) and Julian Coombes (828). Heat 1: Jess Ward (86) took her second victory of the weekend. The clash of bumpers going in could be heard throughout the next four placemen with James Riggall (527) finishing ahead of Ben Borthwick (418), and James Rygor (783) doing likewise to Dan Fallows (581). Result: 86, 527, 418, 783, 581, 325, 522 and 542. Heat 2: NI visitor Brad McKinstry (747) won this one. Joe Marquand (689) lost out on a qualifying place with a last corner tangle with Matt Westaway (835). Result: NI747, 183, 24, 210, 35, 127, 578 and 835. Heat 3: Dave Sansom (352) repeated his heat victory from the previous day. Result: 352, 161, 251, 538, 979, 560, 115 and 184. Consolation: Just short of 30 cars on track and an early caution with a number of cars stopped around the exit of turn two and onto the back straight. After the restart a spectacular crash on the home straight ensued. Paul Dobson (224) rolled entering the straight with Ben Goddard (895) climbing up on top of the overturned car. The two cars then slid down the length of the straight pushed along by Phil Mann (53) who was hooked onto them. They ended up in a heap in turn one where Dobson emerged from his car unscathed and smiling. When the race got going again Marquand made up for his earlier disappointment by taking the victory after chasing down Julian Coombes (828). Result: 689, 828, 992, 890, 526, 920, 844, 746, 376 and 320. Final: 33 cars for this one, and amazingly no stoppages. The race was not short of action however with eighteen Star/Superstar graded drivers putting on a fine display of fierce hard hitting action. Rygor, Jon Palmer (24) and Aaron Vaight (184) all lost time trading some monster hits between themselves, and Riggall and Matt Stoneman (127) ended their races prematurely. As the race neared its conclusion Fallows and Charlie Guinchard (183) were the main threat to Sansom who had broken away early on. With a number of lapped cars including Palmer between them the Semtex Kid held on for the victory. He won the Graders Trophy with a £100 bonus put up by David Hamaar the official F2 grader. Sansom was encouraged not to go overboard in terms of paint and signwriting –a reference to his scruffy car which clearly performed much better than it looked. Three victories over the weekend on his first appearance since 2017 proved that. Result: 352, 581, 183, 578, 890, 560, N1747, 184, 783 and 251. JP and the Semtex Kid. Worth the admission money just for the banter in the pits. A promoters dream pair. GN: Another fine race to bring the curtain down on an excellent weekend for the formula. Fallows ended up leaving the race early on by careering backwards along the back straight. Mark Gibbs (578) held the lead until just a few laps to go but was eventually caught by a hard charging Luke Wrench (560). Result: 560, 578, 538, 127, 24, 210, 184, 251, 352 and 390. V8’s The V8’s were two cars short on the Saturday total with a couple including Glenn Pursey (170) having a long night changing diffs. Heat 1: Stephen Young (176) took the victory in this one. Result: 176, 438, 8, 288, 328, 402, 69 and 167. Heat 2: Another win for Young. An excellent battle between Jon Brown (288), Guy Jolly (222) and Catherine Harris (8) saw the trio swapping places over a number of laps. Result: 176, 384, 131, 288, 222, 8, 525, 170 and 167. Heat 3: Jolly was involved in another tremendous battle for third place with Kev Stuchbury (131) and Carl Boswell (384). All three of them entered the last bend together but the 131 car won the drag race to the line. However, this was not for the victory as Craig Kellett (438) had built up an unassailable lead which he successfully converted into the win. Result: 438, 328, 131, 384, 69, 525, 170 and 167. Final: Brown used the bumper to good effect to hit the front early on. A caution flew with a lap to go for Young who was stranded on turn three. A last lap shootout followed with Jolly just applying enough force to send Brown wide on the last bend to claim the win. In the post-race interview Guy remarked that the V8 teams had enjoyed their first time visit and was sure that should the formula be able to secure further dates more drivers would venture south to enjoy the challenge the track provides. Result: 222, 288, 8, 131, 384, 69, 525, 438, 328 and 402. GN: Brown made no mistakes in this one which featured a battle between Harris and Amy Jagger (525) to bring the curtain down on the V8’s weekend. Result: 288, 384, 131, 176, 438, 222, 525, 8, 170 and 167. The compact Smeatharpe track was well suited to the large V8’s and even saw three wide down the straight at one point! National Ministox Heat 1: Jack Witts (180) carried on where he left off the night before with another dominating win. Result: 180, 186, 414, 67, 77, 51, 120, 335, 28 and 171. Heat 2: Kasey Jones (186) held on for the win in this one despite a late race caution. Result: 186, 20, 77, 120, 51, 28, 27, 64, 223 and 414. Heat 3: White top Fred Hunter-Johnson (20) was victorious, driving excellently to withstand the quicker cars behind. Result: 20, 186, 180, 925, 27, 67, 290, 51, 211 and 335. Heat 4: A repeat of heat 3 with Fred keeping Wittsy at bay. Result: 20, 180, 414, 27, 211, 64, 171, 335, 345 and 67. Golden Helmet: The race of the weekend for the young drivers. The start saw both 180 and 186 spin with 180 re-joining in front of the leader Hunter-Johnson. Luke Syrett-Barsby (27) caught the leader up and the pair engaged in a superb battle until a yellow flag period. At the restart 180 had climbed his way into 4th. This became 2nd before a further caution for Jamie Hanson (611) who had hit the turn one plating hard. The last lap shootout saw Witts and Charlie Tomblin (290) pass the 20 car. Tomblin tried a last bender on 180 but it wasn’t quite hard enough to dislodge the Euro Champ from taking the win. After the excitement of the race it was a shame to have post-race technical inspections suspend the full results. Result: 180, 120, X, X, X, X, X, 335, 67, 28 (925, 64, 414, 345, 186) The three classes put on a superb show over the two days. Hopefully there’ll be a repeat for the future. Pics in the gallery. Continues below:
-
Looking forward to it 👍
-
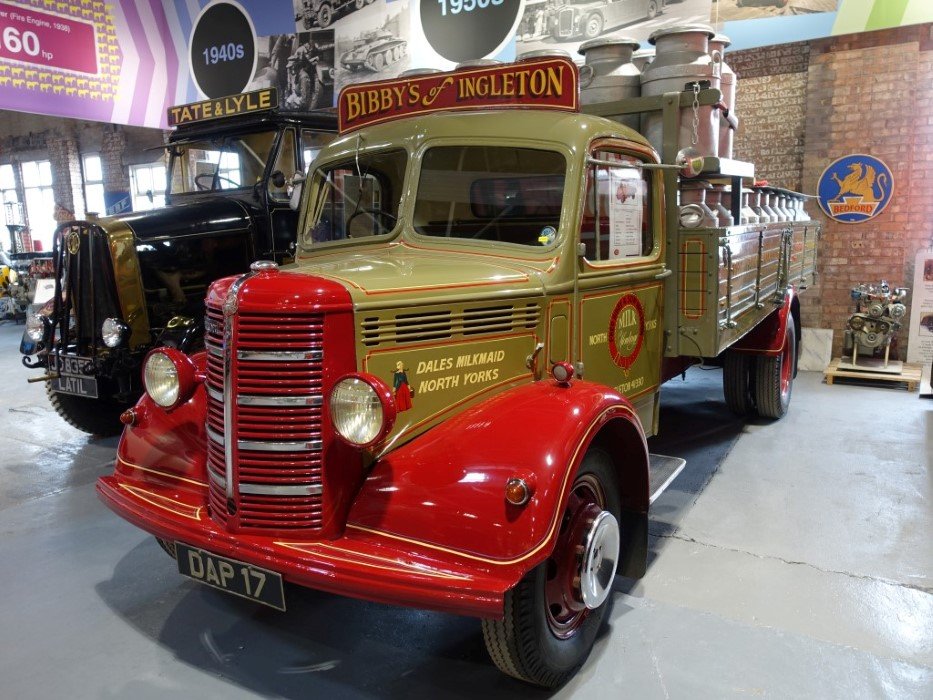
Cheers for the thanks folks 👍 Volvo Trucks UK put this on their Facebook page last weekend: A special Sunday evening shoutout to Mick Sworder - pilot of this 2014 Volvo FH16 750, supplied by Stuarts Truck & Bus.. It's primarily used to pull a low loader moving plant and vehicles, or anything else Mick can find to to fit on the trailer! A regular sight on roads near the firm's base near Huntingdon, Cambridgeshire, Mick loves how it drives, and appreciates every one of its 750 horses when maximum pulling power is required. The business is a true family affair too; Mick spends his days behind the wheel, whilst his Dad takes care of all storage needs in the yard, where they have two big warehouses and parking on concrete for up to 300 trucks. A stunning head-turner
-
Continued from above: Onto our last destination of the day now. We’re heading in the opposite direction back along the N&SJR to the village of Overstrand. As we pass back through Cromer tunnel the line turned south-east and followed the little-used extension line to North Walsham. The first place we come to is Overstrand, situated in ‘Poppyland’, so named for the poppies that grew in the fields and along the lineside. The village is on a cliff-top and was first established in the ninth century, long before it appeared in the Doomsday Book of 1086. It is recorded as Oxstrand and shows that King William gave the village to the captain of the cross-bowmen of his victorious army. Its name means ‘over or above the shore’. Cromer lighthouse was built in 1832 on the Overstrand hills. During the late 1800’s a writer for the Daily Telegraph wrote a series of articles about the village and surrounding area. They attracted the attention of the wealthy and famous. With the coming of the railway in 1906 they were joined by authors, poets and actors who came to enjoy the pleasures of the village. Many of them built houses there and it became known as the ‘village of millionaires’. Most of these houses are still standing together with the sites of some that have fallen into the sea, or have been destroyed by fire. These are just some of the properties with interesting links to their past occupants: Overstrand Hall was designed and built by Edward Lutyens in 1901. He designed and built over thirty major English country houses, and created over one hundred gardens. He designed the Cenotaph in Whitehall, and many other memorials and cemeteries for the Great War. The hall was used as a military hospital during WW1. Overstrand Cottage dates from 1750 and was purchased by rider John Maunsell Richardson. He won every steeplechase in England twice including the Grand National in 1873/4. The Grange has been owned by some influential people. It was built in 1903 for the manager of London’s Garrick Theatre before being subsequently purchased by Sir William Player the tobacco magnate. He in turn sold it to Sir Jesse Boots founder of the pharmaceutical company. Pear Tree Cottage was occupied in the summer leading up to WW1 by Clementine Churchill wife of Sir Winston Churchill. His mother Lady Randolph Churchill brought Winston and his brother Jack to Cromer in August and September 1885 to spend the summer. Lady Churchill became a frequent visitor to Overstrand for many years prior to the start of the war. In 1914 with war imminent Winston’s wife persuaded him to take a short badly needed break with her and their two sons at the cottage. On Sunday 26th July 1914 after speaking with Prince Louis of Battenberg he decided that events demanded his presence in London. He left Overstrand for the last time, and a few days later on the night of the 4th August Great Britain was at war with Germany. The White Horse public house is the oldest in the village and dates from 1725. Sea Marge House built in 1900 for Sir Edgar Speyer (born of German parents), the chairman and founder of the London Underground. One rumour was that Sea Marge was being used as a signalling point for German submarines. Sir Edgar was stripped of his knighthood and British nationality on the grounds of disloyalty to the king and unlawful communications with the enemy. Soon after, he was deported. Meadow Cottage was visited many times by Sir Harold Macmillan ( British Prime Minister 1957-1963) whose uncle owned the property. Beckhythe Manor built in 1904 for an Oxford University professor who was a leading light in the suffragette movement. Pump Cottage was the residence of Henry Royce (of Rolls Royce) for a time. Cliffside constructed in 1888 for Edward Boardman, a Norwich architect who converted Norwich Castle into a museum. It also became the home of Louis Meyer Van Moppen, a diamond merchant. Beck Hythe Fishing Station - Fourteen large boats, and several smaller boats were kept there, the catch was cod, herring and crabs. The Danish Pavilion was a remarkable property which had been exhibited in Paris at the International Exhibition of 1900. It was constructed mainly of compressed paper and timber and re-erected in the village. Unfortunately it was severely damaged by fire in 1951. A lot of the above have been turned into flats/ apartments/ hotels etc, or demolished. I bet the village was a lively place to live in those early years especially if you lived at the seaward end of the High Street. During the late 1930’s the cliffs succumbed to erosion and the properties and road collapsed into the sea. A new road bypassing the village was built owing to the whole of the Coast Road becoming unstable. A cliff fall severed the road in 1968, followed by a massive fall in 1994. Before the arrival of the railway and the building of two coal wharfs at Overstrand station coal and slate was transported from the north of England to Overstrand by sea. The sailing vessels were secured by a Kedge anchor, measuring 10ft long and 5ft wide, whilst their cargo was brought ashore. One of these anchors was left on West Beach, just beyond the rocks, and was visible at low tide until a few years ago, but has since become buried in the sand. A visit to Overstrand isn’t complete without a walk to see the disused station which had a direct service to London. The arrow shows the pedestrian access tunnel which is still complete today A circular walk from the village takes you over the abandoned trackbed to Woodbine Cottage where another track can be followed back past the station. It was opened in 1906, and was heavily used by holiday makers in the summer months. The station was on an embankment and entry to the centre island platforms was via a white tiled sloping subway with a frosted glass roof. A signal box and passing loop were located here. The station was host to a LNER camping coach in 1938 and 1939. Two coaches were also positioned here by the Eastern Region of British Railways in 1952. Closure along with the rest of the line came in 1953. It is now a private residence/farm. Amazingly everything is just as it was at closure. This view was taken from the same path as the scene below The same railings still in situ I think the owners appreciate the history of their property. That completes our tour around this very picturesque part of the country. Head to the gallery for more pics. Next time: We head to the south-west for “Under The Sun” - day two of the Taunton Speedweekend, then back up north for a tour around a Lancashire town with a fascinating industrial heritage.
-
Continued from above: East Runton Viaduct Before we get to the viaduct here’s a grim tale from the past! James Leak was a resident of East Runton around the early part of the 19th century. Leak was the local blacksmith, and renowned bare knuckle fighter. He lived in one of six thatched cottages that once stood on the cliff top near Runton gap. His blacksmith’s forge was at West Runton. In 1827 Leak had a big problem. The story goes that he had developed a gangrenous toe and was in fear of it spreading and causing his death. In his desperation, Leak came up with his own solution to his problem. He went to his forge in West Runton, rested his foot on his anvil and with one mighty blow removed the infected toe with a hammer and chisel. He then cauterized the stump with a red hot poker from out of his forge. This desperate surgery had been as a consequence of Leak being unable to afford surgeon’s fees. He made a full recovery and his home surgery seems to have had little effect on the man as he continued his prize-fighting and lived to the age of 82. They don’t breed em’ like that anymore! There are two viaducts here and both were built by the MGNR in 1902. Constructing the now disused viaduct The red arrow shows the location of the disused viaduct The disused one enabled a Cromer by-pass route for the N&SJR and led on to Sheringham. Closure of this came in 1952. They are unique with one on the skew. A brilliant feat of engineering and a real work of art. To get onto the viaduct is a climb up the embankment onto the trackbed. It is overgrown up here but only with woodland and mercifully no brambles. There is plenty of ballast on the surface, and the blue brick is in good condition. The active line between Cromer and Sheringham can be seen on the lower viaduct. At ground level the view of one viaduct through the arch of the other is unmatched in its perfection. It is a fantastic credit to the workmanship of the builders. Continues below:
-
Continued from above: Let’s see what remains in the area today. Cromer High Station All that’s left of this is the access road to the station from Mill Road. An old railway sleeper and a piece of rail standing upright mark the entrance. Nature is slowly taking over and has reduced its width considerably. Originally this would have led past the turntable. A brick retaining wall still stands at the top of the slope. All traces of the station have been swept away by a new housing estate. Before the houses were built the local youths used to thrash old cars up and down the trackbed and through the tunnel. On Station Road itself the embankment and the bridge brickwork for the GER line into the station are easily seen. Next to the top of the embankment are the remains of an old cattle dock. Cromer Tunnel Built in 1893, this has been hiding away for decades unknown by many of the locals. It’s not a long tunnel by any means at only 61 yards in length. A light is required if you want to take photo’s but to walk through is no problem as it is semi-daylight throughout. The main obstacle is getting to it. It’s in a fairly deep cutting with nettles and thorns on one side of the embankment, and thick razor sharp brambles on the other. The A149 overbridge runs close to it and just by a sign for Northrepps is a narrow gap which I used to get down to the track level. It is a beautiful blue brick construction complete with a full run of cable carriers still in situ. The ballast has been scooped over and piled up to one side. Midway through the tunnel is a WWII spigot mortar base. The local home guard set up a position here in the event of any attempted invasion. I hope the mortar operator was a good shot as it would not be a good idea to miss and hit the brick work. I bet it would have made their ears ring firing from that in this confined space. We’ll head west now to the disused East Runton Viaduct. It would be a treat if we could walk along the trackbed from the tunnel but it’s extremely overgrown and would need a machete to hack through it. Continues below:
-
Continued from above: Let’s have a look back at the local railway network now. It is a bit complicated at first owing to the layout and number of stations, junctions etc. A few attached maps, and reading it a few times may help hopefully. The GER and NSJR both converge to the south at North Walsham The East Norfolk Railway obtained an Act of Parliament in 1872 to build a line from Norwich to Cromer which opened as far as North Walsham on the 20th October 1874. Initially it comprised a single track line that was extended to Cromer in 1877. In 1882 the ENR was incorporated into the Great Eastern Railway who had operated the line from its opening. This map shows the stations This one the junctions In 1906 a new line was opened from Cromer Junction which was south of the GER terminus at Cromer High station. This line made a connection to the Norfolk and Suffolk Joint Railway at Roughton Road Junction. Passing there a train came shortly to Newstead Lane Junction where a left fork took a GER train around to Runton West Junction, and to Sheringham on the Midland and Great Northern line. A right fork took the N&SJR to Runton East Junction and into the M&GN terminus at Cromer Beach. Cromer once operated up to four railway stations at various times over the years, that of Cromer Beach, Cromer Links Halt, Cromer High and, latterly, Roughton Road – all within an apparent complicated rail system which became simplified when closures took their full effect. Now the town has just two – Cromer (former Cromer Beach) and Roughton Road which opened in 1985, near the site of the former Cromer High station. Roughton Road came into existence following the town’s growth as home for a growing number of Norwich commuters. This particular expansion was, of course, in complete contrast to the 1950’s and 60’s closures which followed the fall in traffic caused by Cromer’s decline in popularity as a holiday destination after World War II. At that time, there were also closures of many other Norfolk railway lines. The knock-on effect of this was that an inevitable early decision was made to concentrate all Cromer passenger traffic towards, and from, a single station. This was to be the former, and centralised Cromer Beach station, built in 1887 for the M&GNJR. This station was simply renamed ‘Cromer’. However, there is a hidden gem which will surprise those who believe that the county of Norfolk is completely flat. Cromer, in fact, has a tunnel, which normally would not be necessary if there were no hills to tackle. That tunnel still exists, neglected and almost forgotten, and is the only standard gauge railway tunnel in Norfolk. It was built to carry a single track by the Norfolk and Suffolk Joint Railway to take their Cromer Beach to Mundesley line underneath the Great Eastern’s Cromer High to Norwich line. The location of the tunnel Continues below:
-
Hi there folks, We start with a visit to Taunton last September for day one of their first Speedweekend of the year. This eagerly awaited weekend saw the track debut of the National Ministox and the V8 Stock Cars. Next, as we battle the pandemic we’ll have a brief look at how the railways dealt with diseases. We’ll then head east for a look at a couple of abandoned relics from the Norfolk and Suffolk Railway. Taunton began with a Friday night practice session. An empty stadium saw a handful of cars making laps around the Smeatharpe concrete oval. A very exciting sight was the appearance of the Semtex Kid (Dave Sansom 352) back in action. He is one of the true action men of the sport. He parked up next to Jon Palmer (24), and the pair of them lit the track up with exuberance. At one stage JP logged some laps in the 352 car. When they were on track together Jon put the bumper in on Dave just to remind him how it felt. However, the track marshal had a word to remind them that practice is supposed to be non-contact. Making his Taunton debut with an immaculate car was Dan Roots (776), whilst Aaron Vaight (184) had taken an early dart from Ormskirk to arrive in good time. Stunning! It was a very pleasant and relaxed evening at this delightful circuit in the Blackdown Hills, and it set the scene nicely for the following two days. I’ll cover the Saturday night meeting this time, and day two in our next get together. Taunton-Saturday 19th September 2020 The 53 F2’s for this meeting made it the highest tarmac attendance of the season which enabled a full 3 heat, consolation format. The first eight qualified for the Final. A significant amount of first timers to Smeatharpe gave added interest. Chris Masters (177) was out in an ex Chris Bradbury car which had raced to seven successive Final wins here back in 2013. Gary Kitching (746) made the journey from Grange-over-Sands, and Paul Dobson (224) likewise from Hetton-le-Hole, Tyne and Wear. Add Martin Bentley (982), Johnny ‘Egg’ Whittaker (533) and the above mentioned Dan Roots, and all was set for a great weekend. The 17-car V8 entry was a little less than expected, but there was a great anticipation as to how the tight confines of the track would suit the bigger cars. Several had travelled a long way to be there, and generous sponsorship had been raised to help reward those who had clocked up the motorway miles. The 25-car National Ministox entry were racing for their European Championship which is usually contested for in the Netherlands. As some of the drivers had travelled huge distances this weekend there would have been a few who felt like they were in a foreign country by the time they had arrived this far south and west! No such confusion for local girl Leah Sealy (475) though as she only had a short journey from Taunton. F2 Heat 1: Dave Sansom takes the win in his first race back after withstanding a last bender from Charlie Guinchard (183) Result: 352, NI747, 183, 184, 992, 890, 210 and 325. Heat 2: Jess Ward (86) continued her winning ways here with the victory in this race. A mid-race battle developed between Ant Riley (282) and Matt Hatch (320) resulting in some fierce hits. Results: 86, 560, 418, 538, 542, 115, 736 and 539. Heat 3: An easy win for Matt Stoneman. Result: 127, 24, 776, 161, 527, 581, 689 and 35. Consolation: Half the large field in this were either white or yellow graded and by half way James Rygor (783) had hit the front. However, with just a handful of laps left his rear suspension developed a problem and he was left to nurse it home for an eventual 5th place finish. With the demise of Rygor this left a three-way battle for the lead between Craig Driscoll (251), Matt Westaway (835) and Paul Moss (979). After many heavy bumper clashes Driscoll managed to scramble over the line first. Result: 251, 979, 835, 482, 783, 982, 460, 820, 746 and 920. Final: Before the 33 car field took the green flag James Rygor left the track with his mechanical trouble obviously not sorted. The first lap saw the blues and reds go thundering into turn three. Martin Bentley was at the front of the pack and ended up hitting the plating extremely hard. His car carried on scraping along the fence until it came to a stop on the back straight. The red flags were waved and Martin was given medical treatment before climbing out of his badly damaged car. Shortly after the first restart Charlie Fisher (35) ended up on top of Matt Weston’s (460) car which brought out the yellow flags. Another caution period occurred soon after with Steven Gilbert (542) spun out on the exit of turn two. He was hit by the 979 and 820 cars before he managed to drive to safety. The lead was now taken up by NI747 after a storming drive from the back. Soon after his throttle linkage broke resulting in a reduced speed. Aaron Vaight took advantage to jump into first spot closely followed by Luke Wrench (560) and 183. McKinstry managed to salvage a 4th place. Only eleven cars finished. Result: 184, 560, 183, NI747, 418, 352, 24, 210, 86 and 920. GN: The largest field of the night with 34 cars. Notwithstanding a mid-race caution period Tristan Claydon (210) took his first Taunton victory in this one with 184 finishing in eighth place from the lap handicap. Result: 210, 538, 161, 542, 24, 352, 560, 184, 578 and 581. The V8’s ran to a two from three format. Heat 1: Jon Brown (288) used the bumper with 2 to go to spin the early leader Stephen Young (176) to claim the first victory for the formula. This dropped Young back behind Catherine Harris (8) who he spun out on the next lap. The 8 car was unable to re-join before the flag fell. Result: 288, 438, 176, 402, 525, 170 and 350. Heat 2: Another win for Jon in this one. Result: 288, 8, 131, 222, 328, 384 and 170. Heat 3: National Points Champ Kevin Stuchbury (131) took the win. Result: 131, 69, 22, 438, 384, 525, 402, 167 and 507. Final: The V8’s under the lights were spectacular. Michael Boswell (328) pulled away from the field to build up a commanding lead. 131 and 288 were coming through though and with one to go were within range. Brown tried a spirited last bender but just failed to connect. Boswell known more for his shale form took the first ever V8 Final win here at Smeatharpe. Result: 328, 288, 131, 222, 8, 438, 384, 69, 402 and 176. GN: The second win for 131 after passing long-time leader Craig Kellett (438). Result: 131, 438, 288, 222, 176, 384, 328, 69, 525 and 170. The National Ministox contested four qualifying heats ahead of their European Championship. Each driver raced three times. Heat 1: Kasey Jones (186) had the honour of taking the first win here for the formula. Result: 186, 20, 180, 414, 28, 290, 77, 475, 211 and 27. Heat 2: After a caution for Elexie Bartram (293) who had a hard hit into the turn one plating it was local racer Leah Sealy (475) who took the win. Result: 475, 186, 77, 67, 290, 335, 120, 20, 64 and 51. Heat 3: Fred Hunter-Johnson (20) racing from the white grade made Jack Witts (180) work for his win in this race. After passing the 20 car Witts had to resist a determined challenge from the white top as he tried to retake the place. Result: 180, 20, 414, 77, 67, 64, 120, 335, 925 and 51. Heat 4: Jones takes his second victory of the evening. Result: 186, 180, 27, 211, 475, 424, 290, 120, 171 and 64. European Championship: A closed grid formation with positions within the grades determined by the points scored throughout the meeting. The 20 car was on pole, 186 on the third row and 180 five rows further back. Witts lost no time in making his way through the pack to grab the lead by halfway. He picked his way carefully through the back markers for the remainder of the race to regain the title he last held in 2017. 475 crossed the line in 2nd place but unfortunately failed post-race scrutineering. Result: 180, 77, 28, 67, 20, 64, 211, 27, 120 and 171. Pics in the gallery. Infectious diseases and the railway Ninety years ago building work was underway on the Great Western Railway’s new carriage and vehicle disinfecting plant. Built at Swindon Works next to 24 Shop this was a brick building containing an 85 feet long airtight cylinder into which the vehicle was pushed, and the airtight door closed and sealed. The massive airtight door and sealing ring were machined in the millwrights’ G shop at Swindon. Once sealed, the plant could create a vacuum of 28 inches with steam pipes raising the temperature to 120 degrees Fahrenheit. This was thought to kill all vermin, weevils, cockroaches etc after six hours. If a coach was thought to have come into contact with an infectious disease, formaldehyde gas was pumped into the cylinder when the vacuum had been dispersed. The plant was known as the ‘Bug House’ to Swindon’s workers. The inspiration was believed to have been a German carriage disinfecting plant built before the Great War used to disinfect carriages which had been into Russian territory. Station instructions required that coaches to be disinfected had to be placed in an isolated part of a yard or sidings. Windows had to be closed and paper had to be pasted over keyholes and other apertures. The coach would either be dealt with on the spot by a ‘competent person’, or be sent to Swindon with a label stating whether it was ‘verminous’ or ‘contagious’ to go through the new plant. In extreme cases compartments were stripped and the trimmings were burned. PPE for front line workers at Southall during the 1962 Smallpox epidemic were cigarettes and alcohol! Most of the 10/-, £1 and £5 notes taken that day were sent to the Bank of England for destruction. Many thanks to Mike Peart, the author of the above. Copyright to FNRM. The picture shows how a shunter’s truck was positioned between the vehicle and the propelling engine. ( Photographer unknown) Off we go now to Nelson’s County. However, you will need to answer a few questions before entering. They’re very particular who they let in. Checkpoints will be manned by Mat Newson, Roger Warnes, Old King Cole and Carrot Cruncher. If you get in we’ll meet up in Cromer where we’ll have a look at how the development of a North Norfolk rail network increased the town’s popularity. Intriguingly, what remains from those far off days of the late 1800’s? Cromer used to be known as Crowemere and was a small inland village before coming to prominence as a seaside town in Victorian times. It became a resort well known for Cromer crabs, the golf course, the pier and the lighthouse. The pier is an enduring example of Victorian architecture, having withstood many storms, tidal surges and even an attempt to blow it up by the Government in WW2 to prevent it being used as a landing strip for enemy invaders! The town was also home to Henry Blogg, the lifeboat’s legendary coxswain. Henry became a national hero and was awarded many honours, including three Gold and four Silver Medals from the RNLI, the George Cross for war service and the British Empire Medal. He remains the most decorated person in RNLI history. He carried out 387 rescues, and helped to save 873 lives over his 38 years as coxswain. He had served an outstanding 53 years on the lifeboats before retiring at the age of 74. Imagine you are looking out to sea from the cliff tops of Cromer. You might think that the view of the North Sea, with its crashing waves stretching to the horizon, has been the same for hundreds of years. You would, however be mistaken, for as mentioned above Cromer was actually inland for most of its history. Six hundred years ago you would have been looking at the lost village of Shipden, north Norfolk's own little lost Atlantis. Underneath the waves a quarter of a mile to the north east of Cromer’s pier lie the submerged ruins of a once thriving place. A medieval community once thrived where waves now crash on the North Sea shore. It had a population of 117 residents, a harbour, a collection of manor houses and two churches. The relentless incursions of the sea eventually swallowed up the village. This rising sea had a dramatic effect on the east coast. In 1336 part of Shipden's graveyard fell into the sea, with the church following in 1400. By the 14th Century most of Shipden had been lost to the sea's murky clutches, and most of the townsfolk moved further inland to Cromer. The loss of homes and livelihood was surely a tragedy for the villagers, forced to watch their previous lives vanish into the watery deep. It was however convenient for opportunistic, poor and desperate men; it is said that they would sleep on the shore, waiting until low tide when they could dive down and pillage anything worth taking from old Shipden. Fast forward to the 1800s and the church spire of Shipden is still visible during low tides. The tower stood 20ft high above the sea bed, making it a prominent feature of the coast, and nicknamed 'Church Rock'. By this time Cromer had become well known to the Victorians as a great place to escape the big smoke of the city and enjoy the seaside. A paddle steamer would take the holiday makers from Great Yarmouth to Cromer Pier. It was anchored off shore and rowing boats would ferry the passengers to the beach. However, the day did not go to plan for the tourists on August 8, 1888. The steamer 'Victoria' ran aground on the church tower so ropes were attached to the boat to try and pry it into safer waters. The boat, however, was firmly wedged in place. The steamer was a write-off and from that point on 'Church Rock' was seen as a dangerous nuisance by sailors and fishermen. The decision was made to blow up the tower with dynamite and so it too was devoured by the deep. Now nothing is visible of the lost Atlantis of Shipden and there is no sign of any evidence that it ever existed when you look out from the shoreline. Despite this, divers have been down to the ruins where it is so dark that the walls of the once proud homes are barely visible. The buildings that villagers used to live in are now the perfect habitat for crabs and lobsters that have taken up residency in the old ruins. This is not the end of the story of Shipden or Church Rock, for it has now become the stuff of legend and superstition. It is said that on dark, stormy nights when the sea looks like black ink, and the waves are so high you can feel spray from the cliffs edge, you can still hear the sound of the bells ringing out across the vast sea. Fishermen believe that the bells' tolls are a warning not to venture out to sea. Continues below:
-
Superb pics 👍
-
Cheers Carl Q.1 Q.2 Q.3 Have i passed the test? 😃 Cheers Bas. Happy New Year to all in the Netherlands.
-
Continued from above: In front of us is the memorial cairn to the crew. There were no survivors. Late in the evening of 22nd October 1944, the southern fells of Lakeland were cloaked in an impenetrable blanket of thick, dark cloud. The autumn chill and the still darkness hiding the crags and ridges were familiar conditions to the residents of Little Langdale, several of whom were doubtless huddled around the fire. They certainly would have heard the deep rumble of the four Rolls Royce engines, throttled back to try and save every drop of precious fuel, as the fully armed Royal Canadian Air Force Handley Page Halifax Bomber circled high above them. Halifax LL505, nicknamed ‘S for Sugar’, had flown out of the RAF base at Topcliffe, near Thirsk in North Yorkshire on a night navigation training flight. The crew; seven Canadians and one Scot, took off from Topcliffe at 14.05hrs and the flight plan would have seen them navigate to various turning points in the UK before returning to land back at base on completion of the training. Unfamiliar with this foreign landscape and its brooding weather conditions, the crew of eight young men were filled with a sense of foreboding. By 18.56hrs the crew had encountered very thick cloud whilst over the north-west of England and they became hopelessly lost, circling slowly and continually, waiting and hoping for just a fleeting break in the cloud which would give navigator Francis Bell a chance of getting a fix on their position. At 33, Bell was by several years the oldest member of the crew and a highly experienced navigator; but conditions were stacked against him. Pilot John Johnson, aged 27, knew his plane well, and knew that time wasn’t on their side. They’d been lost and circling too long, fuel was critically low, and the time for a terribly difficult decision, fraught with risk, was now upon him. The other six members of the crew, all in their late teens and early twenties, could do nothing more than wait, hope, and trust in their pilot and navigator. They made a series of radio transmissions including a "Darky" message beginning at 18.56hrs that were picked up on the ground. Upon receiving the "Darky" Topcliffe Flying Control transmitted instructions including a bearing to fly and locate Topcliffe, and a height to remain above to clear high ground. Johnston gently eased the aircraft into a cautious descent. He needed to drop below the cloud base for just long enough for Bell to get a positional fix; there was simply no other way, and no time left, to get their bearings and a route out of trouble. The engines slowed, the blinding cloud whistled around the cockpit windows, and hearts pounded as their eyes strained for that crucial glimpse of the landscape below. Half an hour later the crew were still struggling and were informed to climb to a safe height of 4,000ft and to orbit the area they were flying over. Topcliffe Flying Control made a request to Church Fenton airfield that a Mosquito be scrambled to assist the Halifax crew. A first 307 Squadron Mosquito ("A-165") flown by P/O Jerzy Nowakowski and F/O Emil Sluszkiewicz was despatched at 19.50hrs. The Mosquito would have probably been equipped with the latest night-fighting direction finding equipment, and with the Halifax presumably being the only one in the area the Mosquito crew were homed to it with the aim of guiding the Halifax crew to make a safe landing. The Mosquito crew were successful in locating the Halifax but literally as they located it they witnessed it crash. All the eight men on-board ever knew was a terrible split second of crashing, exploding metal and flames as they thundered into the ridge. The crew were from 1659 Heavy Conversion Unit Topcliffe: Pilot - F/O John Armstrong Johnston RCAF (C/29783), aged 27, of Carp, Ontario, Canada. Buried Blacon Cemetery, Chester. Navigator - F/O Francis Aubrey Bell RCAF (J/39888), aged 33, of Hampton, New Brunswick, Canada. Buried Blacon Cemetery, Chester. Bomb Aimer - P/O Robert Newton Whitley RCAF (J/38243), aged 20, of Regina, Saskatchewan, Canada. Buried Blacon Cemetery, Chester. Flight Engineer - Sgt William Brisbane Ferguson RAFVR (1826294), aged 19, of Caldercruix. Buried New Monkland Cemetery, Lanarkshire, Scotland. Wireless Operator / Air Gunner - Sgt Calvin George Whittingstall RCAF (R/198207), aged 20, of Mount Dennis, Ontario, Canada. Buried Blacon Cemetery, Chester. Air Gunner - Sgt Donald Fraser Titt RCAF (R/271259), aged 19, of Rockwood, Ontario, Canada. Buried Blacon Cemetery, Chester. Air Gunner - Sgt George Riddoch RCAF (R/259938), aged 20, of Sarnia, Ontario, Canada. Buried Blacon Cemetery, Chester. Flight Engineer - Sgt Harvey Ellsworth Pyche RCAF (R/225354), aged 21, of New Glasgow, Nova Scotia, Canada. Buried Blacon Cemetery, Chester. The first Mosquito landed at Church Fenton at 21.10hrs. A second Mosquito (“N-113”) took off at 22.05hrs and landed back at Church Fenton at 22.50hrs. What appears to have happened is that by descending to get a visual fix on the ground the Halifax was flying too low in the heart of the Lake District. The aircraft hit the sloping grass and rock strewn fellside near to the top of Great Carrs while flying in roughly from the west. There have been suggestions that the aircraft clipped the edge and went over the top in the force of the crash. Wreckage undoubtedly will have continued over the edge into the valley. There are signs of an intense fire on the rocks below. However, the massive undercarriage legs are up where the aircraft hit, but the wings are down in the boulder field below. With the legs being located inside the wings it seems improbable that they would fall off but more likely they were removed by the RAF to lighten the load of the wings so they could move them. A small part of the wreckage must have either caught fire near the crash site, or was set on fire after the crash by the RAF team that were sent to clear the site because a large area shows signs of an intense fire. The site was inaccessible to large vehicles which were commonly used to clear larger pieces of wrecked aircraft. The belief is that the larger items, such as the wings, were then pushed off the top of the mountain over the steep rockface into the valley below so as to stop continual reports of sightings by passing planes. In addition to both wings all four engines, all four propeller bosses, the aircraft's centre section, rear fuselage and mid upper turret fuselage are all known to have been strewn across the valley. The cockpit area, the gun turrets, ammunition and large tail section are not in either location. When people became interested in preserving historic aircraft a number of groups removed sections of the aircraft from the valley. Part of the tail was used by the group that created the Halifax at the Yorkshire Air Museum but they must surely have used other parts. A large upper fuselage section with the mid upper turret hole is on display at Newark Air Museum. Two of the Merlin engines were removed from the site by an Odiham based Chinnock helicopter to be placed in museums. One is now at the Ruskin Museum in nearby Coniston along with a propeller boss and gear, and the other engine is believed to be at a museum elsewhere; Newark is suggested as is the RAF Museum Hendon. The Ruskin Museum engine was originally on display in the village churchyard. The Yorkshire Air Museum has one of the engines but is almost certainly not on display due to their apparent no-crash-relics display policy. An MOD licence to excavate / recover items from the site was granted on a number of occasions. Today the wreckage on the boulders is still moving slowly with the rocks damaging the larger wing sections. It’s now a case of threading our way back down the crag to the boulder field to see what remains. I’ve been twice and had thick fog on the first occasion, and a snowstorm the second time even though it was clear at ground level with a good forecast. It’s an eerie place for sure when the mist’s down. I managed to locate one of the engines, part of a wing structure and a load of smaller pieces scattered around. I’ll have to go back on a good weather day as there are parts wedged in amongst the rocks which are not good to climb around unless bone dry. Pics in the gallery. Next time: “Under The Lights” – Day one of the Taunton Speed Weekend last September, which included the first ever visit by the National Ministox, & V8 Stock Cars to the Smeatharpe venue. We then head to Nelson’s County to have a look at an abandoned railway tunnel built 133 years ago, followed by a viaduct built 119 years ago. We’ll finish off with a look at the history of a village dating back to 800AD, which had wealth and prosperity brought to it by this railway. .
-
Continued from above: Let’s head onwards to the crash site now which is by the red mark on the above map. The end of the valley is a huge boulder field which has been created by years of harsh winter freeze/thaw cycles. The rock from the crags above has been shattered and split, and fallen into the valley below. It is leg and ankle breaking territory if you make the wrong move. The first pieces of wreckage will come into view here, but we’ll climb to the ridge high above first as this was the point of impact. Picking our way carefully upwards we emerge at the top with long distance views if the clag isn’t down. After the tough climb up you’ll be needing a breather so have a rest whilst I tell you what happened on that fateful night. Continues below:
-
Continued from above: Leaving these quarries behind it’s now a fair walk along an unmade track until we turn left and head up the valley of the Greenburn Beck. Here in this remote location we find the remains of the Greenburn Mine. The mine is regarded as an outlier of the Coniston Copper Mines and was known for parts of the 19th century as New Coniston Mine and Great Coniston Mine. The site was first mined for copper in the later 1600’s. It was worked intensively from 1845 until around 1861, and then less successfully by a succession of companies until 1885. Further extraction was carried out between 1906 and 1917 and there was intermittent activity on the site between 1924 and 1942, although a minimal amount of work was done. Most of the buildings were constructed before 1861 in the period of the mine’s most intensive use and some are fairly well preserved. Despite the ruinous condition of the buildings, the copper mines remain a relatively well-preserved extensive and impressive mining landscape containing the remains of a wide range of upstanding and buried mining components dating from the 17th to the 20th centuries. These include levels, shafts, trials, water management systems for powering machinery, remains of transportation systems for moving ore, remains of buildings associated with ore processing, spoil heaps, dressing waste, the remains of a range of associated buildings, numerous trackways and the existence of a tramway. The remains of a number of pieces of equipment for processing the ore also survive in situ and the complex as a whole is widely regarded as one of the best preserved copper mines in the Lake District. One of the waterwheel pits The main processing area of the mine lies next to the Greenburn Beck, at an altitude of 260m above sea level, mid-way along the valley, which marks the northern edge of the Tilberthwaite Fells. Five mineral veins were found here all containing copper ore and were mined at different dates to varying degrees. Part of the beck’s course was diverted to create Greenburn Reservoir to provide a water supply for the mines. The reservoir is now disused and the dam has been breached. Entry into the mines themselves is potentially dangerous. Certain structures around the processing area are also unstable and are particularly risky in wet weather, while other remains are situated in boggy or precipitous locations that are not easy to reach on foot. Continues below:
-
Continued from above: We’re going to head off now to the Lake District to have a look at what’s left of a Handley Page Halifax Bomber which came to grief not far from Coniston. It crashed into the top of a ridge between two summits whilst on a night navigation exercise. The Halifax was a four-engined heavy bomber used in WWII. It was designed by Handley Page and powered by four Rolls-Royce Merlin engines. Production began at Cricklewood, and at English Electric’s site at Salmesbury in Lancashire. Owing to the large production run several external companies were used in the manufacturing programme. The aircraft we are looking at was built by Rootes Motors at Speke Airport near Liverpool. The Rootes batch of aircraft were mainly used by Coastal Command, and for training purposes. The total production UK wide was 6,178. At the peak 41 separate factories, along with 600 sub-contractors and 51,000 employees were involved. The combined production rate saw one completed every hour. They were operated by the RAF, and other services such as the Royal Canadian Air Force and the Royal Australian Air Force. It performed many strategic bombing missions, many at night. The maiden flight took place on 25th October 1939, and production continued until April 1945. The Halifax flew a total of 82,773 ops, and dropped 224,207 tons of bombs. In that time 1,833 aircraft were lost. After the war they were used in commercial service mainly as freighters. In 1961 the last remaining ones were retired from operational use. To reach the crash site of this one involves a trek across rough ground and a climb up into the Tilberthwaite High Fells. A lot of the wreckage is strewn across a boulder field on the flanks of a high point called Great Carrs. Before we reach the site though there are some interesting places en-route. Parking is down a single track lane to the extensive old Tilberthwaite Quarry and mining areas. There are lots of old workings around these parts: Tilberthwaite Copper Mines The mines were worked by the Elizabethans from as early as 1540. Until the reign of Elizabeth the 1st England imported copper. Needing brass cannon to defend itself, reliance on copper imports was a strategic weakness. In the 1600’s the processed and prepared ore was transported by packhorse. At Keswick there were smelters, although ore could only be taken there in the summer, when the routes were passable. In the spring of 1602 as many as 500 local people were employed to move the ore to Keswick to make up for lost time over the winter. By the 1700’s packhorses travelled to the much closer Coniston Water. Boats took the ore via a series of linked waterways to the smelters in Liverpool. By the 1800’s the Furness Railway had arrived and transported the ore to the station at Coniston. It was then hauled to the Hafod Morfa copper works at Swansea. The mine was tied into the surrounding community. During the 1860’s and 70’s the mine company bought thousands of candles from suppliers in Kendal, Ulverston and Preston. Many hundredweights of coal were shipped up to the ‘copper station’ from Wigan, to heat the pitmen’s houses and power the machinery. Enormous quantities of gunpowder in cans and casks were exploded, obtained from Elterwater Gunpowder Company and other smaller suppliers. From 1877, receipts for dynamite, caps and cords appear in similarly large quantities. The mines company seems to have used the same suppliers for many things. For example, E. Salmon and Co supplied the stamp heads and stamp plates for the stamp mill, lever sockets, pull plates, rods, wagon wheels, ratchet wheels, small pulley wheels, big pulleys for shafts, and big half-rings for the wheel. For general work up at the mines, there are records of purchases of shovels, spades, rope, barrels of tar, pitch, grease, whips, pick and hammer shafts, oil, horse gear, larch poles and a number of trees, as well as dozens and dozens of brooms. Accounts relating to horses and their equipment show that horse shoe nails were bought by the thousand, while oats, corn, beans and bran were delivered by the sackload. Various owners over the years saw their fortunes fluctuate until by 1942 nothing of value was to be found. Hodge Close Quarry Hodge Close is an old green slate quarry. It was first worked in the 1800’s and continued right up until the 1960’s. Initially it was an open pit with levels and chambers coming off of it at various angles, heights and junctions. However, as the quarrying changed and developed, so the levels and chambers were gradually obliterated leaving just a limited number accessible. It is now known as an extreme diving location. Not only is it at a high altitude but is notorious for the fatalities of divers and rock climbers who have gone there. They end up losing their lives owing to inexperience in the tunnel system, or through cold water shock and drowning. From the far end are two huge openings which are visible at a low water level, one containing the wrecked steel base of a crane. Parrock Quarry By their very nature quarries were dangerous places to work. These three fatalities occurring here in the late 1800’s/early 1900’s: John Bond, aged 50. Huge roof collapse on 13th April 1898. Body not found until May 20th. Edward Phillipson, aged 35. On the 15th February 1899 his lighted candle fell into a cask of gunpowder. John Wilson, aged 55. On the 18th November 1914 he was killed by a wire rope. A small engine driven by compressed air wound the loaded wagons up a short incline plane (as at Cowdale Lime Quarry). At the top the wire haulage rope had to be unhooked. The wagon had not completely crested the top of the slope and as he drove the locating shackle out it started to descend at a rate of knots. He became entangled in the wire rope which threw him headfirst against the rock, fatally fracturing his skull. Continues below:
-
Happy New Year folks, It’s time to get that kettle on. For the first one of 2021 we’ll be having a look at the story behind a Lake District air crash, but before that we start with a whizz around some F2/Saloon meetings from the 2020 season. First: Taunton-Monday 31st August 2020 This was the first afternoon meeting here since racing had resumed at Smeatharpe in July. The prior dates had all been Monday evenings. The F2’s were competing in the annual Club 21 day, and the Saloons were completing their Autospeed Summer Series. The F2’s had been simply outstanding here following the return to racing with a high turnout of cars at all four meetings. A total of 58 different drivers had raced producing some quality entertainment. 38 were in attendance today incl. Brad McKinstry (NI747), and all five Final winners at the track so far during 2020. As is the norm here a traditional Grand Parade of all drivers took place before the meeting. Club 21 were providing trophies for the first three in every race, plus grade awards. Some of the Saloon drivers had not been as committed to the Summer Series here, and at St. Day as first thought. Not all drivers are able to take time off work for a Monday evening meeting which is understandable, and probably the journey to St. Day was not feasible if they had already missed earlier rounds. For this afternoon there were only 17 present but they gave some great entertainment. F2’s Heat 1: Josh Weare (736) took the lead until three-quarter distance when fellow white top Luke Beeson (287) took over. James Rygor (783) half-spun Weare to take 2nd place, before he got the lead a lap later. Result: 783, 287, 736, NI747, 560, 522, 578, 890, 418 and 35. Heat 2: A dominant drive from white graded Wayne Wadge (920) saw him hang on for the victory despite a last bender from Jon Palmer (24). Neil Hooper (676) was in fine form with a massive hit on Matt Stoneman (127) which saw Matt’s head restraint do its job well. Steven Gilbert (542) was another to feel the force of the 676 front bumper but held on for 3rd. Result: 920, 24, 542, 676, 184, 127, 539, 572, 538 and 210. Consolation: All but 4 of the 18 cars for this one were lower grades. Plenty of spinners caused mobile chicanes for the others to negotiate. First to go around was the early leader Chris Hatch (820,) whilst Will Adams (544) had two goes at it. The now leading car of Dale Moon (302) was baulked by the second spin of 544 and surrendered his lead to Matt Westaway (835). However, Moon came back at him to win. Result: 302, 689, 979, 835, 196, 325, 828, 320, 390 and 526. It was nice to see some more tradition upheld prior to the start of the Final. All the cars lined up angled against the fence and were called forward to take up their grid spot. Final: The 29 cars on track gave a super display of action packed racing. White graded Beeson and Weare both had laps up front until Chevy Mills (538) took over the hot spot. Rygor and Palmer were by now on a charge and as Mills was slowed by backmarkers they moved ever closer. With two to go Rygor had a clear track between him and Mills but was a few car lengths in arrears. Entering the last corner on the final lap the 783 car tried a long distance dive but only made light contact. Mills crossed the line to win the Club 21 trophy which his father had won 16 years earlier. The remaining star men hampered their chances with their consistent trading of hard hits in a great display. Result: 538, 783, 24, NI747, 979, 418, 736, 542, 127 and 676. GN: A high twenties car count again for this race. An early caution was called when Steve Hartnett (539) was cannoned into the home straight fence. He was then collected by Julian Coombes (828) and Tristan Claydon (210) who subsequently became locked together. As in the Final Beeson and Weare set the pace at the front. The 24 car was taking no prisoners though and had bludgeoned his way through into the lead spot with 3 to go. A lap down Ben Borthwick (418) had put a monster hit in on NI747 who took a few laps to catch him back up. Entering the last corner on the run to the flag he straight lined the bend and t-boned the 418 car. They became entangled, but both kept the power on. They crossed the line with Brad climbing over him going backwards in mid-air! A tremendous finish. Result: 24, 287, 184, 127, 736, 522, NI747, 689, 890 and 920. Saloons Heat 1: Billy Smith (161) was on top form in this opening race. He took on both his father Diggy (116) and Deane Mayes (730) early on before letting rip big time by removing his opposition in the closing laps but lost time with a half spin. He whacked Joe Powell (799) into a spun car, and then heavily fenced Ryan Wadling (476). Both drivers were done for the day. Up front Joe Grandon (277) forced the long-time leader Brad Morgan (00) into a parked car to take the win. Result: 277, 902, 561, 980, 00, 730, 116, 199, 447 and 161. Heat 2: An explosive end to this race as Grandon forced his way past Morgan with 2 laps to go. However, Morgan retaliated by spinning 277 out with a lap to go. All was not plain sailing for him though as Aaron Totham (561) arrived on the scene in attack mode. 00 held firm against the onslaught until Junior Buster (902) came flying in with a big hit into Totham. He cannoned into Morgan resulting in them both heading fenceward. 902 claimed the win. Result: 902, 561, 161, 00, 116, 980, 730, 504, 399 and 199. Final: It would be hard to match the previous action packed race. Morgan broke away from the field to keep out of trouble to take the win, and the overall Summer Series title. Billy Smith was the first of the star graders home having hammered his way through the pack. He finished things off a treat by fencing 902 on the last bend to take the 3rd place. Result: 00, 561, 161, 116, 730, 980, 399, 902, 842 and 199. Onto the Skegness two-dayer next on what would have been the F2 WF, and Saloons ORCi Championship week-end. For the Saloons it was now the Horry Barnes Memorial meeting. Skegness-Saturday 5th Sept 2020 46 F2’s were on hand to do battle, boosted by six from Scotland, and two from Northern Ireland. F2’s Heat 1: Luke Wrench (560) inherits the victory in this one after Harley Thackra (9) is docked for jumping the start. Result: 560, 527, 9, 226, 564, 251, 482, 282, 512 and 312. Heat 2: Jordan Thackra (324) takes the win in this incident packed race. Result: 324, 488, 618, 38, 7, NI747, 200, 86, 538 and 992. Consolation: A hectic race with the track offering a reduced grip. Ben Bate (161) hammered Dan Fallows (581) hard into the plating whilst Charlie Guinchard (183) set off for the victory. Result: 183, 24, 302, 722, 124, 191, 210, 287, 224 and 903. Final: A false start as the field randomly started racing before the green flag. As the pack were more intent on wrecking each other James Riggall (527) who was pole red managed to escape. He caught and passed Jess Ward (86) the early leader to take the win. A battle commenced between Gordon Moodie (7) and Luke Wrench (560) which continued into the GN. Result: 527, 226, 86, 560, 38, 7, 210, 538, 9 and 184. GN: Jess continued her good form with the win in this one from a fast charging 183. Dave Polley (38) joined in with the 7 v 560 war to provide some lively action which made this the race of the evening. Result: 86, 183, 9, 161, 7, 581, 200, 618, 560 and 324. The Saloons were split into a two thirds format and featured drivers from the West Country, Scotland and NI. Heat 1: An early caution for Nigel Thomas (642) who was sent heavily into the fence. On the restart Zak Gilmour (122) took up the running. Diggy Smith (116) came through from the very back of the field to take the lead just as another yellow flag flew. Rob Speak (318) closed the gap as the green waved but was unable to catch the 116 car. Result: 116, 318, 122, 730, 670, 504, 277,341, 600 and 368. Heat 2: With the sparks flying under the lights the start of the race saw half the field come together in a big way on the home straight. The reds came out for a spectacular rollover for Brad Compton-Sage (902) after he caught an infield marker tyre. He landed back on his wheels and drove off as the red flags flew. On the restart Danny Elbourn (504) took off in the lead pursued by Cole Atkins (399) and Luke Dorling (120). Graeme Shevill (661) had other ideas however and spun the front runners out resulting in another caution. Atkins was repositioned at the front on the restart but Dorling was strangely put to the back. Atkins took the win from Billy Smith (161) Result: 399, 161, 318, 296, 350, 730, 26, 661, 171 and 30. Heat 3: Yould took the victory in this last heat as the sparks from the seaside turn plating lit up the evening darkness. Result: 214, 116, 573, 600, 399, 120, 661, 341, 122 and 270. The Horry Barnes Memorial: From the get go it was clear that Diggy was on a mission to reach the front and retain the trophy. Speaky was his main rival and it took until past halfway before the 116 car found a way past. Barry Russell (600) was by now in the lead and with 3 to go Diggy sent him wide to take over at the front. 318 also got past 600 but in spite of his best endeavour couldn’t catch 116. Result: 116, 318, 600, 161, 349, 504, 670, 661, 399 and 270. A great ending to a superb evening’s racing for Horry. Skegness-Sunday 6th September 2020 A full format meeting for the F2’s with 47 cars present, and all in for the 33 Saloons. F2’s Heat 1: A victory for Harley Thackra (9), and a big hit for Dave Polley (38) from Jon Palmer (24) saw both cars scrape over the line with damage. Result: 9, 183, NI747, 618, 7, 86, 218, 38, 226 and 24. Heat 2: An untroubled win for James Riggall (527) in this one. Result: 527, 564, 302, 560, 324, 488, 200, 992, 538 and 184. Consolation: A somewhat confusing race with loads of crashing and docking of places at the end. The first 3 were all penalised for restart infringements thereby promoting 4th place finisher Steven Mc Cready (NI917) to the top. Result: NI917, 287, 161, 315, 419, 731, 17, 746, 903 and 722. Final: An all action race this one. An early incident between Ryan Farquhar (419) and Dale Moon (302) sees the 302 car hit the turn three fence with such force that the rear wheels lift off the track. A main feature of the race is a big falling out between 24 and 7. It all kicked off with JP laying a massive hit on Gordon who retaliated at the next bend, but then also side-swiped 24 into the plating. With a damaged car Palmer slowly circulated for a couple of laps obviously waiting for the gold roof to come by. He successfully returned the treatment with a similar move on the 7 car. Both cars were too badly damaged to continue. Whilst all this was going on Ben Lockwood (618) had broken away from his blue grade starting position and despite a fast closing Charlie Guinchard (183) had taken a lead he was to hold to the finish. Result: 618, 183, 9, NI747, 324, 488, 560, 992, 226 and 527. GN: 28 cars for this one with the eagerly anticipated inclusion of 7 and 24. The fun and games continued between these two from the early laps. Gordon made the first move with a big hit onto the 24 rear bumper which sent Jon and Luke Wrench (560) spinning. Suffering damage from the hit 7 pulled off whilst 24 continued towards the back. Jess Ward (86) picked up her second GN win of the weekend which would help her white roof change to red later in the season. JP got the last word in with his ongoing war with Gordon as he drove off. He shouted across, “Don’t run and hide on the infield, come down to Taunton and we can have some real fun” Result: 86, 183, 38, 564, NI747, 527, 488, 200, 324 and 419. Saloons Heat 1: This second day began with a big crash on the home straight after Brad Compton-Sage (902) hit a marker tyre for the second time this weekend. Mayhem ensued behind as lots of cars were left with nowhere to go. Michael Allard (349) bounced off another tyre and was launched nose first into the air. Rob Speak (318) ended up under the 902 boot, and Matt Fuller (270) came off worst after hitting the fence extremely hard. After a long delay to get Matt out of his car the restart saw Deane Mayes (730) get the win, followed by Speaky in second with a crumpled bonnet. Only eleven cars finished. Result: 730, 318, 120, 368, 350, 573, 341, 250, 399 and 162. Heat 2: Billy Smith (161) took the victory with dad Diggy unable to catch him. Result: 161, 116, 730, 350, 120, 428, 277, 318, 341 and 296. Final: The 161 car had made the break from the reds as the caution came out. Russell led the field away with both Smith cars and Mayes directly behind. He managed to hold them off for a couple of laps until Diggy took over. However, Billy sent his dad wide with Russell also getting in on the act by half spinning the 116 car to try unsuccessfully to take the 2nd place. Result: 161, 116, 600, 730, 670, 902, 318, 399, 296 and 29. Allcomers: 17 cars for this last race of the weekend. Most of the star men delayed one another as Mayes broke clear. He came in for some attention from the rest, as he had done for most of the two days. Barry Russell had taken the early lead until his car cut out. 730 was held up by cars spinning out in front of him leaving 902 to take the victory. At least his weekend ended on a high note after the crashes he had endured. Result: 902, 116, 161, 318, 120, 670, 370, 350, 730 and 277. As a substitute for the WF weekend this more than made up for it with some excellent entertainment over the two days. Finally a brief look in at a warm and sunny Northampton with 37 F2’s, and 20 Saloons present. South-west based James Lindsay (572) bypassed the clashing Bristol meeting to have a go on the shale. For the spectators, Spedeworth’s Covid rules stated that once in the stadium there would be no re-admittance if you needed to go back to your car for anything. Northampton-Sunday 13th September 2020 F2’s Heat 1: Greg McKenzie’s (47) promising form from the previous evening’s King’s Lynn meeting continued with an impressive flag to flag victory. He won his first ever race by a quarter of a lap! Result: 47, 414, 818, 724, 921, 995, 55, 142, 992 and 618. Heat 2: On a heavily watered track the drivers all piled into turn one in a big heap requiring a full re-start. Andrew Palmer (606) dominated proceedings from the rear of the pack to take the win. Result: 606, 374, 377, 941, 69, 488, 801, 788, 188 and 449. Consolation: Reece Cox (149) took the victory in this race which featured star men Dave Polley (38), and Charlie Guinchard (183). Result: 149, 38, 761, 618, 183, 413, 49, 992, 113 and 239. Final: McKenzie took the early lead before Jack Aldridge (921) had a turn up front. It didn’t last for Jack though as he was taken out by a backmarker in the form of a wayward Stephen Mallinson (788) on the back straight. Pat Issitt (113) took the victory, his second Final in two days. Result: 113, 801, 47, 413, 488, 618, 377, 995, 55 and 941. GN: It was that man McKenzie again in the 20 car race with another dominating win. He did come under pressure from Jack Cave (801) in the last seven laps, but was able to ride out the big hit that came on the last bend. Result: 47, 801, 38, 618, 995, 149, 788, 818, 488 and 449. Saloons Heat 1: Long distance Scottish traveller Barry Russell (600) took the lead with 3 to go from Will Brazier (340). Result: 600, 399, 340, 26, 116, 504, 149, 266, 389 and 349. Heat 2: A hectic race with spins, shunts and a roll. Ryan Santry (389) came through to lead until a red flag for Tyler Bloomfield (502) who had rolled in turn four. At the restart Sam Parrin (250) opened up a decent lead, and looked good for his first win until the throttle cable broke leaving him in a dangerous position. A three way battle between Diggy Smith (116), Jamie Sampson (149), and Russell developed after the restart. After swapping the lead several times Russell went up the inside of Smith on the penultimate lap. Entering the last bend the now second placed Sampson fired the 800 car into the plating. 149 went in as well but managed to scramble across the line before the fast closing 116 caught him. Result: 149, 116, 350, 600, 319, 389, 2, 340, 562 and 399. Final: A jumbled up start caused an early caution as several cars spun out. A four way dice for the lead ensued between Tommy Barnes (26), Michael Allard (349), Santry, and Smith. Barnes got the break, whilst Smith was spun out. He re-joined at the back and drove slowly around. As the leaders came to lap him the 26 car went around the outside and Diggy took him out breaking his steering. Santry now held the lead to the finish with Russell being spun out by Sampson. Santry was using the 161 car as Billy Smith was racing in Northern Ireland. Result: 389, 149, 399, 349, 600, 2, 116, 340, 39 and 319. Pics in the gallery from these meetings. Continues below:
-
Continued from above: The same location today The kilns were continuously run with fuel and stone. Limestone was brought from the quarry to the kiln top (which we’ll climb up to later) in Jubilee carts with a capacity of 1 ton. To get the carts to this level an incline plane was constructed. Various types of incline plane were used in quarries in the late nineteenth and early to mid- twentieth centuries. ‘Single-rope haulage’ worked off a drum at the top of the incline. One end of the cable was attached to the drum, and the other to the leading cart in a linked series of up to six carts. A brakesman let out the cable to lower the carts and in reverse hauled them back up again. A second system, ‘main and tail haulage’, relied more on gravity to send carts down the incline but this was primarily used when the loaded carts were being sent downhill. The main cable pulled empty ones up while the narrower tail cable lowered full ones down with each working off its own drum. A third common system of incline plane relied on an ‘endless (steel) rope’. This was used here at Cowdale. Several carts were clipped on to the cable, or chain, and let down under gravity with other carts being hauled back up by the weight of the descending carts. A Drum House was an integral part of this system containing a winding drum that held the wire cable. There are some remains of this structure here but the winding mechanism has long gone. Once the carts had been unclipped from the winding cable each was hand-pushed on a circular tramway track to whichever bowl was being loaded. They were then side-tipped down into the bowl. These top openings have since been capped off with concrete. Temperatures in excess of 1000C were required for the chemical reaction to take place to produce pure quicklime. The finished lime was then eventually drawn off from the bottom. Running along the base of the front face of the kiln bank is the loading platform, built 7ft above the ground level in front of the bank. Parallel to the loading platform was a standard-gauge rail track: quicklime was transferred in hand-pushed wheelbarrows, to be tipped from the loading platform across fixed planks into the rail wagons below. The loading platform and drawing arches were accessed up a flight of concrete steps at the western end of the loading platform. Look out for the old fading Colorquix graffiti on one of the buttress supports. These are usually to be found around abandoned places in this part of the UK. A little further along we come to my favourite. It is the massive superstructure for loading crushed raw limestone into rail wagons. The crushing plant loading gantry stands on three tiers, between the top of the rock face and the rail sidings at the base. Crushed stone was fed from the crushing plant through a sequence of chutes and hoppers, with different chutes delivering stone of different sizes, to the loading gantry on the rail siding level below. A series of cast-iron pulley wheels from the loading mechanism has survived, with part of the electric switchgear still in place. Before we climb up to the next level there is one final thing to look at. It is a rock cut cave with a stone-built blast wall across the entrance. The opening leads into a very confined space around 6ft high which has been cut from the rock face. It is unlikely to have been cut to create a shelter for storing explosives as black powder then in general use needed to be stored in cool dry conditions. While the shelter is certainly cool it is not dry but damp. In addition, its situation must rule out storage. It is too far away from the quarry that was worked to supply the kiln bank and crushing plant, and was probably associated with the cutting and quarrying of the natural rock face to create space for the rail siding, loading gantry and lime kiln bank at the very start of the site’s development. Its probable use was as a shelter for workmen while blasting was in process further along the face. As such, it would be a rare survivor as in most quarries such shelters were freestanding structures or, had they been rock-cut like this one, later quarrying would have destroyed them. This completes the look around this east-west terrace along which all of these structures have been built. The railway served this whole length right up to the Power House at the western end, and was linked to the Buxton branch of the Midland Railway at the eastern end. Although the track has been removed there is evidence of sleepers protruding from the ground at various points. In the area of the kilns and loading hoppers sidings branched from the main track to get closer to the buildings. To get to the next higher level a side track branched off the site’s main line near to the Power House. This was the start of the incline plane which served the upper levels of the kilns, crushing area and quarry floor. An alternative route up is what we’re going to take now. It is the access path for the workmen. It zigzags up the steep face to reach the main quarry level. This would have provided a short cut for workmen between the rail siding level and the upper levels of the site. The path was an essential link in the movement of people around the site. Without the path and steps, the men would have been faced with a time consuming walk of nearly ¼ mile along the rail siding, and then up the incline plane on to the horizontal tramway. Since the site has been abandoned these polished steps can be a devil to find in the summer when overgrown, and are lethal in winter when wet or icy as there is no handrail. Halfway up is a side path which goes across to the mid-level. This is another dodgy one as it’s a narrow traverse across a 75ft drop. The potential to go base over apex is extremely high. If you make it across in one piece you can get a close up of the tops of the hoppers and chutes. A system of concrete pillars, chute supports and gantries survive intact, with one cast iron chute remaining in place. There are numerous flights of steps in this area and a network of precarious paths linking between the hoppers. There are some big gaps where the stonework has decayed, and the top of the chutes can get overgrown in summer. It would be game over for sure if you went down one of those. At best you’d end up hanging by the neck, at worst slide straight through. To get to the top level it’s a walk through a tunnel and up another flight of steps. At the top you’ll come out onto the lower incline plane slope. This levels out and becomes the track-bed for the tramway. Limestone quarries relied on rail-based transportation systems to move materials around, into and out of the site. Tramways were used to move raw stone from the working faces within the quarry to either crushing plant or lime kilns. In many cases the motive power was the strength of the men themselves: they pushed filled carts from their section of the working face either to the plant or kilns, via a weigh house, or to a point on the co-axial tramway where several carts could be linked up to be hauled by pony. In larger quarries, or those with difficult ground small shunting locomotives would have been the preferred method. Where sloping ground had to be contended with the incline planes were the only possible means of transferring raw stone out of the quarry to crushing plant or kilns, or transferring coal to the top of the kilns. The finished products of lime and crushed stone had to be despatched from the site to market. Smaller or less accessible centres had no option other than to rely on road transport, but ideally direct rail access was the norm with sidings installed parallel to the main line at the kilns or crushing plant, or by siding links off the main railway line. At Cowdale each stage of this system of transport were used, and much of it can still be seen on the ground, except within the quarry itself. There’s a faded pic in the gallery which shows how it was. There was one tramway running the length of the quarry, on its southern side, with individual branches running off it to different sections along the then-working face. The photograph also shows side-tipping Jubilee carts on three of the branches, with others being gathered together in groups on the main line. Jubilee track was portable so the system could easily be reconfigured to suit the changing needs of quarrying operations. Because the quarry floor had topsoil laid on it after abandonment, to create pasture, all traces of the co-axial line and branches have either gone or lie buried. Let’s have a look now at the site of the quarry itself. We first go under an Incline Bridge which served the Upper Incline Plane. This incline would have been used to transfer stone discarded from the quarry and plant area to the upper spoil heaps which ring one side of the quarry. The bridge was only wide enough for a single-track tramway so carts would have been hauled up full one by one and then let down empty. Next we come to an old weigh house. This lies next to the main tramway from the central part of the quarry to the crushing plant. Limestone quarries operated on the ‘breaker and filler’ system, whereby individual quarrymen worked on specific sections of currently worked face, each with its own tramway link. It was their task to smash rock to the requisite size and to fill as many Jubilee carts as they could manage in a day, then to push the filled carts out of the quarry to either the kilns or crushing plant. They were usually paid on a piecework basis, and their daily pay reflected how many tons of rock they delivered to the weigh house. As it is situated directly on the main tramway from the quarry floor it almost certainly served as a weigh house for carts destined for the crushing plant. Alongside it, under the track, would have been the weighbridge. The quarry opens up before us. It is a breath-taking sight. Intensive work over a period of at least 60 years has created an extensive and level quarry floor. On the day I visited two climbers had crossed the adjacent field which is level with the cliff top edge of the back wall of the quarry. They abseiled down and climbed back up a number of times. A good training and practice spot for them. A pic in the gallery shows the scale of them compared to the ‘wall’. The neighbouring farmer had a herd of cows grazing at the far side which looked miniscule from a distance. Lying close to the upper incline plane, on the spoil heaps, is a large cast-iron cylindrical tank, which survives in very good condition. It is likely to be a compressed air receiver, forming part of the plant that generated compressed air used in drilling holes for blasting. A system of iron piping laid on A-frame stands would have covered the entire quarried area, taking compressed air from the compressing unit to each section of the working face; drilling prior to blasting was achieved using compressed air. After abandonment of the quarry, the system would have been stripped out. It was the practice in some limestone quarries, especially in the 1930's and 1940's, and especially so in the Yorkshire Dales, to use a method of blasting known as heading blasts. A broad and high tunnel was driven horizontally into the rock face with a T-shaped tunnel at the inner end. This was filled with powder and the main tunnel was packed with whatever material was available to prevent the blast from shooting out of the tunnel. Heading blasts brought down much more stone than conventional drilling methods. Up to 40,000 tons per blast was not unknown and a single blast provided many months of work for breakers and fillers. There is evidence that Cowdale used this method. BLF’s wage costs include payments to the men involved in ‘baring and heading drilling’. The barers stripped areas about to be blasted of overlying turf and soil, the drillers bored the tunnels for heading blasts, and stone getters drilled holes for powder in traditional forms of blasting. A heading blast at Cowdale in July 1931 brought down 60,000 tons which was one of the highest ever blasts on record. The high level pathway to the Powder House is close to here. It was a narrow ledge of rock with vertical drops on either side. Black powder had to be stored in a building far from the blasting site. It needed to be secure from theft, and be totally dry. The one at Cowdale had a suspended wooden floor to prevent rising damp, and to prevent sparks from hob-nailed boots. On a previous visit to the site I came across a single unused stamped firebrick lying on the ground within the north-western part of the quarry. The manufacturer’s mark was – THISTLE C. It was common practice for firebrick manufacturers to stamp code numbers or letters so that end users knew where each variant was to be used, just as masons’ marks were very common on roofing timbers. In this case, ‘Thistle’ was a trade name and ‘C’ was the variant code. ‘Thistle’ was a brand name for brick manufactured by JG Stein in various plants in Central Scotland, at Linlithgow in Lothian, Bonnybridge near Falkirk, and Castlecary near Cumbernauld. This single brick hints at long-distance trade links between Cowdale and its suppliers. It is possible that lime or crushed stone was being despatched to Central Scotland in trains that brought the bricks down on their return journeys. The brick was nowhere to be seen this time unfortunately. It probably ended up in someone’s back garden. I personally don’t agree with removing artifacts from historical sites. If that continued there would eventually be nothing left to see. Take only photos, and leave only footprints is my motto. The site has been closed for 60 years so few people still alive will have any knowledge of it as a working quarry, and following abandonment vegetation growth across the site makes public access difficult. There are few quarries anywhere with such levels of survival. Many quarries have lost their original features to landfill or later mechanised quarrying and industrial development. Cowdale has retained its features mainly because, apart from the quarry floor, the steep and difficult levels have ruled out any other use. Lack of access has protected the site. That completes our tour around this fascinating site. Next time: F2 and Saloon action from Taunton, Skegness and Northampton, plus the aircraft that never made it back. The story of what happened on a foggy night many years ago. Merry Christmas everyone!
-
Continued from above: The Cowdale quarry was established in the very late 1800’s as Staden Quarry by the New Buxton Lime Company to serve its other quarry on the other side of the valley. A substantial bridge over the river and road was required which was built of timber. The large stone-built kilns standing 50 feet high included a network of railway sidings above the A6. After the takeover by BLF a gatehouse, Power House and ancillary building were constructed in a very unusual ‘neo-Egyptian’ style. By 1924 the bridge was in a very poor state of repair and required renewal. Under the circumstances it was decided to re-route the connection to the sidings and lay a new access track. The original bridge was then demolished. It had got so bad that LMS engines were not permitted to cross it and wagons had to be loose shunted across. Outgoing wagons were run across to the western end of the bridge by horse and were picked up by an engine with a rake of wagons. Cowdale also had a Motor Rail petrol loco for some time after 1921. The works also had its own extensive 2ft gauge tram network using both petrol and diesel locomotives. Concrete buttresses were added to the kilns in 1930/31 to prevent structural failure partly caused by their massive size and top-heavy nature of the construction. Quarrying ceased in 1948 but the works remained in operation until 1955 in order to store stone. Towards the end of the 20th century the tramlines were removed and some of the mine’s buildings were demolished. The remaining works were left to decay. In 1997 English Heritage assessed the site for protection owing to it being one of the last remaining survivors of this type of quarry and the completeness of its features. In 2010 Buxton Water tabled a proposal to use the site as a water bottling and storage plant. It also included plans for the development of a heritage visitor centre. This would require the demolition of the Power House to improve road access. The planning application was refused in 2011, and again in 2012 following an appeal. However, the Power House was demolished in controversial circumstances just prior to the first application in May 2011. The High Peak Borough Council had deemed that the structure was dangerous. This was seen as a complete fabrication of the facts as the building was built like the proverbial brick sh……. It was seen by many as a significant loss. The BLF logo on the building was the last that bore such a mark. English Heritage scheduled the remaining structures on the site ensuring that the other two BLF buildings and buttressed kilns were now under statutory protection. Many of the buildings including the kilns, hoppers and gatehouse sit on terraces cut into steep rock linked by rail track-beds. Well that’s a bit about the history so let’s go and have a look around and see what we can find. Have a look at the pics in the gallery as we go as they help to explain everything, and they follow our route exactly. It’s a short walk from the layby to the gated entrance off the A6 but owing to there being no pavement it’s best not to hang about as some big stuff thunders through here. The first building we come to is the gatehouse. It is three bays wide with a central reception area and rooms either side. Door openings provide an open corridor along the back wall. Inside it’s a shell, and none of the glass or doors survive. Following the track uphill we pass an open niche in the wall. It lies adjacent to the main railway siding track bed and was probably connected to the logistics of shunting rail wagons, perhaps as a workmen’s shelter or tool/lamp store. At the top of the hill we come to a second terrace. At the nearest end is the site of the previously mentioned Power House. It would have been a prominent feature visible from both the road and rail. It contained a large circular water tank which was part of the power source for which the Power House was built. All that remains now is a pile of overgrown rubble. A short distance away is a second gatehouse. This has a door at each end, one of which is half filled in by soil and stone which has slipped from above. The decoration above the window openings mirror that found on the first gatehouse. They are of an Art Deco style but 15 years earlier than that period. The full length of the back wall is a corridor with a concrete ledge or bench which gives the impression it was used as a waiting area. Again, none of the doors or windows survive. Next we come to the bank of four buttressed kilns which stand around 50ft above the former track bed of the railway sidings. The kilns are of special importance, as they are potentially the last traditional vertical stone-built lime kilns to be used in Derbyshire. With the addition of the later buttressing this kiln battery is unique in England in this form. At their base are two brick lined drawing arches. Within these are four recesses each containing a large hopper. The rear wall of each arch is the actual exposed rock face. This great pic from around 1930 shows the original built vertical kilns with the drawing arches at their base. The concrete buttresses are in the process of being added for strength. This shot shows the steps up to the loading platform and the railway sidings Continues below:
-
Continued from above: Ok then, it’s time we got off the beaten track once again. Let’s head north now and I’ll meet you all in the quiet hamlet of Cowdale, six miles from Buxton’s High Edge Raceway. We’ll be having a look around the abandoned site of Cowdale Lime Works & Quarry. There’s a short drive from the hamlet via its single track lane to the A6 where we’ll turn left. Going under two railway bridges we come to a lay-by on the left hand side. You can leave 2020 behind here as we’ll be venturing into the woods to find a hidden gem from the past. It is an unforgettable place, and a truly amazing step back in time. Cowdale is a site with visible remains of almost every stage in the process of limestone quarrying, lime burning and stone crushing. It contains a rare example of an intact massive-scale vertical lime kiln with later massive pre-cast concrete buttressing; a rare example of a precast concrete crushed stone loading gantry system; rare, and possibly unique in a quarry complex, buildings with decorative moulding; and remains of an internal transportation network. It is also thought to be the last traditional lime kiln in Derbyshire to have been worked on an industrial scale. First of all though a bit of history about the lime industry in this part of the Peak District. The whole area was a warm shallow sea many millions of years ago and the layers of limestone which were formed became compressed into rocks. Over time erosion of the softer rock above revealed formations of high quality limestone. The town of Buxton was developed by the lime industry, and it has shaped the land around this area. It has been quarried as building stone for centuries. Before the advent of electricity lime was burnt to provide light. This is the origin of the saying, ’in the limelight’. The Industrial Revolution fuelled the demand for lime. There are the remains of at least 100 large kilns, and associated spoil heaps in the area which date from the 1600-1800’s. In 1874 a company by the name of Brunner Mond had a soda ash works in Northwich, Cheshire. Soda ash was used for making soap, dyes and glass. The Lancashire cotton industry and the glass manufacturers in St. Helens required huge amounts of soda ash. One of the main ingredients was limestone from the Buxton area. More on Brunner Mond later. The coming of the railways from Manchester and London in the 1860’s saw the opening of many additional quarries. By 1891 fierce competition from rival quarry owners resulted in the formation of the Buxton Lime Firms by thirteen independents. They controlled the price of stone and lime, and in addition to the quarries also owned 21 large stone crushers and 3 collieries. BLF produced over 360,000 tons of limestone and 280,000 tons of lime per year. By 1915 they had opened an additional nine quarries including taking over our one at Cowdale in 1908. By 1916, steel companies were beginning to complain about the shortage of limestone supplied to them by the BLF. They responded by saying this shortage was due to the lack of workmen left at the company - by February 1916 over 600 of their men had joined the Army. Accordingly, like many firms in Britain during this period, Buxton Lime Firms employed women. They worked in the following areas: tree felling and wood cutting for quarry and colliery timber dry stone walling joinery agricultural work the rabbit section the goat section painting and signwriting railway trucks (Pic credit to TNA) BLF were supplying ever increasing quantities to Brunner Mond, and in 1919 they were taken over by BM. In 1926 Imperial Chemical Industries (ICI) was formed with the merging of Brunner Mond and three other companies. Buxton became the headquarters of the ICI lime division. Longson's are still active today. (Pic credit to Discover Buxton) Here’s an amusing tale. Sam Longson Haulage ran a lot of Derbyshire limestone into Llanwern, and loaded anthracite back from Ammonford. The drivers stayed in digs in Merthyr and would leave a loaded 8-legger under one of the bedroom windows. This was for the ‘after 11:00pm’ drivers who would climb onto it, and into the room, otherwise being locked out. One night the loaded one was swapped for an empty that had been cleverly sheeted to look full. The well - oiled drivers returned from the pub and one by one climbed up the tipper ladder and crashed straight down into the empty limestone/sand/coal body! Unable to get out they all slept it off in a heap until the next morning. They all woke up soon enough when the driver raised the tipper and they all slid out the back! They were a crazy gang who used to bring terror to the old road to Wales. It was common practice that all new drivers were instructed by the old hands never to give way under any circumstances to the steel boys coming the opposite way. One night four soldiers were thumbing a lift back to Catterick Barracks. They were picked up by four of Longson’s night men heading north for ICI Billingham. The lead driver was known for his not so steady driving manner, and one of the others had crashed a Foden through a shop in Buxton racing his mate. All four lads went on a ride they would never forget. When they stopped to let the soldiers out one of them had a pen and paper and wrote down the company name. He said,”When we get back to the barracks they would post the company name on the notice board stating never to accept a lift off any of these trucks ever!” as he had never been as frightened in his entire life. Continues below:
-
Continued from above: Next up was the Mendips. Bristol – Sunday 30th August 2020 A glorious summer day greeted me on arrival at this unique track in the Somerset hills. Far ranging views were to be had including Glastonbury Tor 20 miles away. Closer to home was the almost circular Cheddar Reservoir which glinted like a mirror in the midday sun. It was a far cry from some of my visits here that have been in thick fog! It was the Mendips Raceway’s turn to host the F2’s after the West Country had restarted the season in earnest with the majority of meetings being held there. The National Points had a look of the 1980’s about it with nearly all the top spots being taken by western drivers. A good entry of 34 cars raced a two heat, consi format. However, the Bristol team had their own ideas and made it ten to qualify from the heats, and four from the Consi! Very strange I thought, and I was not the only one. Big hitters Charlie Guinchard (183), and Brad McKinstry (NI747) over from Northern Ireland were two welcome visitors. A good representation from the north-west included Bolton’s Phil Mann (53), Aaron Vaight (184), and Ant Riley (242). Heat 1: Chris Mikulla (522) blasted through the field to win this opening heat. Result: 522, 801, 783, NI747, 47, 287, 581, 53, 979, 282 and 820 Heat 2: A big crash between Tristan Claydon (210) and Julian Coombes (828) entering the back straight brought out the caution in this one. The yellow flag period aided Luke Wrench’s (560) progress through the pack to claim the victory. Aaron Vaight (184) suffered front end damage in quite a destructive race. Result: 560, 183, 24, 127, 992, 736, 464, 320, 86 and 390 Consolation: Only ten cars out for this one. 210 claimed the win, with 184 following him home which made up for their earlier damage. Result: 210, 184, 542, 976, 890, 578, 359 and 291. N.O.F. Final: The Marion Bennet Trophy was to be raced for in this one. The trophy has been run since the mid-eighties. Marion was a regular attendee at Bristol for many years and her family put this trophy up to commemorate her. Dave Polley (38) won it a couple of seasons back and noticed that it had not been engraved for a few years. His wife Liz, and ace F2 scribe Pete Randall found out who all the previous winners were over the years. Liz then got the trophy cleaned and fully engraved up to date. Marion’s grand-daughter Jenny Chalk now presents this annually. Harley Burns (992) took an early lead until a caution for a turn 2 crash involving Jessica Smith (390) and Paul Rice (890) which left their cars interlocked. Harley had the formidable sight of James Rygor (783), Jon Palmer (24) and 560 lined up behind him for the restart. At the drop of the green Rygor swept through into the lead. The remaining laps were reeled off without any further cautions. Steven Gilbert (542) suffered engine and rear end troubles in this race and the team were kept busy in the pits post-race with an engine swap etc. Result: 783, 24, 560, 127, 183, 522, NI747, 992, 184 and 581 GN: The best race of the day for me. A big fall out between 560 and NI747 saw some huge hits going in between the pair which livened things up a treat. The victory went to Guinchy in the new car, with Rygor coming home second from the lap handicap. Result: 183, 783, 184, 992, 24, 287, 210, 91, 736 and 53 We started with a pic of Guinchy so we’ll finish with one too. A happy Charlie after the GN win. A very enjoyable afternoon indeed. Pics from Bristol in the gallery. Continues below:
-
Hi there folks, Get yourself a brew, a packet of biscuits, and take a seat in your favourite chair. Last time I mentioned we were heading to the Mendips Raceway, but a few days before that there was the Tuesday Skeggy meeting so we’ll have a brief look at that one first. Skegness – Tuesday 25th August 2020 With Storm Francis in the air 29 F2’s turned out to provide a night of excellent racing. The debut of the long awaited new car from Charlie Guinchard (183) being a highlight. The long distance travellers included four from the West Country, and two from the north of Scotland. The Scottish duo were Michael Philip (195) from Forres, and Albert Smith (794) from Fraserburgh. Both lads had an 8½ journey each way, and near enough 1000 miles for the round trip! On a weekday as well. Every credit. A two from three format for this meeting. Heat 1: Local driver James Riggall (527) took the win in the damp conditions, with Guinchy in 2nd. Result: 527, 183, 38, 992, 218, 184, 126, 581, 9 and 411 Heat 2: A disorganised race start had the blues in amongst the lower graders almost straightaway. The race finish saw two Harleys in 1st and 2nd, Thackra (9) followed by Burns (992). Result: 9, 992, 184, 195, 24, 539, 527, 794, 411 and 161 Heat 3: It was the turn of a duo of Philips to finish in the top two this time. Bolton based Phil Mann (53) taking the victory after passing Wayne Wadge (920) with 4 to go, and Michael Philip finishing as runner up. Result: 53, 195, 86, 24, 183, 161, 920, 600, 38 and 581 Final: A dry track to start which became very slippery after heavy rain mid race. There was an early caution period for Jamie Avery (126) after he hit the turn one plating hard. On the restart Jon Palmer (24) gave Dave Polley (38) a big hit but ended up with damage himself, and another spell of waved yellows. Polley joined the back of the field for the restart as the rain began. Guinchy quickly mastered the conditions and left everyone standing as he set sail for the victory. The new car, combined with Charlie’s very accomplished race craft will make this combination an even more formidable opponent. 794 narrowed the gap in the last few laps to take 2nd, with Aaron Vaight (184) in 3rd. Dave P recovering well for 4th. Result; 183, 794, 184, 38, 527, 195, 218, 732, 200 and 581 GN: Only 13 cars braved the cold, wet and windy conditions for this one with Jess Ward (86) taking the victory. Result: 86, 38, 195, 527, 581, 226, 200, 539, 794 and 903. On my way home along the M180 near to Scawby i was passed at a rate of knots by Albert Smith’s van and trailer. I think he would have given the Gordon Moodie team a run for their money as they can certainly shift as I’ve witnessed a few times on the M5! As Albert’s tail lights disappeared into the distance I didn’t envy his 7hrs+ journey still to do. Continues below:
-
Rest assured Graham, there's plenty of articles to come. Many thanks for the info and your memories regarding AW Smith. Just by chance do you have any old photo's from those days?
-
Cheers Bas. Here's a beauty for you: A tag axle DAF XF510 to Euro 6 spec owned by Mouland's of Fordingbridge. They're based not far from Ringwood Raceway, and specialise in heavy haulage and abnormal loads. The company was founded in 1995 with one 28ft rigid. The fleet has expanded greatly since those early days. They have invested heavily in specialist equipment and can carry loads up to 150 tonnes. The Netherlands theme within the company includes a tri-axle Nooteboome extending semi low-loader. The trailer here is a MAC, which is the brand name of McCauley Trailers of Toombridge, Co.Antrim. The company were founded in 1955 and now have a presence in 16 countries. They design and manufacture specialist trailers for agriculture, construction, forestry, waste handling, quarrying, transportation and public utilities. It's good to see two success stories in one pic.
-
Continued from above: A couple of younger exhibits next. The Tame division of DAF Trucks built a hybrid LF45. It had a 4.5ltr Paccar FR diesel engine plus a re-generative 60hp electric motor fitted between the clutch and Eaton 6 speed auto box. Power output was 160bhp. A fully charged set of 96 batteries provided power for 2km of stop/start conditions within a city’s green zone. However, the diesel engine would still be running on idle to power the steering and compressor. Alongside the DAF was a Foden Alpha 8 x 4 built in 2006. It was one of the last and was fitted with a Cummins M11 engine. It put out 420bhp through a ZF 16 speed twin splitter gearbox. A very tidy Mammoth Major in Michelin colours comes next which was built in 1954 by AEC at their factory in Southall, West London. The example here is an 8 x 4 forward control version capable of a 15 ton payload. AEC became part of Leyland in 1962 and its name disappeared in 1977. The owners of the Ribble coach also own our next beauty. I actually saw this when it was in the process of restoration and was eager to see the finished article. It is a stunning 1959 Leyland Octopus bodied as a fuel tanker for Shell-BP. This is in the classic format of a 22 ton 8 wheel chassis which was the standard for heavy duty long distance work until the artics came on stream in the later 1960’s. This example has the Leyland 9.8ltr engine fitted. The colours and presentation of this vehicle are truly to be savoured. We come to the final two in this first part of our look around. A Bedford OL80, and a Latil Traulier. The OL80 was built in 1950 by Vauxhall Motors in Luton. It is fitted with a 3.5ltr engine producing 80bhp through its 4 speed gearbox. The mid-weight truck was based on a very successful American design. Bedford, a subsidiary of General Motors of America had built over 25,000 of these (mainly for export) by 1946, having built many times that number during the war years. Its half millionth sale came in 1947, not bad for a firm that had been newly created in 1931. At the outbreak of war many Bedford trucks were requisitioned for military use. A great number were abandoned at Dunkirk. An attempt was made to render them useless by draining the oil and running the engine until it seized. However, the German forces were so short of transport that they repaired the better ones and used them alongside the Opel Blitz (also part of GM). The example here was used by Bibby’s of Ingleton in the Yorkshire Dales. The family have lived and traded in Ingleton for over 100 years. In 1945 they started a milk haulage business delivering milk from farms to dairies. In 1956 they purchased their first coach, a Leyland Comet. The vehicles were housed in a disused railway tunnel and a corrugated tin shed. By 1962 they had got five coaches and over the following three years phased out the milk business. The first brand new coach arrived in 1971, a Ford R192 with a Duple Viceroy body. In the early eighties they had expanded the fleet to include 7 Fords, 4 minibuses and the Bedford OB. Over the following years they moved from Fords to Bedfords and Leyland Tigers. In the 1990’s they purchased their first rear engined DAF coach, and today DAF chassis’ are favoured. In 1994 two DAF bulk tippers were purchased which delivered animal feed around the local area. They employ around 45 full time staff, and the coaching side is now the main business. They operate 16 school runs a day, and in more normal times around 200 coach tours a year. It’s great to see a survivor from the early days. Our last one is an unusual Latil Trauiler. It was built under licence by Shelvoke and Drury of Letchworth in 1932. A 25hp Meadows petrol engine powered the four wheel steer/four wheel drive machine. Latil was a French builder of cars, trucks and tractors. The firm dates back to 1898 when George Latil built a portable engine to go between the horse shafts of a cart. The German company of MAN took over the factory during WWII, and the Latil company itself was taken over initially by Renault before being sold on to truck maker Saviem. In 1974 the French trailer building company of Brimont became the owner. This exhibit saw service with Tate and Lyle. Henry Tate, a successful grocer from Liverpool opened a sugar refinery in Love Lane, Liverpool in 1872. He expanded the business with the opening of his Thames Sugar Refinery in London’s East End in 1878, specialising in cube sugar. In 1882 Abram Lyle opened a refinery at London’s Plaistow Wharf refining sugar and producing Lyle’s Golden Syrup. In 1921 the two companies merged to become the well known Tate and Lyle. The need to transport the company’s raw materials and finished products resulted in Tate and Lyle investing in their own in-house transport fleet. From those early days they adopted the navy blue and gold livery which the company still use today. Production at the Liverpool factory reached a peak of 550,000 tons in 1972, and stood at 300,000 tons a year when the factory was forced to close in 1981 owing to the EU restricting the supply of cane sugar. In 2010 the sugar business was sold to American Sugar Refining. The last of its operations on Merseyside disappeared with the sale of its molasses business bringing to an end its 150 year association with Liverpool. Well that completes this first visit, we’ll return for part two later in the winter. Pics in the gallery. Next time: We’ll pay an August Bank Holiday visit to the Mendips Raceway for some F2 action in racing for the Marion Bennett Trophy. It’s then off to a location only six miles from Buxton’s High Edge Raceway. We’ll get ourselves off the beaten track to see the industrial remains that lie lost and gone forever, but the ghosts are still there hidden in the woods!

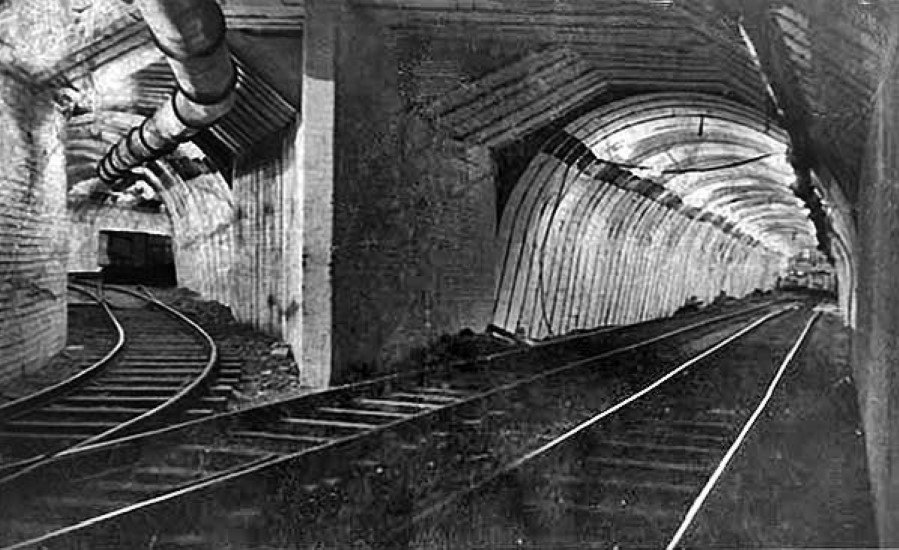
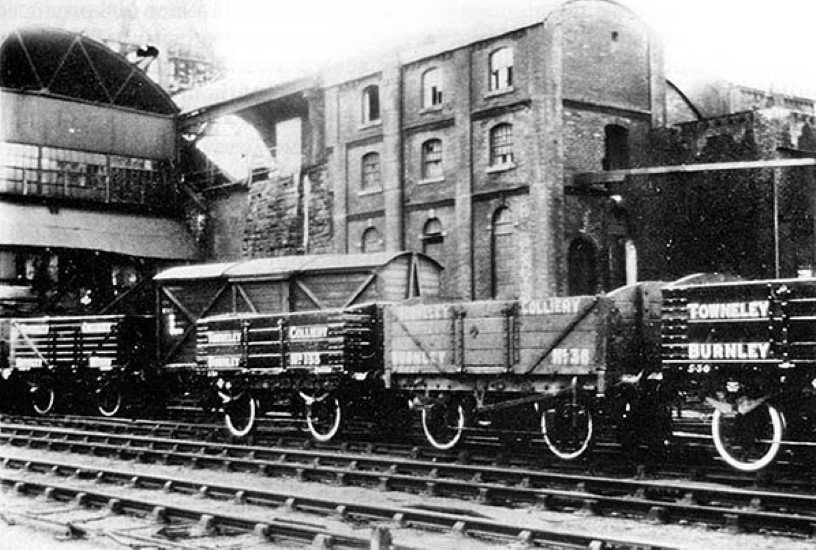
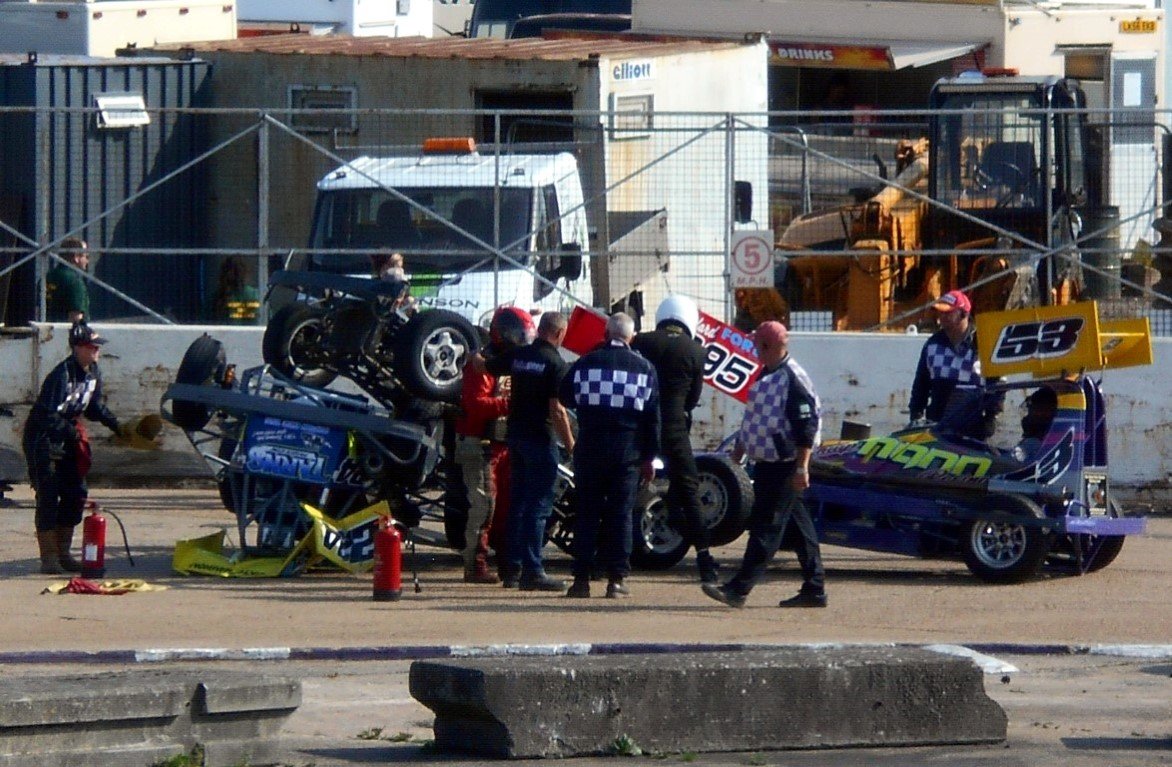
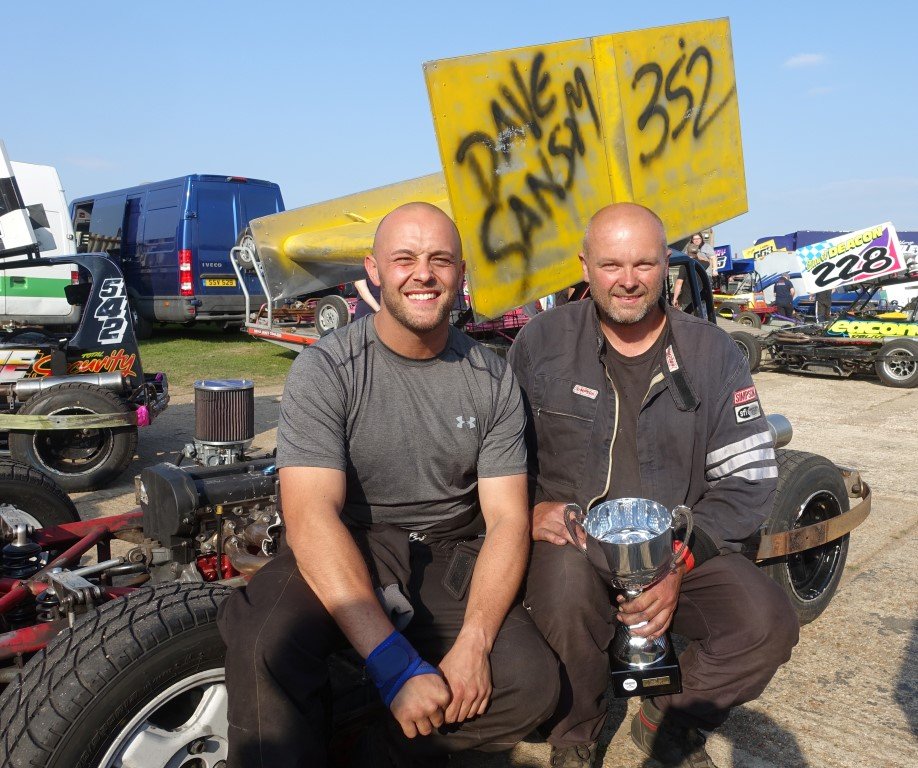
x.jpg.c0059236c2fa135e3d4482480cafdf78.jpg)
xa.jpg.2fd4eb0705fc50a53ef70c1154032f82.jpg)
xa.jpg.c32168095793860673275c6c5fb89a2d.jpg)
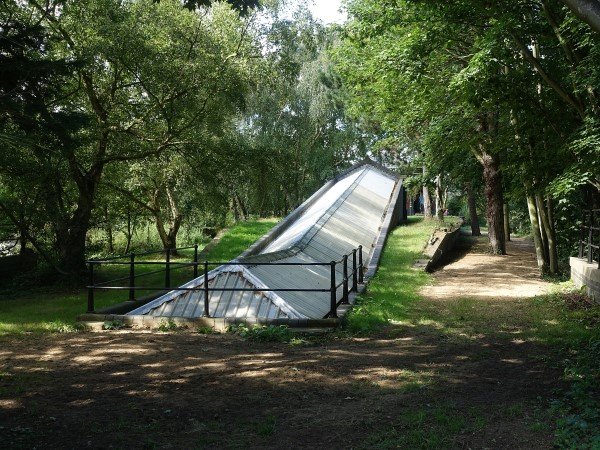
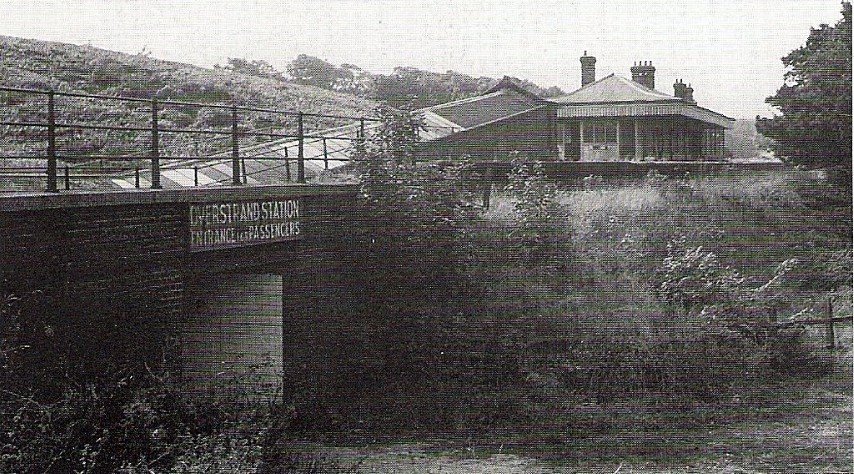
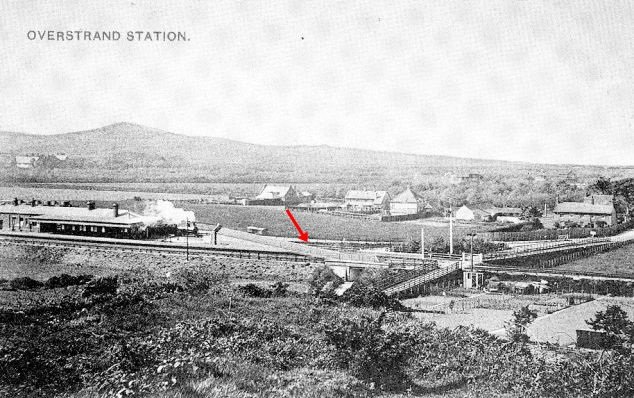


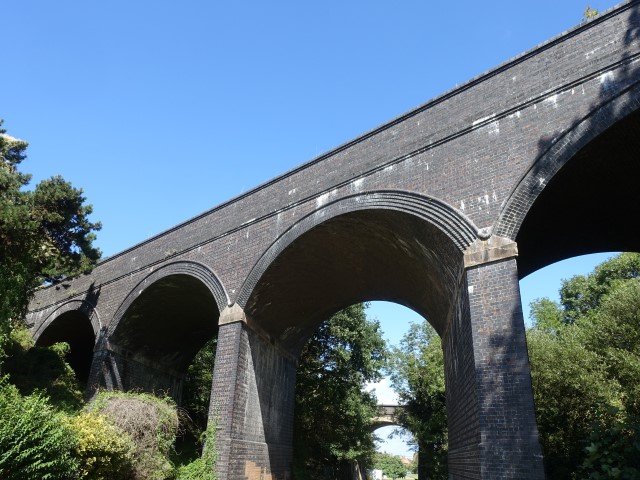
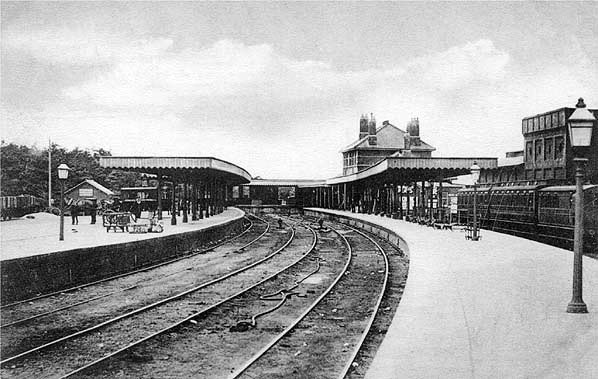
.JPG.99364bd300bbac749c4a109e5be7e008.JPG)
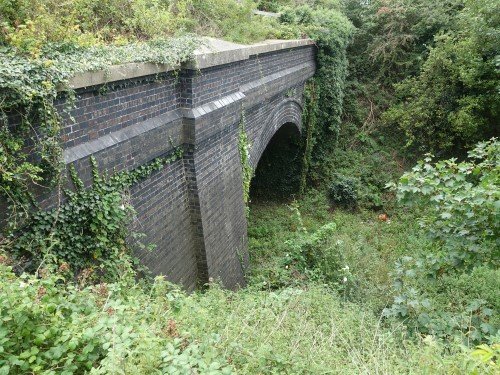
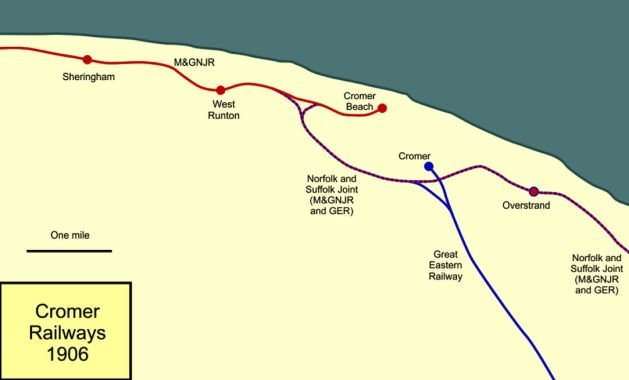

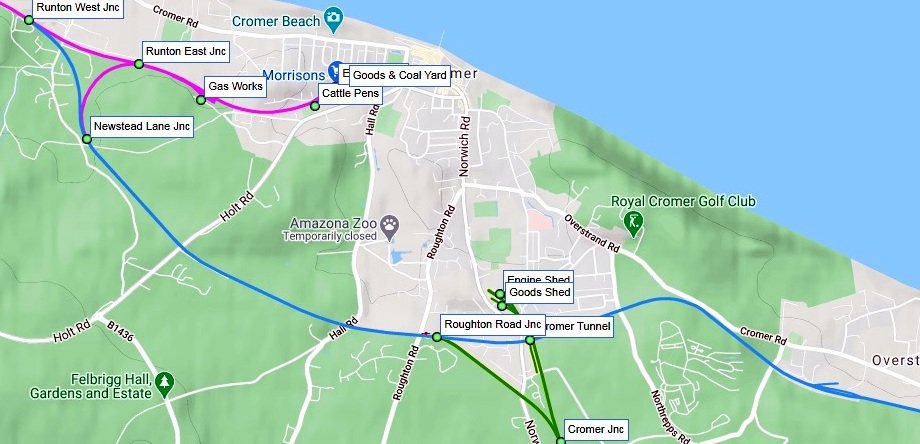
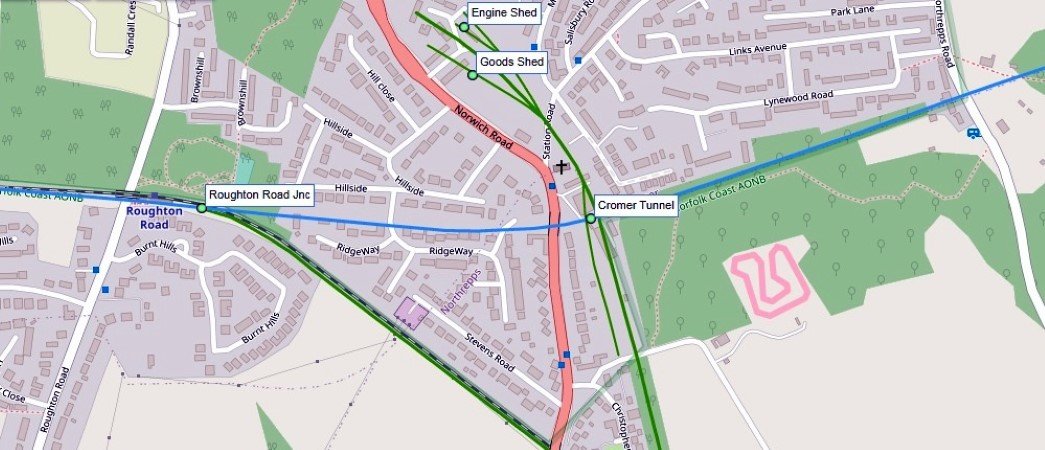
.jpg.eb85009519d8bf106243ff12740b756c.jpg)
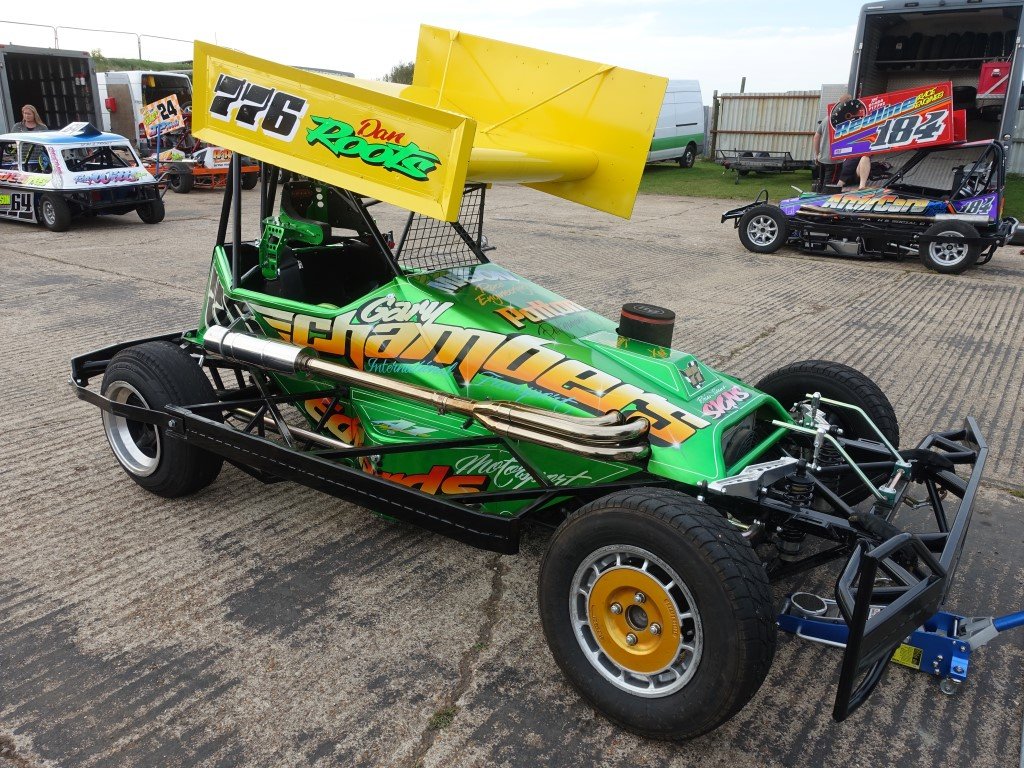
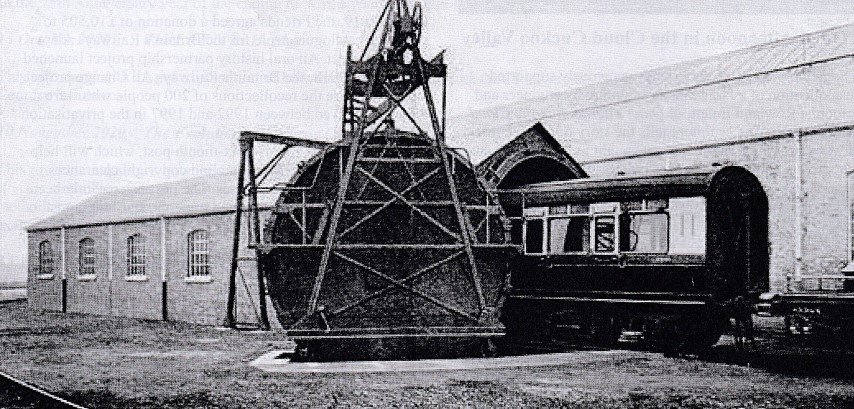

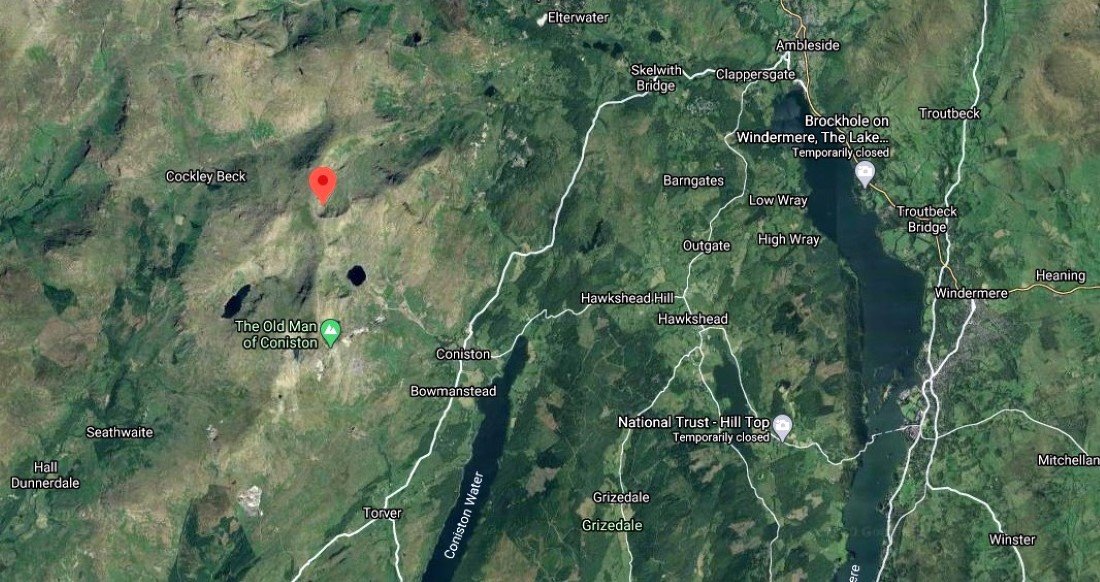
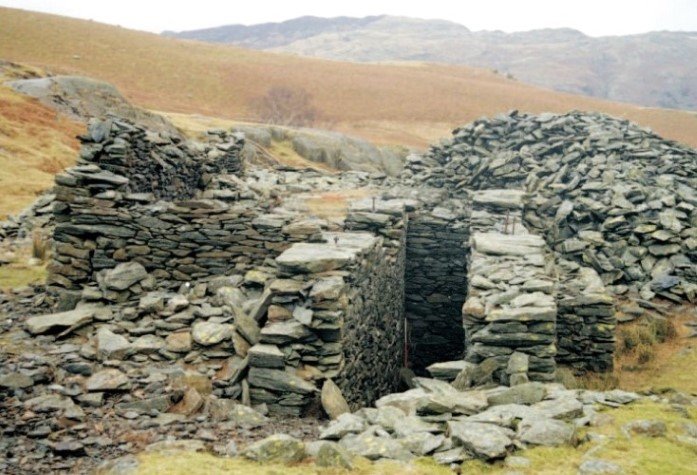
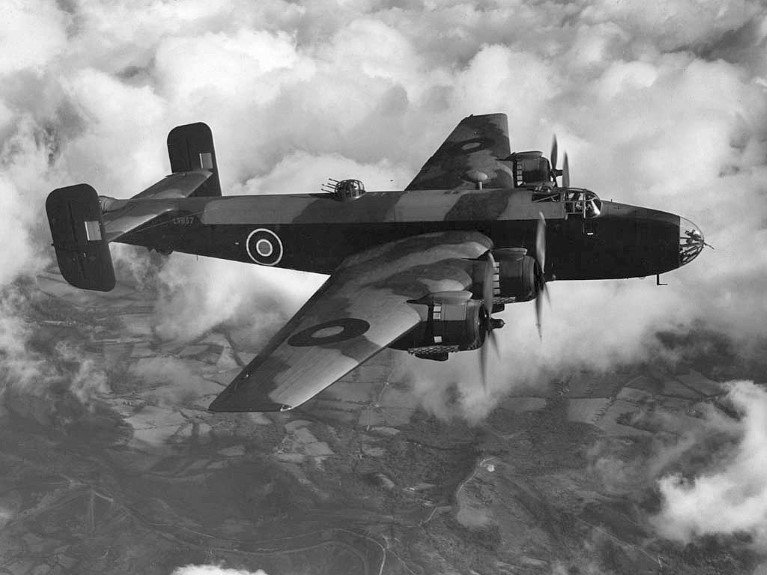
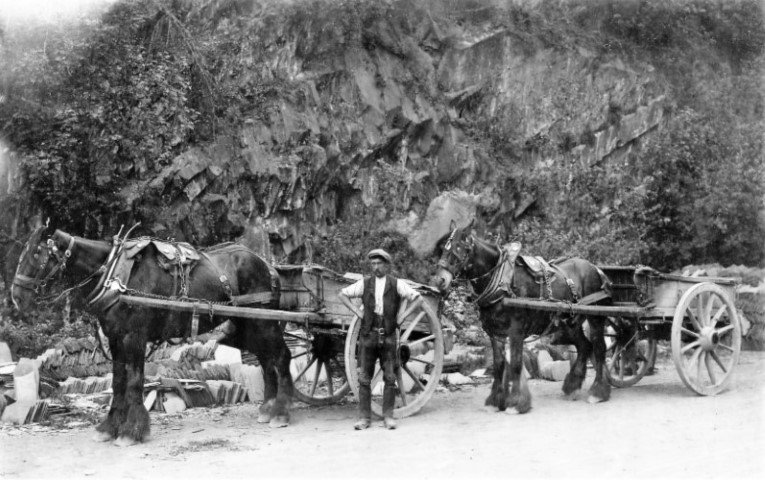
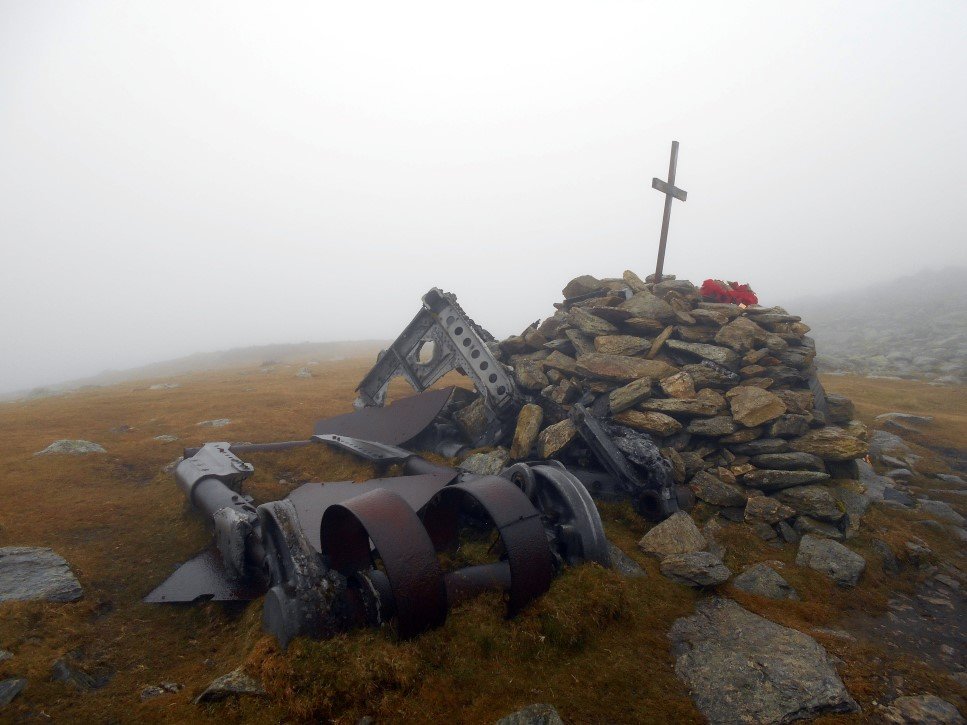

.jpg.d99c55712df1ec16b3539c7416be0107.jpg)

(Small).JPG.452fe39ea676653adbe3d74bf55c9ed2.JPG)
.jpg.7e80950f655faccb332e84d999d34926.jpg)
(Small).jpg.dba32f6b5e01fbf105e0c961089ba3ca.jpg)
.jpg.34c0e79b6224b93d7b966e53e33de5b0.jpg)
.jpg.470f7647d28acd89aff5f502699242fb.jpg)
.JPG.1a973f719c0b59c6b2fa420e93f3aa39.JPG)
.JPG.987f19d5d1f53526988072b2d65ccae9.JPG)
.jpg.00a2c94de09006d310c18257ed77a30a.jpg)
.JPG.d97cb81b77eaf727c347519dec067eac.JPG)
.jpg.55667b81b2420f4eb441d98fadb8e79b.jpg)